This is the multi-page printable view of this section.
Click here to print.
Return to the regular view of this page.
Documentation
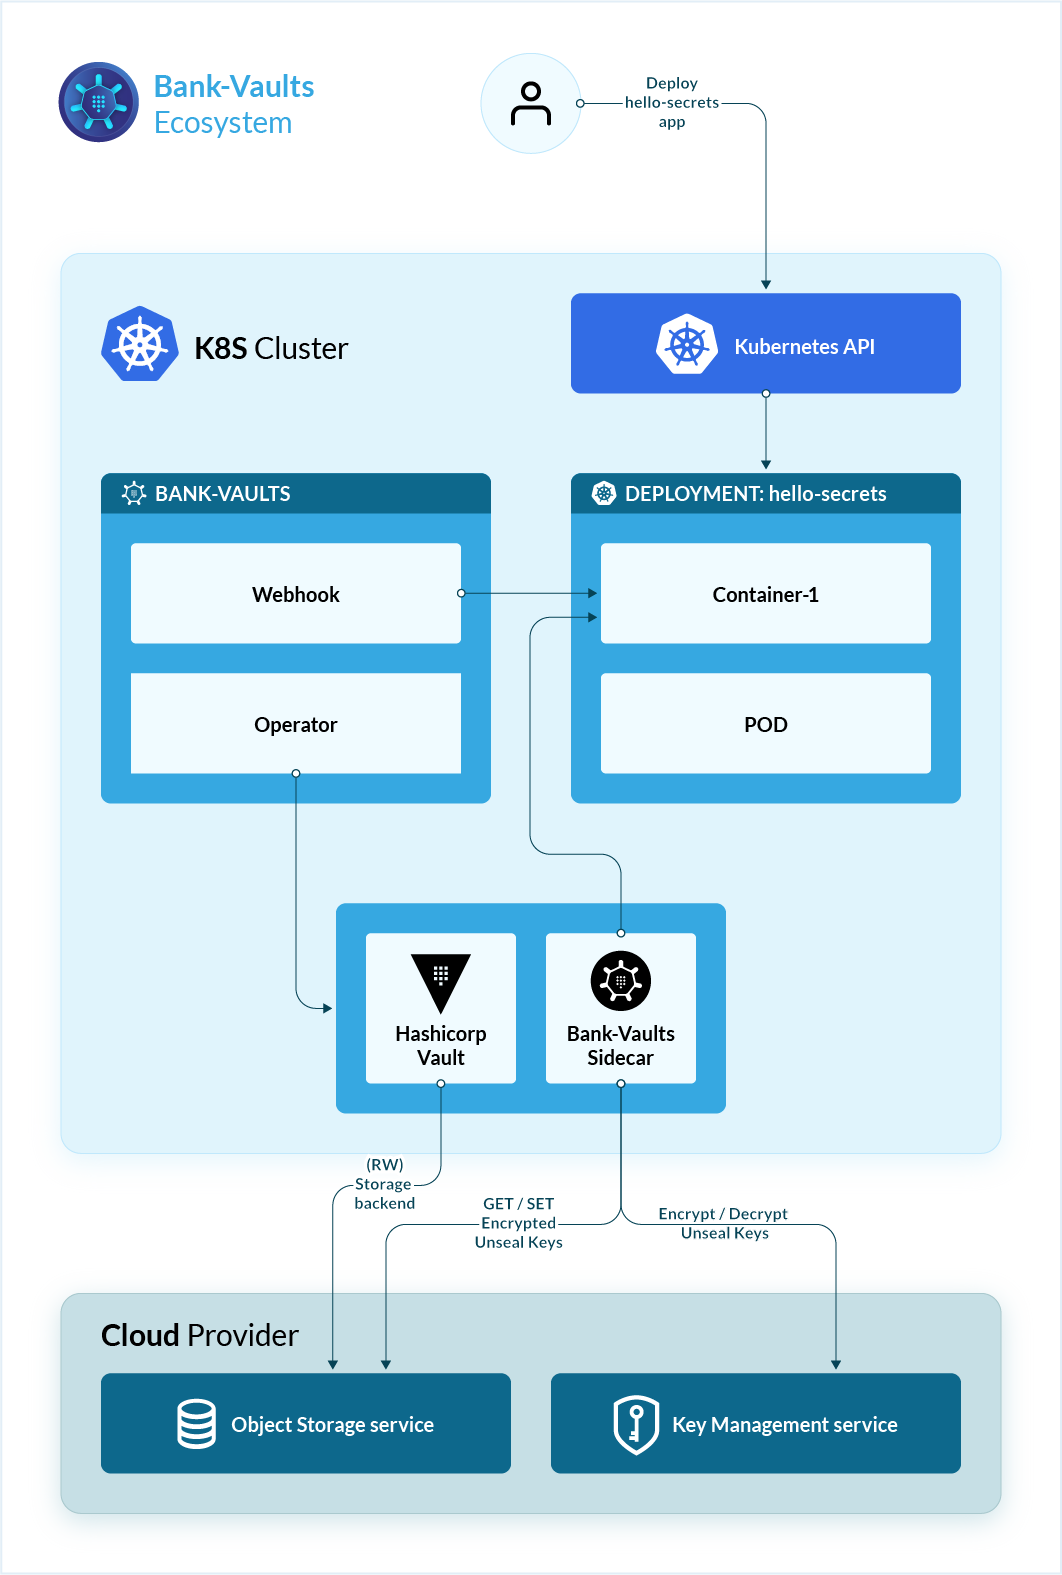
Bank-Vaults is a Vault swiss-army knife: a K8s operator, Go client with automatic token renewal, automatic configuration, multiple unseal options and more. A CLI tool to init, unseal and configure Vault (auth methods, secret engines). Direct secret injection into Pods.
We provide the following tools for Hashicorp Vault to make its usage easier and more automated:
- bank-vaults CLI makes working with Hashicorp Vault easier. For example, it can automatically initialize, unseal, and configure Vault.
- Vault operator is a Kubernetes operator that helps you operate Hashicorp Vault in a Kubernetes environment.
- Vault secrets webhook is a mutating webhook for injecting secrets directly into Kubernetes pods, config maps and custom resources.
- Vault SDK is a Go client wrapper for the official Vault client with automatic token renewal, built-in Kubernetes support, and a dynamic database credential provider. It makes it easier to work with Vault when developing your own Go applications.
In addition, we also provide Helm charts for installing various components, as well as a collection of scripts to support advanced features (for example, dynamic SSH).
Version compatibility matrix
| Operator | Bank-Vaults CLI | Vault |
| 1.24.x | >= 1.33.1 | 1.21.x
2.0.x |
We provide patches and security fixes for the last two minor versions.
First step
Support
If you encounter problems while using Bank-Vaults that the documentation does not address, you can open an issue or write to us on Slack.
1 - Getting started
Bank-Vaults is a swiss-army knife with multiple manifestations, so the first steps depend on what you want to achieve.
Deploy with Helm
We have some fully fledged, production-ready Helm charts for deploying:
With the help of these charts you can run a HA Vault instance with automatic initialization, unsealing, and external configuration which would otherwise be a tedious manual operation. Also secrets from Vault can be injected into your Pods directly as environment variables (without using Kubernetes Secrets). These charts can be used easily for development purposes as well.
Note: Starting with Bank-Vaults version 1.6.0, only Helm 3 is supported.
Deploy a local Vault operator
This is the simplest scenario: you install the Vault operator on a simple cluster. The following commands install a single-node Vault instance that stores unseal and root tokens in Kubernetes secrets. If you want to customize the Helm chart, see the list of vault-operator Helm chart values.
-
Install the Bank-Vaults operator:
helm upgrade --install --wait vault-operator oci://ghcr.io/bank-vaults/helm-charts/vault-operator
Expected output:
Release "vault-operator" does not exist. Installing it now.
Pulled: ghcr.io/bank-vaults/helm-charts/vault-operator:1.20.0
Digest: sha256:46045be1c3b215f0c734908bb1d4022dc91eae48d2285382bb71d63f72c737d1
NAME: vault-operator
LAST DEPLOYED: Thu Jul 27 11:22:55 2023
NAMESPACE: default
STATUS: deployed
REVISION: 1
TEST SUITE: None
-
Create a Vault instance using the Vault custom resources. This will create a Kubernetes CustomResource called vault and a PersistentVolumeClaim for it:
kubectl kustomize https://github.com/bank-vaults/vault-operator/deploy/rbac | kubectl apply -f -
Expected output:
serviceaccount/vault created
    role.rbac.authorization.k8s.io/vault created
    role.rbac.authorization.k8s.io/leader-election-role created
    rolebinding.rbac.authorization.k8s.io/leader-election-rolebinding created
    rolebinding.rbac.authorization.k8s.io/vault created
    clusterrolebinding.rbac.authorization.k8s.io/vault-auth-delegator created
kubectl apply -f https://raw.githubusercontent.com/bank-vaults/vault-operator/v1.24.0/deploy/examples/cr-raft.yaml
Expected output:
vault.vault.banzaicloud.com/vault created
Note: If needed, you can install the latest CustomResource from the main branch, but that’s usually under development and might not be stable.
kubectl kustomize https://github.com/bank-vaults/vault-operator/deploy/crd | kubectl apply -f -
-
Wait a few seconds, then check the operator and the vault pods:
Expected output:
NAME                                                        READY     STATUS    RESTARTS   AGE
vault-0                                                     3/3       Running   0          10s
vault-configurer-6c545cb6b4-dmvb5                           1/1       Running   0          10s
vault-operator-788559bdc5-kgqkg                             1/1       Running   0          23s
-
Configure your Vault client to access the Vault instance running in the vault-0 pod.
-
Port-forward into the pod:
kubectl port-forward vault-0 8200 &
-
Set the address of the Vault instance.
export VAULT_ADDR=https://127.0.0.1:8200
-
Import the CA certificate of the Vault instance by running the following commands (otherwise, you’ll get x509: certificate signed by unknown authority errors):
kubectl get secret vault-tls -o jsonpath="{.data.ca\.crt}" | base64 --decode > $PWD/vault-ca.crt
export VAULT_CACERT=$PWD/vault-ca.crt
Alternatively, you can instruct the Vault client to skip verifying the certificate of Vault by running: export VAULT_SKIP_VERIFY=true
-
If you already have the Vault CLI installed, check that you can access the Vault:
Expected output:
Key             Value
---             -----
Seal Type       shamir
Initialized     true
Sealed          false
Total Shares    5
Threshold       3
Version         1.5.4
Cluster Name    vault-cluster-27ecd0e6
Cluster ID      ed5492f3-7ef3-c600-aef3-bd77897fd1e7
HA Enabled      false
-
To authenticate to Vault, you can access its root token by running:
export VAULT_TOKEN=$(kubectl get secrets vault-unseal-keys -o jsonpath={.data.vault-root} | base64 --decode)
Note: Using the root token is recommended only in test environments. In production environment, create dedicated, time-limited tokens.
-
Now you can interact with Vault. For example, add a secret by running vault kv put secret/demosecret/aws AWS_SECRET_ACCESS_KEY=s3cr3t
If you want to access the Vault web interface, open https://127.0.0.1:8200 in your browser using the root token (to reveal the token, run echo $VAULT_TOKEN).
For other configuration examples of the Vault CustomResource, see the YAML files in the deploy/examples and test/deploy directories of the vault-operator repository. After you are done experimenting with Bank-Vaults and you want to delete the operator, you can delete the related CRs:
kubectl kustomize https://github.com/bank-vaults/vault-operator/deploy/rbac | kubectl delete -f -
kubectl delete -f https://raw.githubusercontent.com/bank-vaults/vault-operator/v1.24.0/deploy/examples/cr-raft.yaml
Deploy the mutating webhook
You can deploy the Vault Secrets Webhook using Helm. Note that:
- The Helm chart of the vault-secrets-webhook contains the templates of the required permissions as well.
- The deployed RBAC objects contain the necessary permissions fo running the webhook.
Prerequisites
- The user you use for deploying the chart to the Kubernetes cluster must have cluster-admin privileges.
- The chart requires Helm 3.
- To interact with Vault (for example, for testing), the Vault command line client must be installed on your computer.
- You have deployed Vault with the operator and configured your Vault client to access it, as described in Deploy a local Vault operator.
Deploy the webhook
-
Create a namespace for the webhook and add a label to the namespace, for example, vault-infra:
kubectl create namespace vault-infra
kubectl label namespace vault-infra name=vault-infra
-
Deploy the vault-secrets-webhook chart. If you want to customize the Helm chart, see the list of vault-secrets-webhook Helm chart values.
helm upgrade --install --wait vault-secrets-webhook oci://ghcr.io/bank-vaults/helm-charts/vault-secrets-webhook --namespace vault-infra
Expected output:
Release "vault-secrets-webhook" does not exist. Installing it now.
NAME: vault-secrets-webhook
LAST DEPLOYED: Fri Jul 14 15:42:36 2023
NAMESPACE: vault-infra
STATUS: deployed
REVISION: 1
TEST SUITE: None
For further details, see the webhook’s Helm chart repository.
-
Check that the pods are running:
kubectl get pods --namespace vault-infra
Expected output:
NAME                                     READY   STATUS    RESTARTS   AGE
vault-secrets-webhook-58b97c8d6d-qfx8c   1/1     Running   0          22s
vault-secrets-webhook-58b97c8d6d-rthgd   1/1     Running   0          22s
-
If you already have the Vault CLI installed, write a secret into Vault:
vault kv put secret/demosecret/aws AWS_SECRET_ACCESS_KEY=s3cr3t
Expected output:
Key              Value
---              -----
created_time     2020-11-04T11:39:01.863988395Z
deletion_time    n/a
destroyed        false
version          1
-
Apply the following deployment to your cluster. The webhook will mutate this deployment because it has an environment variable having a value which is a reference to a path in Vault:
kubectl apply -f - <<"EOF"
apiVersion: apps/v1
kind: Deployment
metadata:
  name: vault-test
spec:
  replicas: 1
  selector:
    matchLabels:
      app.kubernetes.io/name: vault
  template:
    metadata:
      labels:
        app.kubernetes.io/name: vault
      annotations:
        vault.security.banzaicloud.io/vault-addr: "https://vault:8200" # optional, the address of the Vault service, default values is https://vault:8200
        vault.security.banzaicloud.io/vault-role: "default" # optional, the default value is the name of the ServiceAccount the Pod runs in, in case of Secrets and ConfigMaps it is "default"
        vault.security.banzaicloud.io/vault-skip-verify: "false" # optional, skip TLS verification of the Vault server certificate
        vault.security.banzaicloud.io/vault-tls-secret: "vault-tls" # optional, the name of the Secret where the Vault CA cert is, if not defined it is not mounted
        vault.security.banzaicloud.io/vault-agent: "false" # optional, if true, a Vault Agent will be started to do Vault authentication, by default not needed and vault-env will do Kubernetes Service Account based Vault authentication
        vault.security.banzaicloud.io/vault-path: "kubernetes" # optional, the Kubernetes Auth mount path in Vault the default value is "kubernetes"
    spec:
      serviceAccountName: default
      containers:
      - name: alpine
        image: alpine
        command: ["sh", "-c", "echo $AWS_SECRET_ACCESS_KEY && echo going to sleep... && sleep 10000"]
        env:
        - name: AWS_SECRET_ACCESS_KEY
          value: vault:secret/data/demosecret/aws#AWS_SECRET_ACCESS_KEY
EOF
Expected output:
deployment.apps/vault-test created
-
Check the mutated deployment.
kubectl describe deployment vault-test
The output should look similar to the following:
Name:                   vault-test
Namespace:              default
CreationTimestamp:      Wed, 04 Nov 2020 12:44:18 +0100
Labels:                 <none>
Annotations:            deployment.kubernetes.io/revision: 1
Selector:               app.kubernetes.io/name=vault
Replicas:               1 desired | 1 updated | 1 total | 1 available | 0 unavailable
StrategyType:           RollingUpdate
MinReadySeconds:        0
RollingUpdateStrategy:  25% max unavailable, 25% max surge
Pod Template:
  Labels:           app.kubernetes.io/name=vault
  Annotations:      vault.security.banzaicloud.io/vault-addr: https://vault:8200
                    vault.security.banzaicloud.io/vault-agent: false
                    vault.security.banzaicloud.io/vault-path: kubernetes
                    vault.security.banzaicloud.io/vault-role: default
                    vault.security.banzaicloud.io/vault-skip-verify: false
                    vault.security.banzaicloud.io/vault-tls-secret: vault-tls
  Service Account:  default
  Containers:
   alpine:
    Image:      alpine
    Port:       <none>
    Host Port:  <none>
    Command:
      sh
      -c
      echo $AWS_SECRET_ACCESS_KEY && echo going to sleep... && sleep 10000
    Environment:
      AWS_SECRET_ACCESS_KEY:  vault:secret/data/demosecret/aws#AWS_SECRET_ACCESS_KEY
    Mounts:                   <none>
  Volumes:                    <none>
Conditions:
  Type           Status  Reason
  ----           ------  ------
  Available      True    MinimumReplicasAvailable
  Progressing    True    NewReplicaSetAvailable
OldReplicaSets:  <none>
NewReplicaSet:   vault-test-55c569f9 (1/1 replicas created)
Events:
  Type    Reason             Age   From                   Message
  ----    ------             ----  ----                   -------
  Normal  ScalingReplicaSet  29s   deployment-controller  Scaled up replica set vault-test-55c569f9 to 1
As you can see, the original environment variables in the definition are unchanged, and the sensitive value of the AWS_SECRET_ACCESS_KEY variable is only visible within the alpine container.
You can download the bank-vaults CLI from the Bank-Vaults releases page. Select the binary for your platform from the Assets section for the version you want to use.
Alternatively, fetch the source code and compile it using go get:
go get github.com/bank-vaults/bank-vaults/cmd/bank-vaults
go get github.com/bank-vaults/bank-vaults/cmd/vault-env
Docker images
If you want to build upon our Docker images, you can find them on Docker Hub:
docker pull ghcr.io/bank-vaults/vault-operator:latest
docker pull ghcr.io/bank-vaults/vault-env:latest
2 - Concepts
The following sections give you an overview of the main concepts of Bank-Vaults. Most of these apply equally to the bank-vaults CLI and to the Vault operator, because under the hood the operator often uses the CLI tool with the appropriate parameters.
2.1 - Initialize Vault and store the root token and unseal keys
Vault starts in an uninitialized state, which means it has to be initialized with an initial set of parameters. The response to the init request is the root token and unseal keys. After that, Vault becomes initialized, but remains in a sealed state.
Bank-Vaults stores the root token and the unseal keys in one of the following:
- AWS KMS keyring (backed by S3)
- Azure Key Vault
- Google Cloud KMS keyring (backed by GCS)
- Alibaba Cloud KMS (backed by OSS)
For development and testing purposes, the following solutions are also supported. Do not use these in production environments.
- Kubernetes Secrets (should be used only for development purposes)
- Dev Mode (useful for
vault server -dev dev mode Vault servers) - Files (backed by files, should be used only for development purposes)
Keys stored by Bank-Vaults
Bank-Vaults stores the following keys:
vault-root, which is Vault’s root token.vault-unseal-N unseal keys, where N is a number, starting at 0 up to the maximum defined minus 1. For example, 5 unseal keys will be vault-unseal-0 ... vault-unseal-4.
HashiCorp recommends revoking the root tokens after the initial set up of Vault has been completed.
Note: The vault-root token is not needed to unseal Vault, and can be removed from the storage if it was put there via the --init call to bank-vaults.
If you want to decrypt the root token for some reason, see Decrypt the root token.
Unseal Vault
Unsealing is the process of constructing the master key necessary to read the decryption key to decrypt data, allowing access to Vault. (From the official Vault documentation)
After initialization, Vault remains in a sealed state. In sealed state no secrets can reach or leave Vault until a person, possibly more people than one, unseals it with the required number of unseal keys.
Vault data and the unseal keys live together: if you delete a Vault instance installed by the operator, or if you delete the Helm chart, all your data and the unseal keys to that initialized state should remain untouched. For details, see the official documentation.
Note: If you change the unseal configuration after initializing Vault, you may have to move the unseal keys from the old location to the new one, or reinitialize vault.
The Bank-Vaults Init and Unseal process
Bank-Vaults runs in an endless loop and does the following:

- Bank-Vaults checks if Vault is initialized. If yes, it continues to step 2, otherwise Bank-Vaults:
- Calls Vault init, which returns the root token and the configured number of unseal keys.
- Encrypts the received token and keys with the configured KMS key.
- Stores the encrypted token and keys in the cloud provider’s object storage.
- Flushes the root token and keys from its memory with explicit garbage control as soon as possible.
- Bank-Vaults checks if Vault is sealed. If it isn’t, it continues to step 3, otherwise Bank-Vaults:
- Reads the encrypted unseal keys from the cloud provider’s object storage.
- Decrypts the unseal keys with the configured KMS key.
- Unseals Vault with the decrypted unseal keys.
- Flushes the keys from its memory with explicit garbage control as soon as possible.
- If the external configuration file was changed and an OS signal is received, then Bank-Vaults:
- Parses the configuration file.
- Reads the encrypted root token from the cloud provider’s object storage.
- Decrypts the root token with the configured KMS key.
- Applies the parsed configuration on the Vault API.
- Flushes the root token from its memory with explicit garbage control as soon as possible.
- Repeats from the second step after the configured time period.
2.1.1 - Decrypt the root token
If you want to decrypt the root token for some reason, see the section corresponding to the storage provider you used to store the token.
AWS
To use the KMS-encrypted root token with Vault CLI:
Required CLI tools:
Steps:
-
Download and decrypt the root token (and the unseal keys, but that is not mandatory) into a file on your local file system:
BUCKET=bank-vaults-0
REGION=eu-central-1

for key in "vault-root" "vault-unseal-0" "vault-unseal-1" "vault-unseal-2" "vault-unseal-3" "vault-unseal-4"
do
    aws s3 cp s3://${BUCKET}/${key} .

    aws kms decrypt \
        --region ${REGION} \
        --ciphertext-blob fileb://${key} \
        --encryption-context Tool=bank-vaults \
        --output text \
        --query Plaintext | base64 -d > ${key}.txt

    rm ${key}
done
-
Save it as an environment variable:
export VAULT_TOKEN="$(cat vault-root.txt)"
Google Cloud
To use the KMS-encrypted root token with vault CLI:
Required CLI tools:
GOOGLE_PROJECT="my-project"
GOOGLE_REGION="us-central1"
BUCKET="bank-vaults-bucket"
KEYRING="beta"
KEY="beta"

export VAULT_TOKEN=$(gsutil cat gs://${BUCKET}/vault-root | gcloud kms decrypt \
                     --project ${GOOGLE_PROJECT} \
                     --location ${GOOGLE_REGION} \
                     --keyring ${KEYRING} \
                     --key ${KEY} \
                     --ciphertext-file - \
                     --plaintext-file -)
Kubernetes
There is a Kubernetes Secret backed unseal storage in Bank-Vaults, you should be aware of that Kubernetes Secrets are base64 encoded only if you are not using a EncryptionConfiguration in your Kubernetes cluster.
VAULT_NAME="vault"

export VAULT_TOKEN=$(kubectl get secrets ${VAULT_NAME}-unseal-keys -o jsonpath={.data.vault-root} | base64 -d)
2.1.2 - Migrate unseal keys between cloud providers
Note: If you change the unseal configuration after initializing Vault, you may have to move the unseal keys from the old location to the new one, or reinitialize vault.
If you need to move your Vault instance from one provider or an external managed Vault, you have to:
- Retrieve and decrypt the unseal keys (and optionally the root token) in the Bank-Vaults format. For details, see Decrypt the root token.
- Migrate the Vault storage data to the new provider. Use the official migration command provided by Vault.
All examples assume that you have created files holding the root-token and the 5 unseal keys in plaintext:
vault-root.txtvault-unseal-0.txtvault-unseal-1.txtvault-unseal-2.txtvault-unseal-3.txtvault-unseal-4.txt
AWS
Move the above mentioned files to an AWS bucket and encrypt them with KMS before:
REGION=eu-central-1
KMS_KEY_ID=02a2ba49-42ce-487f-b006-34c64f4b760e
BUCKET=bank-vaults-1

for key in "vault-root" "vault-unseal-0" "vault-unseal-1" "vault-unseal-2" "vault-unseal-3" "vault-unseal-4"
do
    aws kms encrypt \
        --region ${REGION} --key-id ${KMS_KEY_ID} \
        --plaintext fileb://${key}.txt \
        --encryption-context Tool=bank-vaults \
        --output text \
        --query CiphertextBlob | base64 -d > ${key}

    aws s3 cp ./${key} s3://${BUCKET}/

    rm ${key} ${key}.txt
done
2.2 - Cloud permissions
The operator and the bank-vaults CLI command needs certain cloud permissions to function properly (init, unseal, configuration).
Google Cloud
The Service Account in which the Pod is running has to have the following IAM Roles:
- Cloud KMS Admin
- Cloud KMS CryptoKey Encrypter/Decrypter
- Storage Admin
A CLI example how to run bank-vaults based Vault configuration on Google Cloud:
bank-vaults configure --google-cloud-kms-key-ring vault --google-cloud-kms-crypto-key bank-vaults --google-cloud-kms-location global --google-cloud-storage-bucket vault-ha --google-cloud-kms-project continual-flow-276578
Azure
The Access Policy in which the Pod is running has to have the following IAM Roles:
- Key Vault All Key permissions
- Key Vault All Secret permissions
AWS
Enable IAM OIDC provider for an EKS cluster
To allow Vault pods to assume IAM roles in order to access AWS services the IAM OIDC provider needs to be enabled on the cluster.
BANZAI_CURRENT_CLUSTER_NAME="mycluster"

# Enable OIDC provider for the cluster with eksctl
# Follow the docs here to do it manually https://docs.aws.amazon.com/eks/latest/userguide/enable-iam-roles-for-service-accounts.html
eksctl utils associate-iam-oidc-provider \
    --cluster ${BANZAI_CURRENT_CLUSTER_NAME} \
    --approve

# Create a KMS key and S3 bucket and enter details here
AWS_ACCOUNT_ID=$(aws sts get-caller-identity --query "Account" --output text)
REGION="eu-west-1"
KMS_KEY_ID="9f054126-2a98-470c-9f10-9b3b0cad94a1"
KMS_KEY_ARN="arn:aws:kms:${REGION}:${AWS_ACCOUNT_ID}:key/${KMS_KEY_ID}"
BUCKET="bank-vaults"
OIDC_PROVIDER=$(aws eks describe-cluster --name ${BANZAI_CURRENT_CLUSTER_NAME} --query "cluster.identity.oidc.issuer" --output text | sed -e "s/^https:\/\///")
SERVICE_ACCOUNT_NAME="vault"
SERVICE_ACCOUNT_NAMESPACE="vault"

cat > trust.json <<EOF
{
  "Version": "2012-10-17",
  "Statement": [
    {
      "Effect": "Allow",
      "Principal": {
        "Federated": "arn:aws:iam::${AWS_ACCOUNT_ID}:oidc-provider/${OIDC_PROVIDER}"
      },
      "Action": "sts:AssumeRoleWithWebIdentity",
      "Condition": {
        "StringEquals": {
          "${OIDC_PROVIDER}:sub": "system:serviceaccount:${SERVICE_ACCOUNT_NAMESPACE}:${SERVICE_ACCOUNT_NAME}"
        }
      }
    }
  ]
}
EOF

cat > vault-policy.json <<EOF
{
    "Version": "2012-10-17",
    "Statement": [
        {
            "Effect": "Allow",
            "Action": [
                "kms:Decrypt",
                "kms:Encrypt"
            ],
            "Resource": [
                "${KMS_KEY_ARN}"
            ]
        },
        {
            "Effect": "Allow",
            "Action": [
                "s3:PutObject",
                "s3:GetObject",
                "s3:DeleteObject"
            ],
            "Resource": [
                "arn:aws:s3:::${BUCKET}/*"
            ]
        },
        {
            "Effect": "Allow",
            "Action": "s3:ListBucket",
            "Resource": "arn:aws:s3:::${BUCKET}"
        }
    ]
}
EOF

# AWS IAM role and Kubernetes service account setup
aws iam create-role --role-name vault --assume-role-policy-document file://trust.json
aws iam create-policy --policy-name vault --policy-document file://vault-policy.json
aws iam attach-role-policy --role-name vault --policy-arn arn:aws:iam::${AWS_ACCOUNT_ID}:policy/vault

# If you are having a ServiceAccount already, only the annotation is needed
kubectl create serviceaccount $SERVICE_ACCOUNT_NAME --namespace $SERVICE_ACCOUNT_NAMESPACE
kubectl annotate serviceaccount $SERVICE_ACCOUNT_NAME  --namespace $SERVICE_ACCOUNT_NAMESPACE eks.amazonaws.com/role-arn="arn:aws:iam::${AWS_ACCOUNT_ID}:role/vault"

# Cleanup
rm vault-policy.json trust.json
Getting the root token
After Vault is successfully deployed, you can query the root-token for admin access.
# Fetch Vault root token, check bucket for actual name based on unsealConfig.aws.s3Prefix
aws s3 cp s3://$s3_bucket_name/vault-root /tmp/vault-root

export VAULT_TOKEN="$(aws kms decrypt \
  --ciphertext-blob fileb:///tmp/vault-root \
  --encryption-context Tool=bank-vaults \
  --query Plaintext --output text | base64 --decode)"
The Instance profile in which the Pod is running has to have the following IAM Policies:
- KMS:
kms:Encrypt, kms:Decrypt - S3:
s3:GetObject, s3:PutObject, s3:DeleteObject on object level and s3:ListBucket on bucket level
An example command how to init and unseal Vault on AWS:
bank-vaults unseal --init --mode aws-kms-s3 --aws-kms-key-id 9f054126-2a98-470c-9f10-9b3b0cad94a1 --aws-s3-region eu-west-1 --aws-kms-region eu-west-1 --aws-s3-bucket bank-vaults
When using existing unseal keys, you need to make sure to kms encrypt these with the proper EncryptionContext.
If this is not done, the invocation of bank-vaults will trigger an InvalidCiphertextException from AWS KMS.
An example how to encrypt the keys (specify --profile and --region accordingly):
aws kms encrypt --key-id "alias/kms-key-alias" --encryption-context "Tool=bank-vaults" --plaintext fileb://vault-unseal-0.txt --output text --query CiphertextBlob | base64 -D > vault-unseal-0
From this point on copy the encrypted files to the appropriate S3 bucket.
As an additional security measure make sure to turn on encryption of the S3 bucket before uploading the files.
Alibaba Cloud
A CLI example how to run bank-vaults based Vault unsealing on Alibaba Cloud:
bank-vaults unseal --mode alibaba-kms-oss --alibaba-access-key-id ${ALIBABA_ACCESS_KEY_ID} --alibaba-access-key-secret ${ALIBABA_ACCESS_KEY_SECRET} --alibaba-kms-region eu-central-1 --alibaba-kms-key-id ${ALIBABA_KMS_KEY_UUID} --alibaba-oss-endpoint oss-eu-central-1.aliyuncs.com --alibaba-oss-bucket bank-vaults
Kubernetes
The Service Account in which the bank-vaults Pod is running has to have the following Roles rules:
rules:
- apiGroups: [""]
  resources: ["secrets"]
  verbs:     ["get", "create", "update"]
2.3 - External configuration for Vault
In addition to the standard Vault configuration, the operator and CLI can continuously configure Vault using an external YAML/JSON configuration. That way you can configure Vault declaratively using your usual automation tools and workflow.
The following sections describe the configuration sections you can use.
2.3.1 - Fully or partially purging unmanaged configuration in Vault
Bank-Vaults gives you a full control over Vault in a declarative style by removing any unmanaged configuration.
By enabling purgeUnmanagedConfig you keep Vault configuration up-to-date.
So if you added a policy using Bank-Vaults then removed it from the configuration,
Bank-Vaults will remove it from Vault too. In other words, if you enabled purgeUnmanagedConfig
then any changes not in Bank-Vaults configuration will be removed (including manual changes).
WARNING:
This feature is destructive, so be careful when you enable it especially for the first time
because it can delete all data in your Vault. Always test it a non-production environment first.
This feature is disabled by default and it needs to be enabled explicitly in your configuration.
Mechanism
Bank-Vaults handles unmanaged configuration by simply comparing what in Bank-Vaults configuration (the desired state)
and what’s already in Vault (the actual state), then it removes any differences that are not in Bank-Vaults
configuration.
Fully purge unmanaged configuration
You can remove all unmanaged configuration by enabling the purge option as following:
purgeUnmanagedConfig:
  enabled: true
Partially purge unmanaged configuration
You can also enable the purge feature for some of the config by excluding any config that
you don’t want to purge its unmanaged config.
It could be done by explicitly exclude the Vault configuration that you don’t want to mange:
purgeUnmanagedConfig:
  enabled: true
  exclude:
    secrets: true
This will remove any unmanaged or manual changes in Vault but it will leave secrets untouched.
So if you enabled a new secret engine manually (and it’s not in Bank-Vaults configuration),
Bank-Vaults will not remove it.
2.3.2 - Audit devices
You can configure Audit Devices in Vault (File, Syslog, Socket).
audit:
  - type: file
    description: "File based audit logging device"
    options:
      file_path: /tmp/vault.log
2.3.3 - Authentication
You can configure Auth Methods in Vault.
Currently the following auth methods are supported:
AppRole auth method
Allow machines/apps to authenticate with Vault-defined roles. For details,
see the official Vault documentation.
auth:
  - type: approle
    roles:
    - name: default
      policies: allow_secrets
      secret_id_ttl: 10m
      token_num_uses: 10
      token_ttl: 20m
      token_max_ttl: 30m
      secret_id_num_uses: 40
AWS auth method
Creating roles in Vault which can be used for
AWS IAM based authentication.
auth:
  - type: aws
    # Make the auth provider visible in the web ui
    # See https://developer.hashicorp.com/vault/api-docs/system/auth#config for more
    # information.
    options:
      listing_visibility: "unauth"
    config:
      access_key: VKIAJBRHKH6EVTTNXDHA
      secret_key: vCtSM8ZUEQ3mOFVlYPBQkf2sO6F/W7a5TVzrl3Oj
      iam_server_id_header_value: vault-dev.example.com # consider setting this to the Vault server's DNS name
    crossaccountrole:
    # Add cross account number and role to assume in the cross account
    # https://developer.hashicorp.com/vault/api-docs/auth/aws#create-sts-role
    - sts_account: 12345671234
      sts_role: arn:aws:iam::12345671234:role/crossaccountrole
    roles:
    # Add roles for AWS instances or principals
    # See https://developer.hashicorp.com/vault/api-docs/auth/aws#create-role
    - name: dev-role-iam
      bound_iam_principal_arn: arn:aws:iam::123456789012:role/dev-vault
      policies: allow_secrets
      period: 1h
    - name: cross-account-role
      bound_iam_principal_arn: arn:aws:iam::12345671234:role/crossaccountrole
      policies: allow_secrets
      period: 1h
Azure auth method
The Azure auth method allows authentication against Vault using
Azure Active Directory credentials for more information.
auth:
  - type: azure
    config:
      tenant_id: 00000000-0000-0000-0000-000000000000
      resource: https://vault-dev.example.com
      client_id: 00000000-0000-0000-0000-000000000000
      client_secret: 00000000-0000-0000-0000-000000000000
    roles:
    # Add roles for azure identities
    # See https://developer.hashicorp.com/vault/api-docs/auth/azure#create-role
      - name: dev-mi
        policies: allow_secrets
        bound_subscription_ids:
          - "00000000-0000-0000-0000-000000000000"
        bound_service_principal_ids:
          - "00000000-0000-0000-0000-000000000000"
GCP auth method
Create roles in Vault which can be used for
GCP IAM based authentication.
auth:
  - type: gcp
    # Make the auth provider visible in the web ui
    # See https://developer.hashicorp.com/vault/api-docs/system/auth#config for more
    # information.
    options:
      listing_visibility: "unauth"
    config:
      # Credentials context is service account's key. Can download when you create a key for service account.
      # No need to manually create it. Just paste the json context as multiline yaml.
      credentials: -|
        {
          "type": "service_account",
          "project_id": "PROJECT_ID",
          "private_key_id": "KEY_ID",
          "private_key": "-----BEGIN PRIVATE KEY-----.....-----END PRIVATE KEY-----\n",
          "client_email": "SERVICE_ACCOUNT@PROJECT_ID.iam.gserviceaccount.com",
          "client_id": "CLIENT_ID",
          "auth_uri": "https://accounts.google.com/o/oauth2/auth",
          "token_uri": "https://oauth2.googleapis.com/token",
          "auth_provider_x509_cert_url": "https://www.googleapis.com/oauth2/v1/certs",
          "client_x509_cert_url": "https://www.googleapis.com/robot/v1/metadata/x509/SERVICE_ACCOUNT%40PROJECT_ID.iam.gserviceaccount.com"
        }
    roles:
    # Add roles for gcp service account
    # See https://developer.hashicorp.com/vault/api-docs/auth/gcp#create-role
    - name: user-role
      type: iam
      project_id: PROJECT_ID
      policies: "readonly_secrets"
      bound_service_accounts: "USER_SERVICE_ACCOUNT@PROJECT_ID.iam.gserviceaccount.com"
    - name: admin-role
      type: iam
      project_id: PROJECT_ID
      policies: "allow_secrets"
      bound_service_accounts: "ADMIN_SERVICE_ACCOUNT@PROJECT_ID.iam.gserviceaccount.com"
GitHub auth method
Create team mappings in Vault which can be used later on for the GitHub authentication.
auth:
  - type: github
    # Make the auth provider visible in the web ui
    # See https://developer.hashicorp.com/vault/api-docs/system/auth#config for more
    # information.
    options:
      listing_visibility: "unauth"
    config:
      organization: banzaicloud
    map:
      # Map the banzaicloud GitHub team on to the dev policy in Vault
      teams:
        dev: dev
      # Map my username (bonifaido) to the root policy in Vault
      users:
        bonifaido: allow_secrets
JWT auth method
Create roles in Vault which can be used for JWT-based authentication.
auth:
  - type: jwt
    path: jwt
    config:
      oidc_discovery_url: https://myco.auth0.com/
    roles:
    - name: role1
      bound_audiences:
        - https://vault.plugin.auth.jwt.test
      user_claim: https://vault/user
      groups_claim: https://vault/groups
      policies: allow_secrets
      ttl: 1h
Kubernetes auth method
Use the Kubernetes auth method to authenticate with Vault
using a Kubernetes Service Account Token.
auth:
  - type: kubernetes
    # If you want to configure with specific kubernetes service account instead of default service account
    # https://developer.hashicorp.com/vault/docs/auth/kubernetes
    # config:
    #   token_reviewer_jwt: eyJhbGciOiJSUzI1NiIsImtpZCI6IiJ9....
    #   kubernetes_ca_cert: |
    #     -----BEGIN CERTIFICATE-----
    #     ...
    #     -----END CERTIFICATE-----
    #   kubernetes_host: https://192.168.64.42:8443
    # Allows creating roles in Vault which can be used later on for the Kubernetes based
    # authentication.
    #  See https://developer.hashicorp.com/vault/docs/auth/kubernetes#creating-a-role for
    # more information.
    roles:
      # Allow every pod in the default namespace to use the secret kv store
      - name: default
        bound_service_account_names: default
        bound_service_account_namespaces: default
        policies: allow_secrets
        ttl: 1h
LDAP auth method
Create group mappings in Vault which can be used for
LDAP based authentication.
- To start an LDAP test server, run: docker run -it –rm -p 389:389 -e LDAP_TLS=false –name ldap osixia/openldap
- To start an LDAP admin server, run: docker run -it –rm -p 6443:443 –link ldap:ldap -e PHPLDAPADMIN_LDAP_HOSTS=ldap -e PHPLDAPADMIN_LDAP_CLIENT_TLS=false osixia/phpldapadmin
auth:
  - type: ldap
    description: LDAP directory auth.
    # add mount options
    # See https://developer.hashicorp.com/vault/api-docs/system/auth#config for more
    # information.
    options:
      listing_visibility: "unauth"
    config:
      url: ldap://localhost
      binddn: "cn=admin,dc=example,dc=org"
      bindpass: "admin"
      userattr: uid
      userdn: "ou=users,dc=example,dc=org"
      groupdn: "ou=groups,dc=example,dc=org"
    groups:
      # Map the banzaicloud dev team on GitHub to the dev policy in Vault
      developers:
        policies: allow_secrets
    # Map myself to the allow_secrets policy in Vault
    users:
      bonifaido:
        groups: developers
        policies: allow_secrets
2.3.4 - Plugins
To register a new plugin in Vault’s plugin catalog,
set the plugin_directory option in the Vault server configuration to the directory where the plugin binary
is located. Also, for some plugins readOnlyRootFilesystem Pod Security Policy should be disabled to allow RPC
communication between plugin and Vault server via Unix socket. For details,
see the Hashicorp Go plugin documentation.
plugins:
  - plugin_name: ethereum-plugin
    command: ethereum-vault-plugin --ca-cert=/vault/tls/client/ca.crt --client-cert=/vault/tls/server/server.crt --client-key=/vault/tls/server/server.key
    sha256: 62fb461a8743f2a0af31d998074b58bb1a589ec1d28da3a2a5e8e5820d2c6e0a
    type: secret
2.3.5 - Policies
You can create policies in Vault, and later use these policies in roles for the
Kubernetes-based authentication. For details,
see Policies in the official Vault documentation.
policies:
  - name: allow_secrets
    rules: path "secret/*" {
             capabilities = ["create", "read", "update", "delete", "list"]
           }
  - name: readonly_secrets
    rules: path "secret/*" {
             capabilities = ["read", "list"]
           }
2.3.6 - Secrets engines
You can configure Secrets Engines in Vault.
The Key-Value, Database, and SSH values are tested, but the configuration is free form, so probably others work as well.
AWS
The AWS secrets engine generates AWS access credentials
dynamically based on IAM policies.
secrets:
  - type: aws
    path: aws
    description: AWS Secrets Engine
    configuration:
        config:
          - name: root
            access_key: "${env `AWS_ACCESS_KEY_ID`}"
            secret_key: "${env `AWS_SECRET_ACCESS_KEY`}"
            region: us-east-1
        roles:
          - credential_type: iam_user
            policy_arns: arn-of-policy
            name: my-aws-role
Consul
The Consul secrets engine generates Consul ACL tokens dynamically based on policies created in Consul.
secrets:
  - path: consul
    type: consul
    description: Consul secrets
    configuration:
      config:
        - name: "access"
          address: "consul-server:8500"
          token: "${env `CONSUL_GLOBAL_MANAGEMENT_TOKEN`}" # Example how to read environment variables
      roles:
        - name: "<application_name>-read-only-role"
          consul_policies: "<application_name>-read-only-policy"
        - name: "<application_name>-read-write-role"
          consul_policies: "<application_name>-read-write-policy"
Database
This plugin stores database credentials dynamically based on configured roles for the
MySQL/MariaDB database.
secrets:
  - type: database
    description: MySQL Database secret engine.
    configuration:
      config:
        - name: my-mysql
          plugin_name: "mysql-database-plugin"
          connection_url: "{{username}}:{{password}}@tcp(127.0.0.1:3306)/"
          allowed_roles: [pipeline]
          username: "${env `ROOT_USERNAME`}" # Example how to read environment variables
          password: "${env `ROOT_PASSWORD`}"
      roles:
        - name: pipeline
          db_name: my-mysql
          creation_statements: "GRANT ALL ON *.* TO '{{name}}'@'%' IDENTIFIED BY '{{password}}';"
          default_ttl: "10m"
          max_ttl: "24h"
Identity Groups
Allows you to configure identity groups.
Note:
Only external groups are supported at the moment through the use of group-aliases.
For supported authentication backends (for example JWT, which automatically matches those aliases
to groups returned by the backend) the configuration files for the groups and group-aliases
need to be parsed after the authentication backend has been mounted. Ideally they should be in the same file
to avoid of errors.
groups:
  - name: admin
    policies:
      - admin
    metadata:
      admin: "true"
      priviliged: "true"
    type: external

group-aliases:
  - name: admin
    mountpath: jwt
    group: admin
Key-Values
This plugin stores arbitrary secrets within the configured
physical storage for Vault.
secrets:
  - path: secret
    type: kv
    description: General secrets.
    options:
      version: 2
    configuration:
      config:
        - max_versions: 100
Non-default plugin path
Mounts a non-default plugin’s path.
  - path: ethereum-gateway
    type: plugin
    plugin_name: ethereum-plugin
    description: Immutability's Ethereum Wallet
PKI
The PKI secrets engine generates X.509 certificates.
secrets:
  - type: pki
    description: Vault PKI Backend
    config:
      default_lease_ttl: 168h
      max_lease_ttl: 720h
    configuration:
      config:
      - name: urls
        issuing_certificates: https://vault.default:8200/v1/pki/ca
        crl_distribution_points: https://vault.default:8200/v1/pki/crl
      root/generate:
      - name: internal
        common_name: vault.default
      roles:
      - name: default
        allowed_domains: localhost,pod,svc,default
        allow_subdomains: true
        generate_lease: true
        ttl: 30m
RabbitMQ
The RabbitMQ secrets engine
generates user credentials dynamically based on configured permissions and virtual hosts.
To start a RabbitMQ test server, run: docker run -it –rm -p 15672:15672 rabbitmq:3.7-management-alpine
secrets:
  - type: rabbitmq
    description: local-rabbit
    configuration:
      config:
        - name: connection
          connection_uri: "http://localhost:15672"
          username: guest
          password: guest
      roles:
        - name: prod_role
          vhosts: '{"/web":{"write": "production_.*", "read": "production_.*"}}'
SSH
Create a named Vault role for
signing SSH client keys.
secrets:
  - type: ssh
    path: ssh-client-signer
    description: SSH Client Key Signing.
    configuration:
      config:
        - name: ca
          generate_signing_key: "true"
      roles:
        - name: my-role
          allow_user_certificates: "true"
          allowed_users: "*"
          key_type: "ca"
          default_user: "ubuntu"
          ttl: "24h"
          default_extensions:
            permit-pty: ""
            permit-port-forwarding: ""
            permit-agent-forwarding: ""
2.3.7 - Startup secrets
Allows writing some secrets to Vault (useful for development purposes). For details,
see the Key-Value secrets engine.
startupSecrets:
  - type: kv
    path: secret/data/accounts/aws
    data:
      data:
        AWS_ACCESS_KEY_ID: secretId
        AWS_SECRET_ACCESS_KEY: s3cr3t
3 - Vault operator
The Vault operator builds on Bank-Vaults features such as:
- external, API based configuration (secret engines, auth methods, policies) to automatically re/configure a Vault cluster
- automatic unsealing (AWS, GCE, Azure, Alibaba, Kubernetes Secrets (for dev purposes), Oracle)
- TLS support
The operator flow is the following:

The source code can be found in the vault-operator repository.
The operator requires the following cloud permissions.
Deploy a local Vault operator
This is the simplest scenario: you install the Vault operator on a simple cluster. The following commands install a single-node Vault instance that stores unseal and root tokens in Kubernetes secrets. If you want to customize the Helm chart, see the list of vault-operator Helm chart values.
-
Install the Bank-Vaults operator:
helm upgrade --install --wait vault-operator oci://ghcr.io/bank-vaults/helm-charts/vault-operator
Expected output:
Release "vault-operator" does not exist. Installing it now.
Pulled: ghcr.io/bank-vaults/helm-charts/vault-operator:1.20.0
Digest: sha256:46045be1c3b215f0c734908bb1d4022dc91eae48d2285382bb71d63f72c737d1
NAME: vault-operator
LAST DEPLOYED: Thu Jul 27 11:22:55 2023
NAMESPACE: default
STATUS: deployed
REVISION: 1
TEST SUITE: None
-
Create a Vault instance using the Vault custom resources. This will create a Kubernetes CustomResource called vault and a PersistentVolumeClaim for it:
kubectl kustomize https://github.com/bank-vaults/vault-operator/deploy/rbac | kubectl apply -f -
Expected output:
serviceaccount/vault created
    role.rbac.authorization.k8s.io/vault created
    role.rbac.authorization.k8s.io/leader-election-role created
    rolebinding.rbac.authorization.k8s.io/leader-election-rolebinding created
    rolebinding.rbac.authorization.k8s.io/vault created
    clusterrolebinding.rbac.authorization.k8s.io/vault-auth-delegator created
kubectl apply -f https://raw.githubusercontent.com/bank-vaults/vault-operator/v1.24.0/deploy/examples/cr-raft.yaml
Expected output:
vault.vault.banzaicloud.com/vault created
Note: If needed, you can install the latest CustomResource from the main branch, but that’s usually under development and might not be stable.
kubectl kustomize https://github.com/bank-vaults/vault-operator/deploy/crd | kubectl apply -f -
-
Wait a few seconds, then check the operator and the vault pods:
Expected output:
NAME                                                        READY     STATUS    RESTARTS   AGE
vault-0                                                     3/3       Running   0          10s
vault-configurer-6c545cb6b4-dmvb5                           1/1       Running   0          10s
vault-operator-788559bdc5-kgqkg                             1/1       Running   0          23s
-
Configure your Vault client to access the Vault instance running in the vault-0 pod.
-
Port-forward into the pod:
kubectl port-forward vault-0 8200 &
-
Set the address of the Vault instance.
export VAULT_ADDR=https://127.0.0.1:8200
-
Import the CA certificate of the Vault instance by running the following commands (otherwise, you’ll get x509: certificate signed by unknown authority errors):
kubectl get secret vault-tls -o jsonpath="{.data.ca\.crt}" | base64 --decode > $PWD/vault-ca.crt
export VAULT_CACERT=$PWD/vault-ca.crt
Alternatively, you can instruct the Vault client to skip verifying the certificate of Vault by running: export VAULT_SKIP_VERIFY=true
-
If you already have the Vault CLI installed, check that you can access the Vault:
Expected output:
Key             Value
---             -----
Seal Type       shamir
Initialized     true
Sealed          false
Total Shares    5
Threshold       3
Version         1.5.4
Cluster Name    vault-cluster-27ecd0e6
Cluster ID      ed5492f3-7ef3-c600-aef3-bd77897fd1e7
HA Enabled      false
-
To authenticate to Vault, you can access its root token by running:
export VAULT_TOKEN=$(kubectl get secrets vault-unseal-keys -o jsonpath={.data.vault-root} | base64 --decode)
Note: Using the root token is recommended only in test environments. In production environment, create dedicated, time-limited tokens.
-
Now you can interact with Vault. For example, add a secret by running vault kv put secret/demosecret/aws AWS_SECRET_ACCESS_KEY=s3cr3t
If you want to access the Vault web interface, open https://127.0.0.1:8200 in your browser using the root token (to reveal the token, run echo $VAULT_TOKEN).
For other configuration examples of the Vault CustomResource, see the YAML files in the deploy/examples and test/deploy directories of the vault-operator repository. After you are done experimenting with Bank-Vaults and you want to delete the operator, you can delete the related CRs:
kubectl kustomize https://github.com/bank-vaults/vault-operator/deploy/rbac | kubectl delete -f -
kubectl delete -f https://raw.githubusercontent.com/bank-vaults/vault-operator/v1.24.0/deploy/examples/cr-raft.yaml
HA setup with Raft
In a production environment you want to run Vault as a cluster. The following CR creates a 3-node Vault instance that uses the Raft storage backend:
-
Install the Bank-Vaults operator:
helm upgrade --install --wait vault-operator oci://ghcr.io/bank-vaults/helm-charts/vault-operator
-
Create a Vault instance using the cr-raft.yaml custom resource. This will create a Kubernetes CustomResource called vault that uses the Raft backend:
kubectl kustomize https://github.com/bank-vaults/vault-operator/deploy/rbac | kubectl apply -f -
Expected output:
serviceaccount/vault created
    role.rbac.authorization.k8s.io/vault created
    role.rbac.authorization.k8s.io/leader-election-role created
    rolebinding.rbac.authorization.k8s.io/leader-election-rolebinding created
    rolebinding.rbac.authorization.k8s.io/vault created
    clusterrolebinding.rbac.authorization.k8s.io/vault-auth-delegator created
kubectl apply -f https://raw.githubusercontent.com/bank-vaults/vault-operator/v1.24.0/deploy/examples/cr-raft.yaml
Expected output:
vault.vault.banzaicloud.com/vault created
Note: If needed, you can install the latest CustomResource from the main branch, but that’s usually under development and might not be stable.
kubectl kustomize https://github.com/bank-vaults/vault-operator/deploy/crd | kubectl apply -f -
CAUTION:
Make sure to set up a solution for backing up the storage backend to prevent data loss. Bank-Vaults doesn’t do this automatically. We recommend using
Velero for backups.
Pod anti-affinity
If you want to setup pod anti-affinity, you can set podAntiAffinity vault with a topologyKey value.
For example, you can use failure-domain.beta.kubernetes.io/zone to force K8S deploy vault on multi AZ.
Delete a resource created by the operator
If you manually delete a resource that the Bank-Vaults operator has created (for example, the Ingress resource), the operator automatically recreates it every 30 seconds. If it doesn’t, then something went wrong, or the operator is not running. In this case, check the logs of the operator.
3.1 - Running Vault with external end to end encryption
This document assumes you have a working Kubernetes cluster which has a:
- Working install of Vault.
- That you have a working knowledge of Kubernetes.
- A working install of helm
- A working knowledge of Kubernetes ingress
- A valid external (www.example.com) SSL certificate, verified by your provider as a Kubernetes secret.
Background
The bank-vaults operator takes care of creating and maintaining internal cluster communications but if you wish to use your vault install
outside of your Kubernetes cluster what is the best way to maintain a secure state. Creating a standard Ingress object will reverse proxy
these requests to your vault instance but this is a hand off between the external SSL connection and the internal one. This might not be acceptable
under some circumstances, for example, if you have to adhere to strict security standards.
Workflow
Here we will create a separate TCP listener for vault using a custom SSL certificate on an external domain of your choosing. We will then
install a unique ingress-nginx controller allowing SSL pass through. SSL Pass through comes with a performance hit, so you would not use this
on a production website or ingress-controller that has a lot of traffic.
Install
ingress-nginx
values.yaml
controller:
  electionID: vault-ingress-controller-leader
  ingressClass: nginx-vault
  extraArgs:
    enable-ssl-passthrough:
  publishService:
    enabled: true
  scope:
    enabled: true
  replicaCount: 2
  affinity:
    podAntiAffinity:
      requiredDuringSchedulingIgnoredDuringExecution:
      - labelSelector:
          matchExpressions:
          - key: release
            operator: In
            values: ["vault-ingress"]
        topologyKey: kubernetes.io/hostname
Install nginx-ingress via helm
helm install nginx-stable/nginx-ingress --name my-release -f values.yaml
Configuration
SSL Secret example:
apiVersion: v1
data:
  tls.crt: LS0tLS1......=
  tls.key: LS0tLS.......==
kind: Secret
metadata:
  labels:
    ssl: "true"
    tls: "true"
  name: wildcard.example.com
type: Opaque
CR Vault Config:
---
apiVersion: "vault.banzaicloud.com/v1alpha1"
kind: "Vault"
metadata:
  name: "vault"
  namespace: secrets
spec:
  size: 2
  image: hashicorp/vault:2.0.1
  bankVaultsImage: ghcr.io/bank-vaults/bank-vaults:latest

  # A YAML representation of a final vault config file.
  # See https://developer.hashicorp.com/vault/docs/configuration for more information.
  config:
    listener:
      - tcp:
          address: "0.0.0.0:8200"
          tls_cert_file: /vault/tls/server.crt
          tls_key_file: /vault/tls/server.key
      - tcp:
          address: "0.0.0.0:8300"
          tls_cert_file: /etc/ingress-tls/tls.crt
          tls_key_file: /etc/ingress-tls/tls.key
    api_addr: https://vault:8200
    cluster_addr: https://vault:8201
    ui: true
CR Service:
  # Specify the Service's type where the Vault Service is exposed
  serviceType: ClusterIP
  servicePorts:
    api-port: 8200
    cluster-port: 8201
    ext-api-port: 8300
    ext-clu-port: 8301
Mount the secret into your vault pod
  volumes:
    - name: wildcard-ssl
      secret:
        defaultMode: 420
        secretName: wildcard.example.com

  volumeMounts:
    - name: wildcard-ssl
      mountPath: /etc/ingress-tls
CR Ingress:
  # Request an Ingress controller with the default configuration
  ingress:
    annotations:
      kubernetes.io/ingress.allow-http: "false"
      kubernetes.io/ingress.class: "nginx-vault"
      nginx.ingress.kubernetes.io/force-ssl-redirect: "true"
      nginx.ingress.kubernetes.io/ssl-passthrough: "true"
      nginx.ingress.kubernetes.io/backend-protocol: "HTTPS"
      nginx.ingress.kubernetes.io/whitelist-source-range: "127.0.0.1"

    spec:
      rules:
        - host: vault.example.com
          http:
            paths:
              - path: /
                backend:
                  serviceName: vault
                  servicePort: 8300
3.2 - Using templates for injecting dynamic configuration
Background
When configuring a Vault object via the externalConfig property, sometimes it’s convenient (or necessary) to inject settings that are only known at runtime, for example:
- secrets that you don’t want to store in source control
- dynamic resources managed elsewhere
- computations based on multiple values (string or arithmetic operations).
For these cases, the operator supports parameterized templating. The vault-configurer component evaluates the templates and injects the rendered configuration into Vault.
This templating is based on Go templates, extended by Sprig, with some custom functions available specifically for bank-vaults (for example, to decrypt strings using the AWS Key Management Service or the Cloud Key Management Service of the Google Cloud Platform).
Using templates
To avoid confusion and potential parsing errors (and interference with other templating tools like Helm), the templates don’t use the default delimiters that Go templates use ({{ and }}). Instead, use the following characters:
- ${ for the left delimiter
- } for the right one.
- To quote parameters being passed to functions, surround them with backticks (`) instead.
For example, to call the env function, you can use this in your manifest:
password: "${ env `MY_ENVIRONMENT_VARIABLE` }"
In this case, vault-configurer evaluates the value of MY_ENVIRONMENT_VARIABLE at runtime (assuming it was properly injected), and sets the result as the value of the password field.
Note that you can also use Sprig functions and custom Kubernetes-related functions in your templates.
Sprig functions
In addition to the default functions in Go templates, you can also use Sprig functions in your configuration.
CAUTION:
Use only functions that return a string, otherwise the generated configuration is invalid.
Custom functions
To provide functionality that’s more Kubernetes-friendly and cloud-native, bank-vaults provides a few additional functions not available in Sprig or Go. The functions and their parameters (in the order they should go in the function) are documented below.
awskms
Takes a base64-encoded, KMS-encrypted string and returns the decrypted string. Additionally, the function takes an optional second parameter for any encryption context that might be required for decrypting. If any encryption context is required, the function will take any number of additional parameters, each of which should be a key-value pair (separated by a = character), corresponding to the full context.
Note: This function assumes that the vault-configurer pod has the appropriate AWS IAM credentials and permissions to decrypt the given string. You can inject the AWS IAM credentials by using Kubernetes secrets as environment variables, an EC2 instance role, kube2iam, or EKS IAM roles, and so on.
| Parameter | Type | Required |
| encodedString | Base64-encoded string | Yes |
| encryptionContext | Variadic list of strings | No |
For example:
password: '${ awskms (env `ENCRYPTED_DB_CREDS`) }'
You can also nest functions in the template, for example:
password: '${ awskms (blob `s3://bank-vaults/encrypted/db-creds?region=eu-west-1`) }'
gcpkms
Takes a base64-encoded string, encrypted with a Google Cloud Platform (GCP) symmetric key and returns the decrypted string.
Note: This function assumes that the vault-configurer pod has the appropriate GCP IAM credentials and permissions to decrypt the given string. You can inject the GCP IAM credentials by using Kubernetes secrets as environment variables, or they can be acquired via a service account authentication, and so on.
| Parameter | Type | Required |
| encodedString | Base64-encoded string | Yes |
| projectId | String | Yes |
| location | String | Yes |
| keyRing | String | Yes |
| key | String | Yes |
blob
Reads the content of a blob from disk (file) or from cloud blob storage services (object storage) at the given URL and returns it. This assumes that the path exists, and is readable by vault-configurer.
Valid values for the URL parameters are listed below, for more fine grained options check the documentation of the underlying library:
file:///path/to/dir/files3://my-bucket/object?region=us-west-1gs://my-bucket/objectazblob://my-container/blob
Note: This function assumes that the vault-configurer pod has the appropriate rights to access the given cloud service. For details, see the awskms and gcpkms functions.
| Parameter | Type | Required |
| url | String | Yes |
For example:
password: '${ blob `s3://bank-vaults/encrypted/db-creds?region=eu-west-1` }'
You can also nest functions in the template, for example:
password: '${ awskms (blob `s3://bank-vaults/encrypted/db-creds?region=eu-west-1`) }'
file
Reads the content of a file from disk at the given path and returns it. This assumes that the file exists, it’s mounted, and readable by vault-configurer.
| Parameter | Type | Required |
| path | String | Yes |
accessor
Looks up the accessor id of the given auth path and returns it. This function is only useful in policies that use templated policies, to generalize the <mount accessor> field.
| Parameter | Type | Required |
| path | String | Yes |
For example:
policies:
  - name: allow_secrets
    rules: path "secret/data/{{identity.entity.aliases.${ accessor `kubernetes/` }.metadata.service_account_namespace}}/*" {
             capabilities = ["read"]
           }
3.3 - Environment variables
You can add environment variables to the different containers of the Bank-Vaults pod using the following configuration options:
envsConfig: Adds environment variables to all Bank-Vaults pods.sidecarEnvsConfig: Adds environment variables to Vault sidecar containers.vaultEnvsConfig: Adds environment variables to the Vault container.
For example:
envsConfig:
  - name: ROOT_USERNAME
    valueFrom:
      secretKeyRef:
        name: mysql-login
        key: user
  - name: ROOT_PASSWORD
    valueFrom:
      secretKeyRef:
        name: mysql-login
        key: password
See the database secret engine section for usage. Further information:
3.4 - Upgrade strategies
Upgrade Vault
To upgrade the Vault, complete the following steps.
- Check the release notes of Vault for any special upgrade instructions. Usually there are no instructions, but it’s better to be safe than sorry.
- Adjust the spec.image field in the Vault custom resource. If you are using the Vault Helm chart, adjust the image.tag field in the values.yaml.
- The Vault Helm chart updates the StatefulSet. It does not take the HA leader into account in HA scenarios, but this has never caused any issues so far.
Upgrade Vault operator
v1.24.0 upgrade guide
Adds support for HashiCorp Vault 2.0.x. Bumps the minimum bank-vaults CLI image
to v1.33.1. Existing Vault 1.x deployments continue to work — no spec changes
required on upgrade.
The operator handles Vault 2.0 behavior changes automatically:
- Auto
disable_mlock: true when the field is unset and the Vault image needs it
(2.0.0 across all backends; 2.0.1+ with raft storage). Explicit user values are
preserved. - Auto
VAULT_API_ADDR on the vault container, silencing the “no api_addr
value specified” warning. - New
spec.skipEntrypointSetup field (*bool). Sets SKIP_CHOWN=true /
SKIP_SETCAP=true to bypass the hashicorp/vault docker-entrypoint steps that
fail under Kubernetes. Default (nil) only enables this for Vault 2.0.0 (the
only version where the chown is fatal); set to true/false to override. IPC_LOCK + SETFCAP always granted, regardless of disable_mlock —
Vault 2.0’s entrypoint refuses to exec without IPC_LOCK.
Examples under deploy/examples/cr-raft*.yaml, cr-hsm-*.yaml, and the multi-DC
samples now set disable_mlock: true explicitly. Adding it to your CRs is
recommended for clarity but not required.
helm upgrade vault-operator oci://ghcr.io/bank-vaults/helm-charts/vault-operator \
	--set image.tag=v1.24.0 \
	--set bankVaults.image.tag=v1.33.1 \
	--wait
v1.20.0 upgrade guide
The release of the Vault Operator v1.20.0 marks the beginning of a new chapter in the development of the Bank-Vaults ecosystem, as this is the first release across the project after it has been dissected and migrated from the original banzaicloud/bank-vaults repository under its own bank-vaults organization. We paid attention to not introduce breaking changes during the process, however, the following changes are now in effect:
- All Helm charts will now be distributed via OCI registry on GitHub.
- All releases will be tagged with
v prefix, starting from v1.20.0.
Upgrade to the new Vault Operator by changing the helm repository to the new OCI registry, and specifying the new version numbers:
helm upgrade vault-operator oci://ghcr.io/bank-vaults/helm-charts/vault-operator \
	--set image.tag=v1.20.0 \
	--set bankVaults.image.tag=v1.20.0 \
	--wait
Make sure to also change the bank-vaults image in the Vault CR’s spec.bankVaultsImage field to ghcr.io/bank-vaults/bank-vaults:1.20.x.
3.5 - Operator Configuration for Functioning Webhook Secrets Mutation
You can find several examples of the vault operator CR manifest in
the vault-operator repository. The following examples use only this vanilla CR
to demonstrate some main points about how to properly configure the
operator for secrets mutations to function.
This document does not attempt to explain every possible scenario with respect to
the CRs in the aforementioned directory, but instead attempts to explain at
a high level the important aspects of the CR, so that you can determine how best to configure your operator.
Main points
Some important aspects of the operator and its configuration with respect to secrets
mutation are:
- The vault operator instantiates:
- the vault configurer pod(s),
- the vault pod(s),
- the vault-secrets-webhook pod(s).
- The vault configurer:
- unseals the vault,
- configures vault with policies, roles, and so on.
- vault-secrets-webhook does nothing more than:
- monitors cluster for resources with specific annotations for secrets injection, and
- integrates with vault API to answer secrets requests from those resources for
requested secrets.
- For pods using environment secrets, it injects a binary
vault-env into pods
and updates ENTRYPOINT to run vault-env CMD instead of CMD.
vault-env intercepts requests for env secrets requests during runtime of
pod and upon such requests makes vault API call for requested secret
injecting secret into environment variable so CMD works with proper
secrets.
- Vault
- the secrets workhorse
- surfaces a RESTful API for secrets management
CR configuration properties
This section goes over some important properties of the CR and their purpose.
Vault’s service account
This is the serviceaccount where Vault will be running. The Configurer runs
in the same namespace and should have the same service account. The operator
assigns this serviceaccount to Vault.
  # Specify the ServiceAccount where the Vault Pod and the Bank-Vaults configurer/unsealer is running
  serviceAccount: vault
caNamespaces
In order for vault communication to be encrypted, valid TLS certificates need to
be used. The following property automatically creates TLS certificate secrets for
the namespaces specified here. Notice that this is a list, so you can
specify multiple namespaces per line, or use the splat or wildcard asterisk to
specify all namespaces:
  # Support for distributing the generated CA certificate Secret to other namespaces.
  # Define a list of namespaces or use ["*"] for all namespaces.
  caNamespaces:
    - "*"
Vault Config
The following is simply a YAML representation (as the comment says) for the
Vault configuration you want to run. This is the configuration that vault
configurer uses to configure your running Vault:
  # A YAML representation of a final vault config file.
  config:
    api_addr: https://vault:8200
    cluster_addr: https://${.Env.POD_NAME}:8201
    listener:
      tcp:
        address: 0.0.0.0:8200
        # Commenting the following line and deleting tls_cert_file and tls_key_file disables TLS
        tls_cert_file: /vault/tls/server.crt
        tls_key_file: /vault/tls/server.key
    storage:
      file:
        path: "${ .Env.VAULT_STORAGE_FILE }"
    ui: true
  credentialsConfig:
    env: ""
    path: ""
    secretName: ""
  etcdSize: 0
  etcdVersion: ""
  externalConfig:
    policies:
      - name: allow_secrets
        rules: path "secret/*" {
          capabilities = ["create", "read", "update", "delete", "list"]
          }
    auth:
      - type: kubernetes
        roles:
          # Allow every pod in the default namespace to use the secret kv store
          - name: default
            bound_service_account_names:
              - external-secrets
              - vault
              - dex
            bound_service_account_namespaces:
              - external-secrets
              - vault
              - dex
              - auth-system
              - loki
              - grafana
            policies:
              - allow_secrets
            ttl: 1h

          # Allow mutation of secrets using secrets-mutation annotation to use the secret kv store
          - name: secretsmutation
            bound_service_account_names:
              - vault-secrets-webhook
            bound_service_account_namespaces:
              - vault-secrets-webhook
            policies:
              - allow_secrets
            ttl: 1h
externalConfig
The externalConfig portion of this CR example correlates to Kubernetes
configuration as specified by .auth[].type.
This YAML representation of configuration is flexible enough to work with any
auth methods available to Vault as documented in the Vault documentation.
For now, we’ll stick with this kubernetes configuration.
externalConfig.purgeUnmanagedConfig
Delete any configuration that in Vault but not in externalConfig. For more details please check
Purge unmanaged configuration
externalConfig.policies
Correlates 1:1 to the creation of the specified policy in conjunction with Vault
policies.
externalConfig.auth[].type
- type: kubernetes - specifies to configure Vault to use Kubernetes
authentication
Other types are yet to be documented with respect to the operator
configuration.
externalConfig.auth[].roles[]
Correlates to Creating Kubernetes roles. Some important nuances here are:
- Vault does not respect inline secrets serviceaccount annotations, so the
namespace of any serviceaccount annotations for secrets are irrelevant to
getting inline secrets mutations functioning.
- Instead, the serviceaccount of the vault-secrets-webhook pod(s) should be
used to configure the
bound_service_account_names and
bound_service_account_namespaces for inline secrets to mutate. - Pod serviceaccounts, however, are respected so
bound_service_account_namespaces and bound_service_account_names for
environment mutations must identify such of the running pods.
Note: There are two roles specified in the YAML example above: one for pods, and one for inline secrets mutations. While this was not strictly required, it makes for cleaner implementation.
3.6 - TLS
Bank-Vaults tries to automate as much as possible for handling TLS certificates.
- The
vault-operator automates the creation and renewal of TLS certificates for Vault. - The
vault Helm Chart automates only the creation of TLS certificates for Vault via Sprig.
Both the operator and the chart generate a Kubernetes Secret holding the TLS certificates, this is named ${VAULT_CR_NAME}-tls. For most examples in the vault-operator repository, the name of the secret is vault-tls.
The Secret data keys are:
ca.crtca.keyserver.crtserver.key
Note: The operator doesn’t overwrite this Secret if it already exists, so you can provide this certificate in any other way, for example using cert-manager or by simply placing it there manually.
Operator custom TLS settings
The following attributes influence the TLS settings of the operator. The ca.crt key is mandatory in existingTlsSecretName, otherwise the Bank-Vaults components can’t verify the Vault server certificate.
CANamespaces
The list of namespaces where the generated CA certificate for Vault should be distributed. Use ["*"] for all namespaces.
Default value: []
ExistingTLSSecretName
The name of the secret that contains a TLS server certificate, key, and the corresponding CA certificate. The secret must be in the kubernetes.io/tls type secret keys + ca.crt key format. If the attribute is set, the operator uses the certificate already set in the secret, otherwise it generates a new one.
The ca.crt key is mandatory, otherwise the Bank-Vaults components can’t verify the Vault server certificate.
Default value: ""
TLSAdditionalHosts
A list hostnames or IP addresses to add to the SAN on the automatically generated TLS certificate.
Default value: []
TLSExpiryThreshold
The expiration threshold of the Vault TLS certificate in Go Duration format.
Default value: 168h
Helm chart custom TLS settings
Starting with version 1.20, the Vault Helm chart allows you to set custom TLS settings. The following attributes influence the TLS settings of the Helm chart. The ca.crt key is mandatory in secretName, otherwise the Bank-Vaults components can’t verify the Vault server certificate.
SecretName
The name of the secret that contains a TLS server certificate, key, and the corresponding CA certificate. The secret must be in the kubernetes.io/tls type secret keys + ca.crt key format. If the attribute is set, the operator uses the certificate already set in the secret, otherwise it generates a new one.
The ca.crt key is mandatory, otherwise the Bank-Vaults components can’t verify the Vault server certificate.
Default value: ""
CANamespaces
The list of namespaces where the generated CA certificate for Vault should be distributed.
Default value: []
Using the generated custom TLS certificate with vault-operator
To use an existing secret which contains the TLS certificate, define existingTlsSecretName in the Vault custom resource.
Generate custom certificates with CFSSL
If you don’t want to use the certificates generated by Helm or the Bank-Vaults operator, the easiest way to create a custom certificate for Bank-Vaults is using CFSSL.
The TLS directory in the documentation holds a set of custom CFSSL configurations which are prepared for the Helm release name vault in the default namespace. Of course, you can put any other certificates into the Secret below, this is just an example.
-
Install CFSSL.
-
Create a CA:
cfssl genkey -initca csr.json | cfssljson -bare ca
-
Create a server certificate:
cfssl gencert -ca=ca.pem -ca-key=ca-key.pem -config=config.json -profile=server server.json | cfssljson -bare server
-
Put these certificates (and the server key) into a Kubernetes Secret:
kubectl create secret generic vault-tls --from-file=ca.crt=ca.pem --from-file=server.crt=server.pem --from-file=server.key=server-key.pem
-
Install the Vault instance:
- With the chart which uses this certificate:
helm upgrade --install vault ../charts/vault --set tls.secretName=vault-tls
- With the operator, create a Vault custom resource, and apply it:
kubectl apply -f vault-cr.yaml
Generate custom certificates with cert-manager
You can use the following cert-manager custom resource to generate a certificate for Bank-Vaults.
kubectl apply -f - <<EOF
apiVersion: cert-manager.io/v1
kind: Issuer
metadata:
  name: test-selfsigned
spec:
  selfSigned: {}
---
apiVersion: cert-manager.io/v1
kind: Certificate
metadata:
  name: selfsigned-cert
spec:
  commonName: vault
  usages:
    - server auth
  dnsNames:
    - vault
    - vault.default
    - vault.default.svc
    - vault.default.svc.cluster.local
  ipAddresses:
    - 127.0.0.1
  secretName: selfsigned-cert-tls
  issuerRef:
    name: test-selfsigned
EOF
3.7 - Backing up Vault
You can configure the vault-operator to create backups of the Vault cluster with Velero.
Prerequisites
- The Velero CLI must be installed on your computer.
- To create Persistent Volume (PV) snapshots, you need access to an object storage. The following example uses an Amazon S3 bucket called
bank-vaults-velero in the Stockholm region.
Install Velero
To configure the vault-operator to create backups of the Vault cluster, complete the following steps.
-
Install Velero on the target cluster with Helm.
-
Add the Velero Helm repository:
helm repo add vmware-tanzu https://vmware-tanzu.github.io/helm-charts
-
Create a namespace for Velero:
kubectl create namespace velero
-
Install Velero with Restic so you can create PV snapshots as well:
BUCKET=bank-vaults-velero
REGION=eu-north-1
KMS_KEY_ID=alias/bank-vaults-velero
SECRET_FILE=~/.aws/credentials

helm upgrade --install velero --namespace velero \
          --set "configuration.backupStorageLocation[0].name"=aws \
          --set "configuration.backupStorageLocation[0].provider"=aws \
          --set "configuration.backupStorageLocation[0].bucket"=YOUR_BUCKET_NAME \
          --set "configuration.backupStorageLocation[0].config.region"=${REGION} \
          --set "configuration.backupStorageLocation[0].config.kmsKeyId"=${KMS_KEY_ID} \
          --set "configuration.volumeSnapshotLocation[0].name"=aws \
          --set "configuration.volumeSnapshotLocation[0].provider"=aws \
          --set "configuration.volumeSnapshotLocation[0].config.region"=${REGION} \
          --set "initContainers[0].name"=velero-plugin-for-aws \
          --set "initContainers[0].image"=velero/velero-plugin-for-aws:v1.7.0 \
          --set "initContainers[0].volumeMounts[0].mountPath"=/target \
          --set "initContainers[0].volumeMounts[0].name"=plugins \
          vmware-tanzu/velero
-
Install the vault-operator to the cluster:
helm upgrade --install vault-operator oci://ghcr.io/bank-vaults/helm-charts/vault-operator

kubectl apply -f operator/deploy/rbac.yaml
kubectl apply -f operator/deploy/cr-raft.yaml
Note: The Vault CR in cr-raft.yaml has a special flag called veleroEnabled. This is useful for file-based Vault storage backends (file, raft), see the Velero documentation:
  # Add Velero fsfreeze sidecar container and supporting hook annotations to Vault Pods:
  # https://velero.io/docs/v1.2.0/hooks/
  veleroEnabled: true
-
Create a backup with the Velero CLI or with the predefined Velero Backup CR:
velero backup create --selector vault_cr=vault vault-1

# OR

kubectl apply -f https://raw.githubusercontent.com/bank-vaults/bank-vaults.dev/main/content/docs/operator/backup/backup.yaml
Note: For a daily scheduled backup, see schedule.yaml.
-
Check that the Velero backup got created successfully:
velero backup describe --details vault-1
Expected output:
Name:         vault-1
Namespace:    velero
Labels:       velero.io/backup=vault-1
              velero.io/pv=pvc-6eb4d9c1-25cd-4a28-8868-90fa9d51503a
              velero.io/storage-location=default
Annotations:  <none>

Phase:  Completed

Namespaces:
  Included:  *
  Excluded:  <none>

Resources:
  Included:        *
  Excluded:        <none>
  Cluster-scoped:  auto

Label selector:  vault_cr=vault

Storage Location:  default

Snapshot PVs:  auto

TTL:  720h0m0s

Hooks:  <none>

Backup Format Version:  1

Started:    2020-01-29 14:17:41 +0100 CET
Completed:  2020-01-29 14:17:45 +0100 CET

Expiration:  2020-02-28 14:17:41 +0100 CET
Test the backup
-
To emulate a catastrophe, remove Vault entirely from the cluster:
kubectl delete vault -l vault_cr=vault
kubectl delete pvc -l vault_cr=vault
-
Now restore Vault from the backup.
-
Scale down the vault-operator, so it won’t reconcile during the restore process:
kubectl scale deployment vault-operator --replicas 0
-
Restore all Vault-related resources from the backup:
velero restore create --from-backup vault-1
-
Check that the restore has finished properly:
velero restore get
NAME                    BACKUP   STATUS      WARNINGS   ERRORS   CREATED                         SELECTOR
vault1-20200129142409   vault1   Completed   0          0        2020-01-29 14:24:09 +0100 CET   <none>
-
Check that the Vault cluster got actually restored:
kubectl get pods
NAME                                READY   STATUS    RESTARTS   AGE
vault-0                             4/4     Running   0          1m42s
vault-1                             4/4     Running   0          1m42s
vault-2                             4/4     Running   0          1m42s
vault-configurer-5499ff64cb-g75vr   1/1     Running   0          1m42s
-
Scale the operator back after the restore process:
kubectl scale deployment vault-operator --replicas 1
-
Delete the backup if you don’t wish to keep it anymore:
velero backup delete vault-1
3.8 - Running the Bank-Vaults secret webhook alongside Istio
Both the vault-operator and the vault-secrets-webhook can work on Istio-enabled clusters.
We support the following three scenarios:
Prerequisites
-
Install the Istio operator.
-
Make sure you have mTLS enabled in the Istio mesh through the operator with the following command:
Enable mTLS if it is not set to STRICT:
kubectl patch istio -n istio-system mesh --type=json -p='[{"op": "replace", "path": "/spec/meshPolicy/mtlsMode", "value":STRICT}]'
-
Check that mesh is configured with mTLS turned on which applies to all applications in the cluster in Istio-enabled namespaces. You can change this if you would like to use another policy.
kubectl get meshpolicy default -o yaml
Expected output:
apiVersion: authentication.istio.io/v1alpha1
kind: MeshPolicy
metadata:
  name: default
  labels:
    app: security
spec:
  peers:
  - mtls: {}
Now your cluster is properly running on Istio with mTLS enabled globally.
Install the Bank-Vaults components
-
You are recommended to create a separate namespace for Bank-Vaults called vault-system. You can enable Istio sidecar injection here as well, but Kubernetes won’t be able to call back the webhook properly since mTLS is enabled (and Kubernetes is outside of the Istio mesh). To overcome this, apply a PERMISSIVE Istio authentication policy to the vault-secrets-webhook Service itself, so Kubernetes can call it back without Istio mutual TLS authentication.
kubectl create namespace vault-system
kubectl label namespace vault-system name=vault-system istio-injection=enabled
kubectl apply -f - <<EOF
apiVersion: authentication.istio.io/v1alpha1
kind: Policy
metadata:
  name: vault-secrets-webhook
  namespace: vault-system
  labels:
    app: security
spec:
  targets:
  - name: vault-secrets-webhook
  peers:
  - mtls:
      mode: PERMISSIVE
EOF
-
Now you can install the operator and the webhook to the prepared namespace:
helm upgrade --install --wait vault-secrets-webhook oci://ghcr.io/bank-vaults/helm-charts/vault-secrets-webhook --namespace vault-system --create-namespace
helm upgrade --install --wait vault-operator oci://ghcr.io/bank-vaults/helm-charts/vault-operator --namespace vault-system
Soon the webhook and the operator become up and running. Check that the istio-proxy got injected into all Pods in vault-system.
Proceed to the description of your scenario:
3.8.1 - Scenario 1 - Vault runs outside, the application inside the mesh
In this scenario, Vault runs outside an Istio mesh, whereas the namespace where the application runs and the webhook injects secrets has Istio sidecar injection enabled.
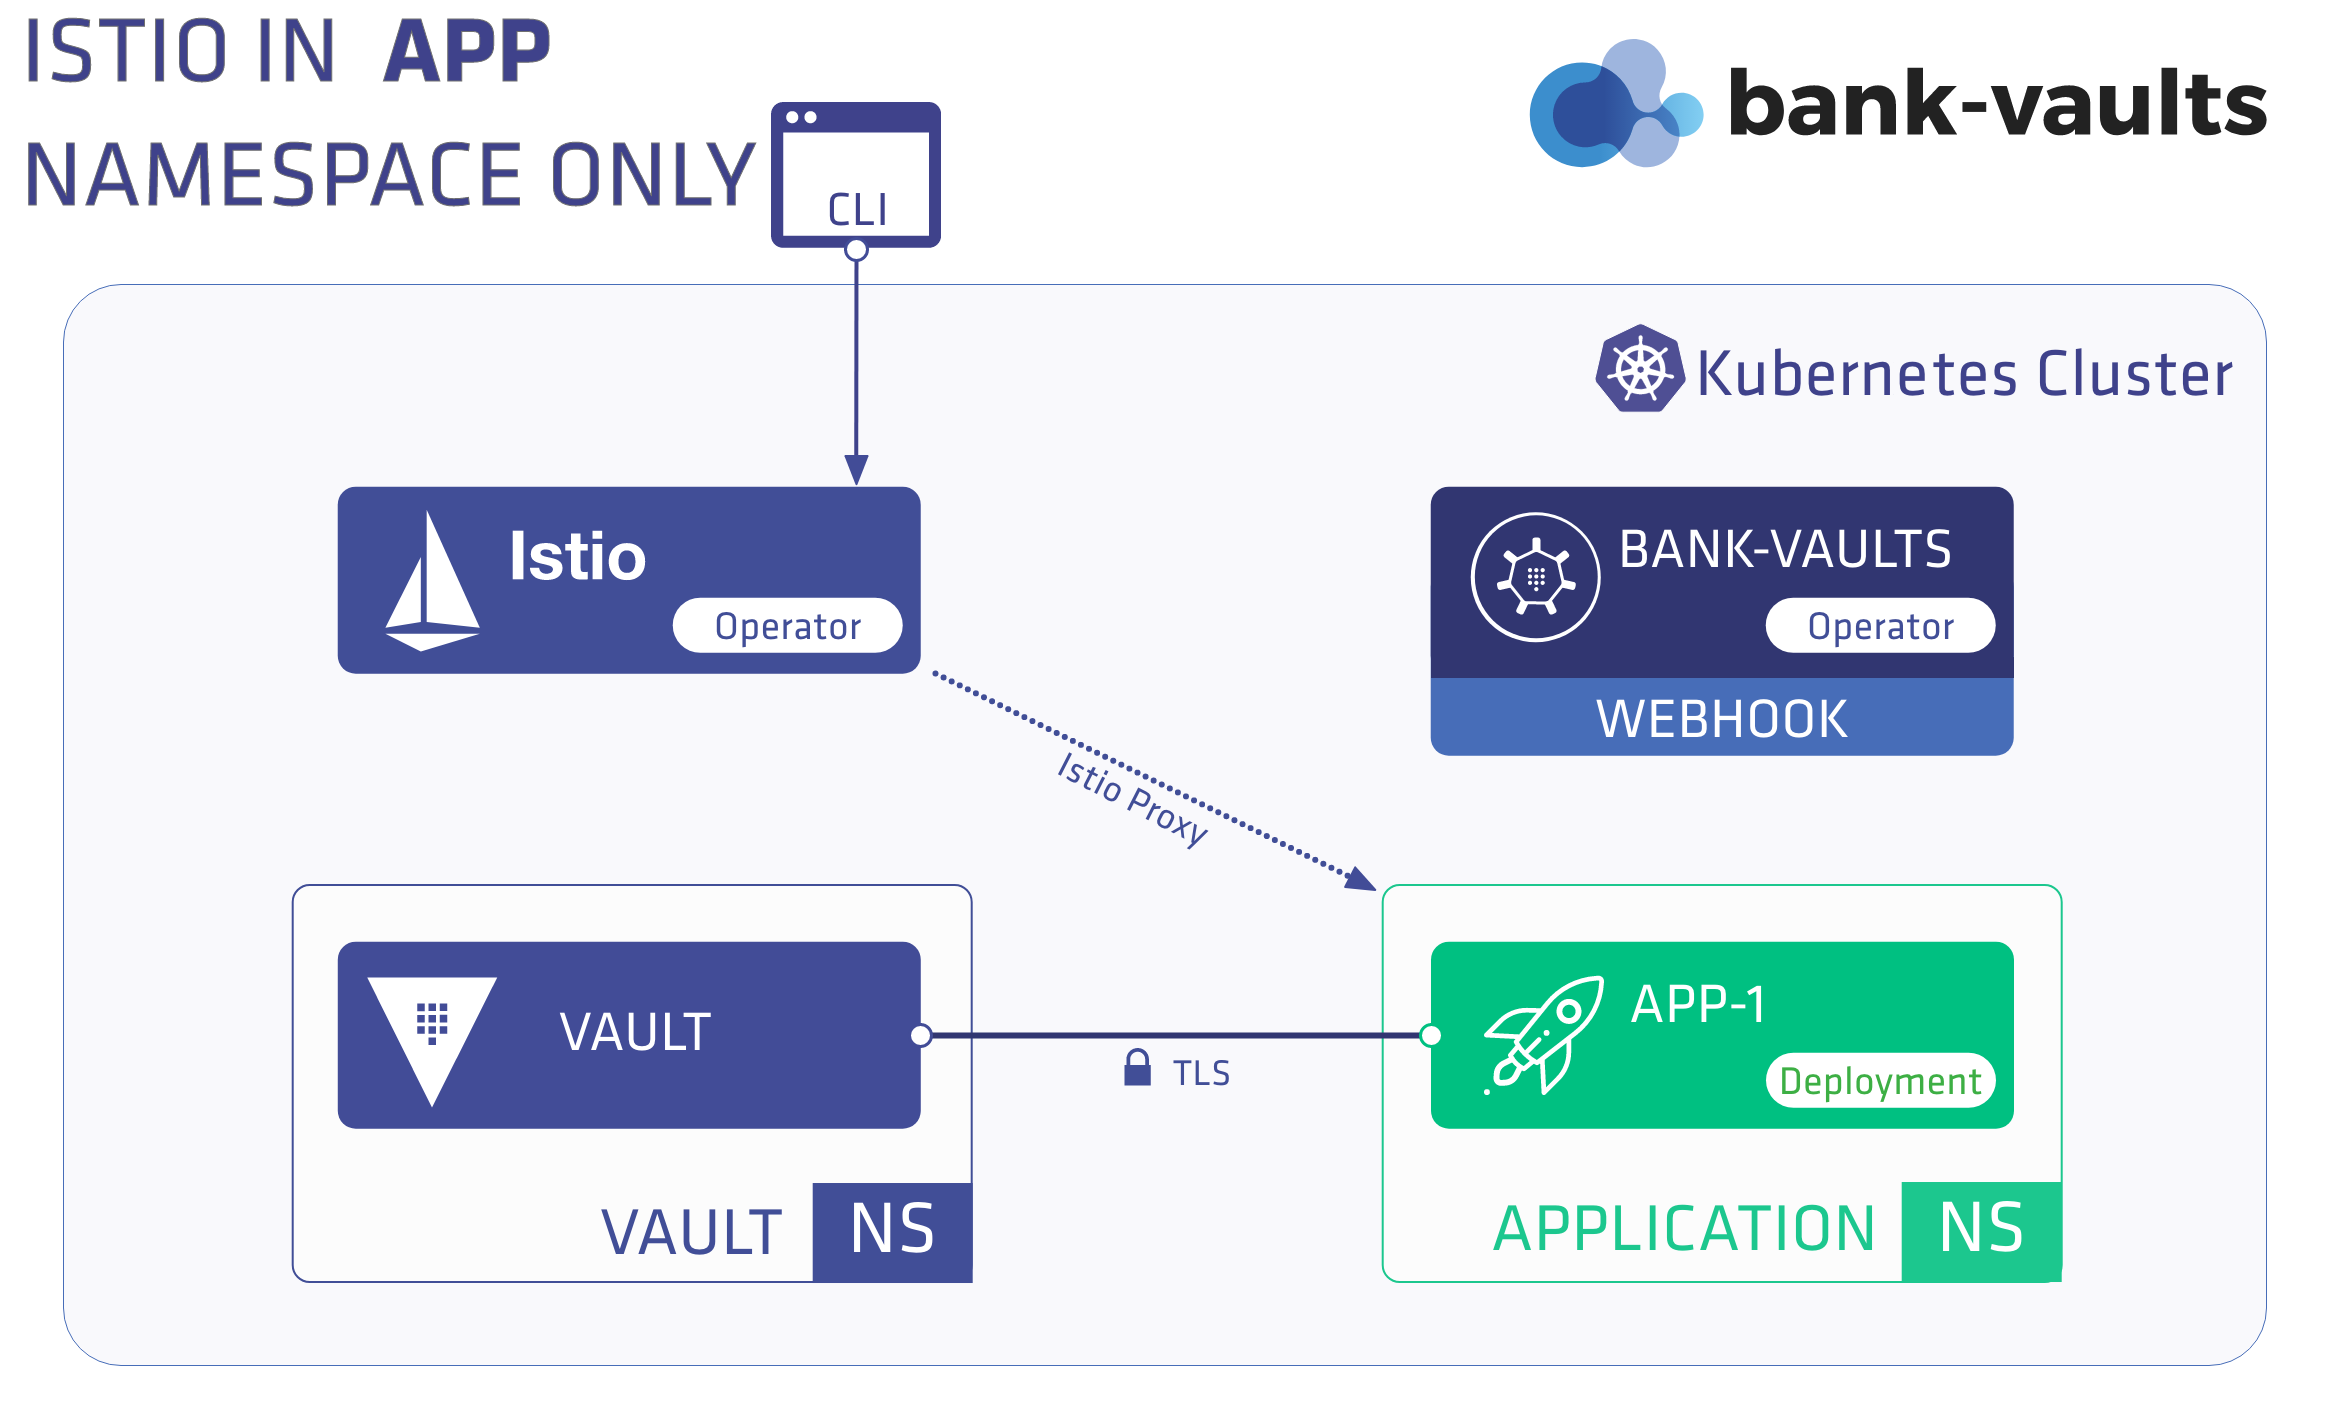
First, complete the Prerequisites, then install Vault outside the mesh, and finally install an application within the mesh.
Install Vault outside the mesh
-
Provision a Vault instance with the Bank-Vaults operator in a separate namespace:
kubectl create namespace vault
-
Apply the RBAC and CR files to the cluster to create a Vault instance in the vault namespace with the operator:
kubectl apply -f rbac.yaml -f cr-istio.yaml
kubectl get pods -n vault
Expected output:
NAME                               READY   STATUS    RESTARTS   AGE
vault-0                            3/3     Running   0          22h
vault-configurer-6458cc4bf-6tpkz   1/1     Running   0          22h
If you are writing your own Vault CR make sure that istioEnabled: true is configured, this influences port naming so the Vault service port protocols are detected by Istio correctly.
-
The vault-secrets-webhook can’t inject Vault secrets into initContainers in an Istio-enabled namespace when the STRICT authentication policy is applied to the Vault service, because Istio needs a sidecar container to do mTLS properly, and in the phase when initContainers are running the Pod doesn’t have a sidecar yet.
If you wish to inject into initContainers as well, you need to apply a PERMISSIVE authentication policy in the vault namespace, since it has its own TLS certificate outside of Istio scope (so this is safe to do from networking security point of view).
kubectl apply -f - <<EOF
apiVersion: authentication.istio.io/v1alpha1
kind: Policy
metadata:
  name: default
  namespace: vault
  labels:
    app: security
spec:
  peers:
  - mtls:
      mode: PERMISSIVE
EOF
Install the application inside a mesh
In this scenario Vault is running outside the Istio mesh (as we have installed it in the previous steps and our demo application runs within the Istio mesh. To install the demo application inside the mesh, complete the following steps:
-
Create a namespace first for the application and enable Istio sidecar injection:
kubectl create namespace app
kubectl label namespace app istio-injection=enabled
-
Install the application manifest to the cluster:
kubectl apply -f app.yaml
-
Check that the application is up and running. It should have two containers, the app itself and the istio-proxy:
Expected output:
NAME                  READY   STATUS    RESTARTS   AGE
app-5df5686c4-sl6dz   2/2     Running   0          119s
kubectl logs -f -n app deployment/app app
Expected output:
time="2020-02-18T14:26:01Z" level=info msg="Received new Vault token"
time="2020-02-18T14:26:01Z" level=info msg="Initial Vault token arrived"
s3cr3t
going to sleep...
3.8.2 - Scenario 2 - Running Vault inside the mesh
To run Vault inside the mesh, complete the following steps.

Note: These instructions assume that you have Scenario 1 up and running, and modifying it to run Vault inside the mesh.
-
Turn off Istio in the app namespace by removing the istio-injection label:
kubectl label namespace app istio-injection-
kubectl label namespace vault istio-injection=enabled
-
Delete the Vault pods in the vault namespace, so they will get recreated with the istio-proxy sidecar:
kubectl delete pods --all -n vault
-
Check that they both come back with an extra container (4/4 and 2/2 now):
kubectl get pods -n vault
Expected output:
NAME                                READY   STATUS    RESTARTS   AGE
vault-0                             4/4     Running   0          1m
vault-configurer-6d9b98c856-l4flc   2/2     Running   0          1m
-
Delete the application pods in the app namespace, so they will get recreated without the istio-proxy sidecar:
kubectl delete pods --all -n app
The app pod got recreated with only the app container (1/1) and Vault access still works:
Expected output:
NAME                  READY   STATUS    RESTARTS   AGE
app-5df5686c4-4n6r7   1/1     Running   0          71s
kubectl logs -f -n app deployment/app
Expected output:
time="2020-02-18T14:41:20Z" level=info msg="Received new Vault token"
time="2020-02-18T14:41:20Z" level=info msg="Initial Vault token arrived"
s3cr3t
going to sleep...
3.8.3 - Scenario 3 - Both Vault and the app are running inside the mesh
In this scenario, both Vault and the app are running inside the mesh.
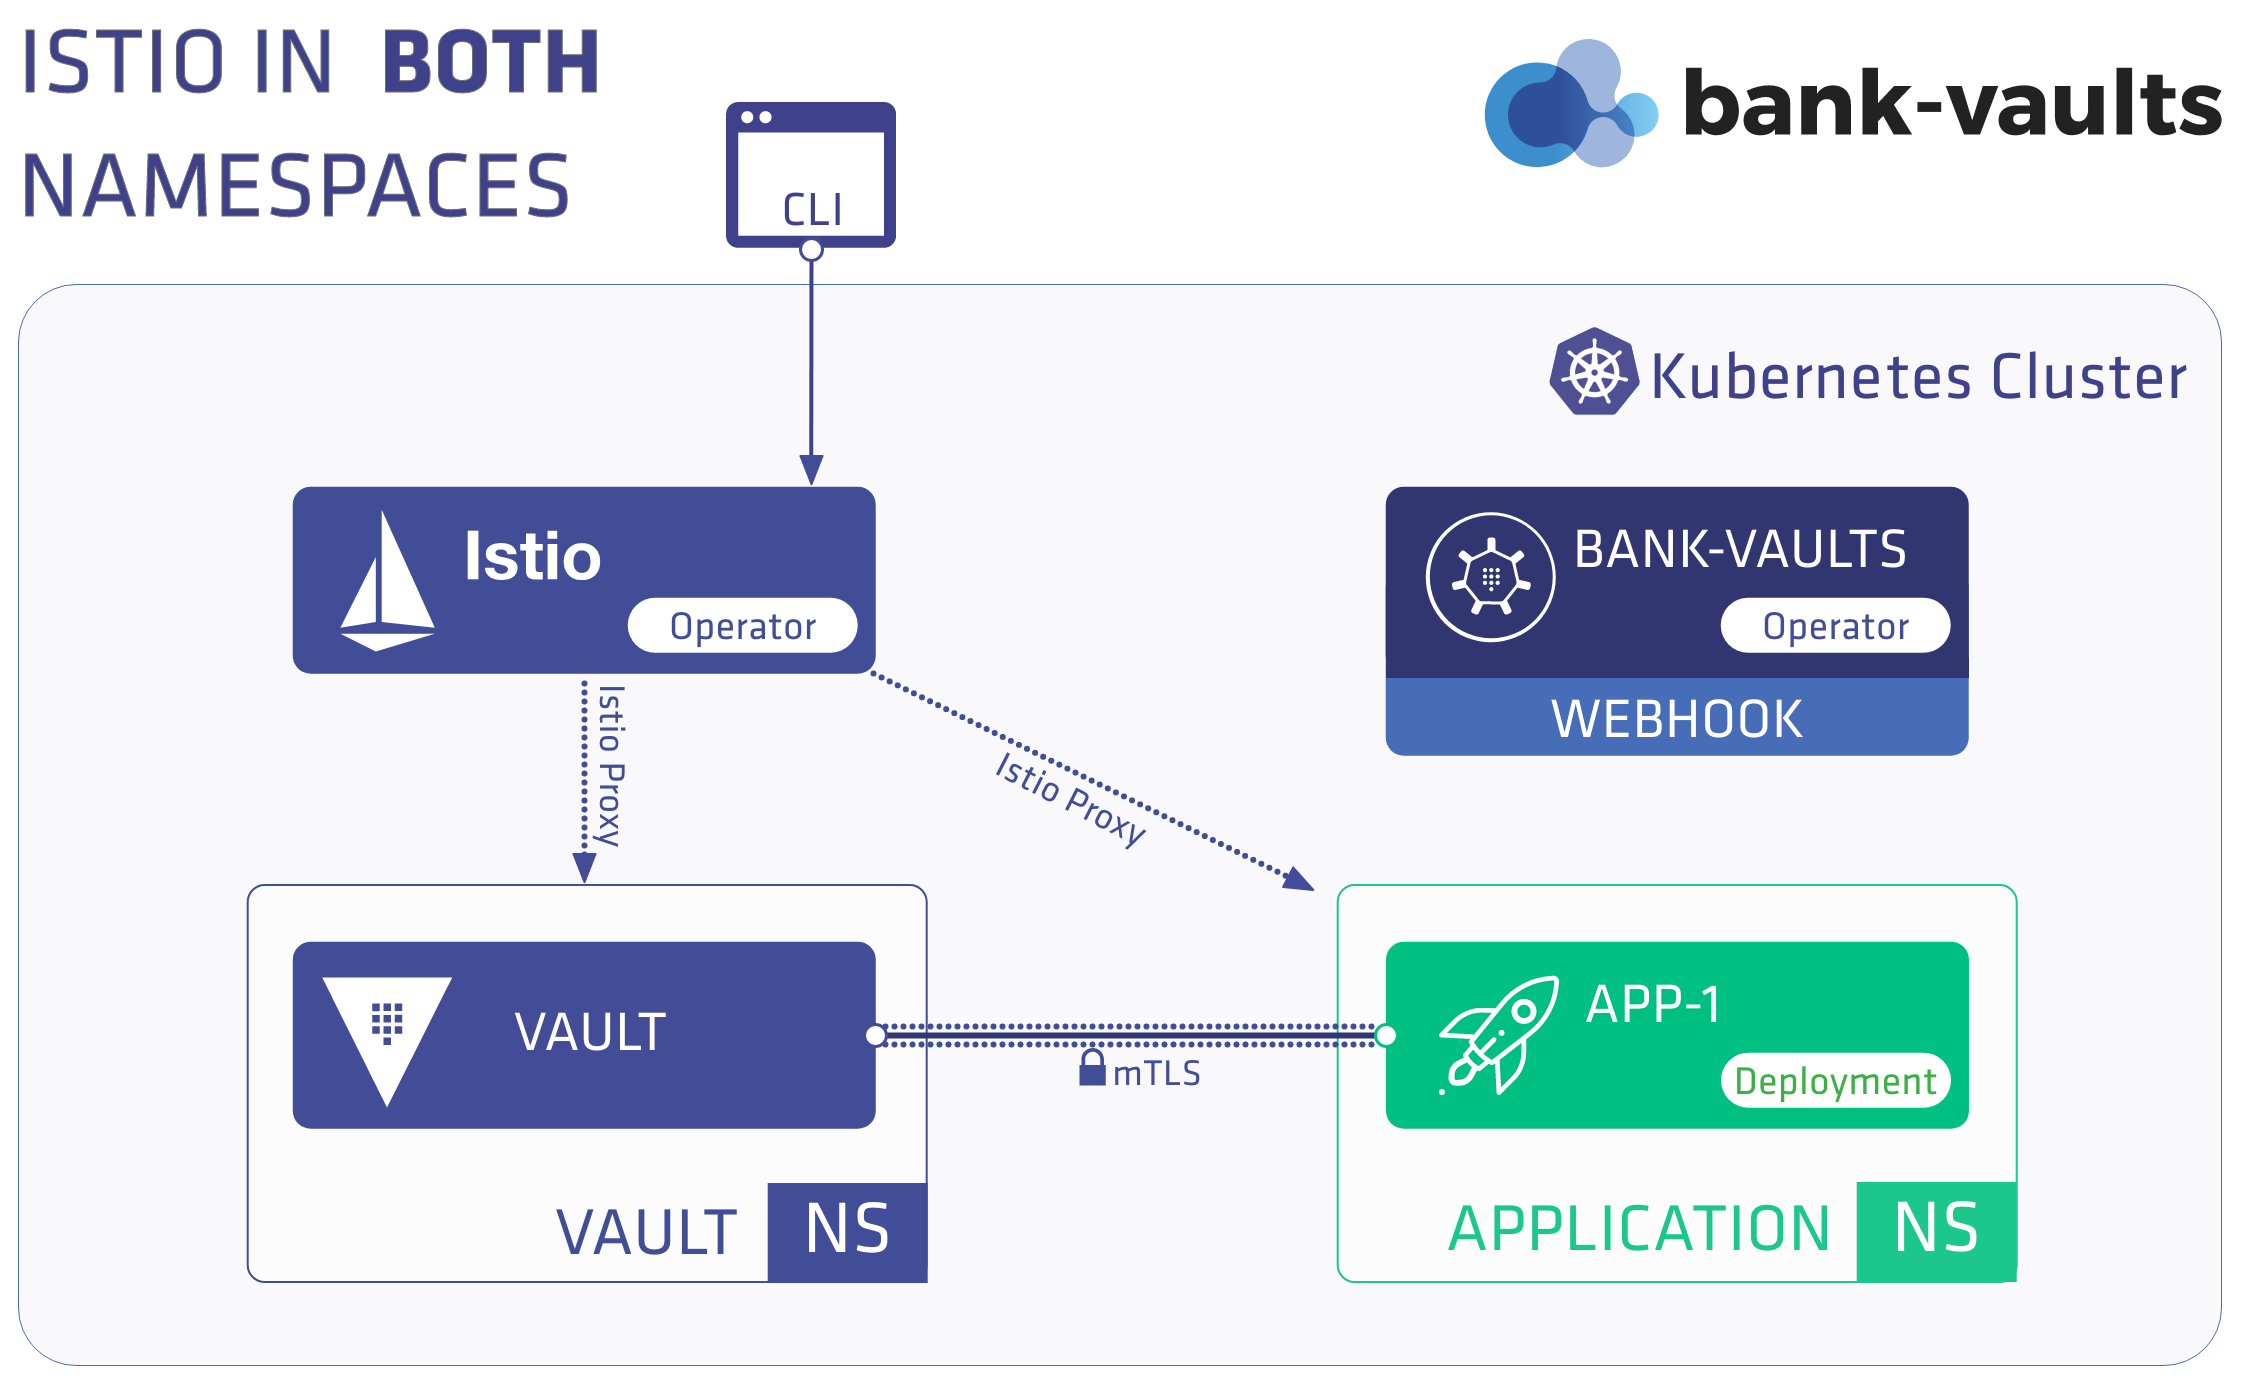
-
Complete the Prerequisites.
-
Enable sidecar auto-injection for both namespaces:
kubectl label namespace app   istio-injection=enabled
kubectl label namespace vault istio-injection=enabled
-
Delete all pods so they are getting injected with the proxy:
kubectl delete pods --all -n app
kubectl delete pods --all -n vault
-
Check the logs in the app container. It should sill show success:
kubectl logs -f -n app deployment/app
Expected output:
time="2020-02-18T15:04:03Z" level=info msg="Initial Vault token arrived"
time="2020-02-18T15:04:03Z" level=info msg="Renewed Vault Token"
s3cr3t
going to sleep...
3.9 - HSM Support
Bank-Vaults offers a lot of alternatives for encrypting and storing the unseal-keys and the root-token for Vault. One of the encryption technics is the HSM - Hardware Security Module. HSM offers an industry-standard way to encrypt your data in on-premise environments.
You can use a Hardware Security Module (HSM) to generate and store the private keys used by Bank-Vaults. Some articles still point out the speed of HSM devices as their main selling point, but an average PC can do more cryptographic operations. Actually, the main benefit is from the security point of view. An HSM protects your private keys and handles cryptographic operations, which allows the encryption of protected information without exposing the private keys (they are not extractable). Bank-Vaults currently supports the PKCS11 software standard to communicate with an HSM. Fulfilling compliance requirements (for example, PCI DSS) is also a great benefit of HSMs, so from now on you can achieve that with Bank-Vaults.
Implementation in Bank-Vaults
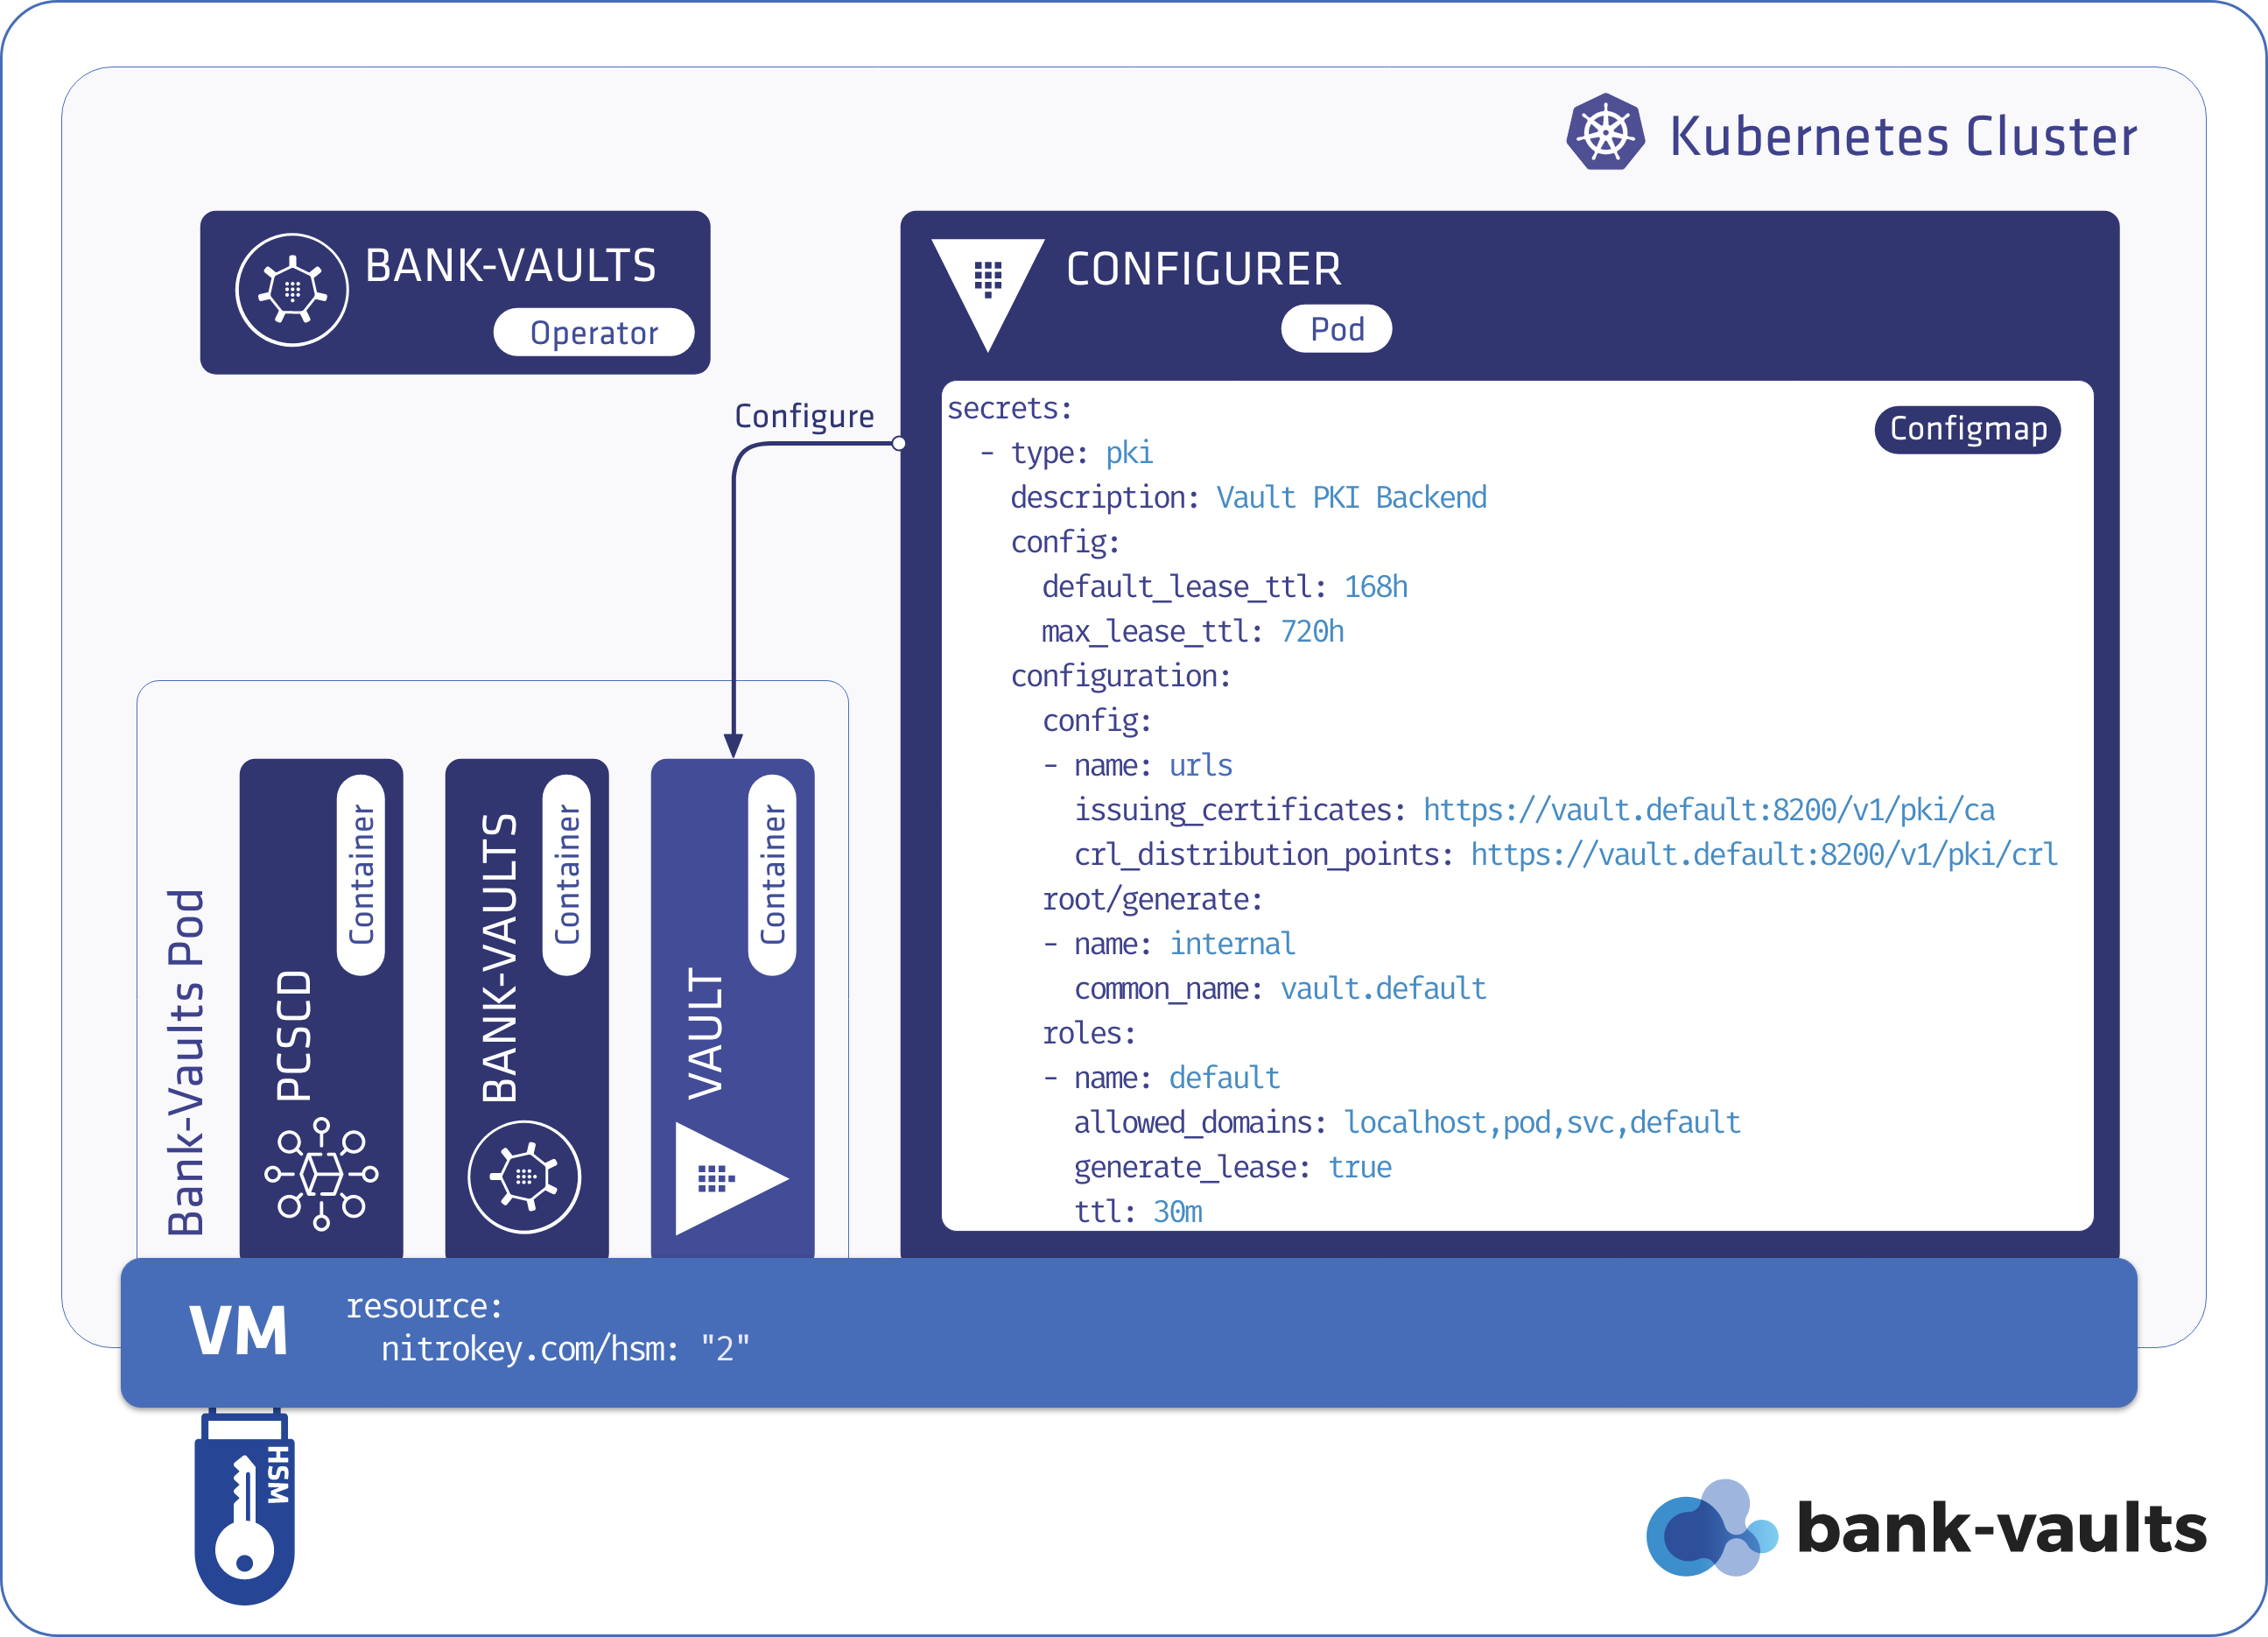
To support HSM devices for encrypting unseal-keys and root-tokens, Bank-Vaults:
- implements an encryption/decryption
Service named hsm in the bank-vaults CLI, - the
bank-vaults Docker image now includes the SoftHSM (for testing) and the OpenSC tooling, - the operator is aware of HSM and its nature.
The HSM offers an encryption mechanism, but the unseal-keys and root-token have to be stored somewhere after they got encrypted. Currently there are two possible solutions for that:
- Some HSM devices can store a limited quantity of arbitrary data (like Nitrokey HSM), and Bank-Vaults can store the unseal-keys and root-token here.
- If the HSM does not support that, Bank-Vaults uses the HSM to encrypt the unseal-keys and root-token, then stores them in Kubernetes Secrets. We believe that it is safe to store these keys in Kubernetes Secrets in encrypted format.
Bank-Vaults offers the ability to use the pre-created the cryptographic encryption keys on the HSM device, or generate a key pair on the fly if there isn’t any with the specified label in the specified slot.
Since Bank-Vaults is written in Go, it uses the github.com/miekg/pkcs11 wrapper to pull in the PKCS11 library, to be more precise the p11 high-level wrapper .
Supported HSM solutions
Bank-Vaults currently supports the following HSM solutions:
- SoftHSM, recommended for testing
- NitroKey HSM.
- AWS CloudHSM supports the PKCS11 API as well, so it probably works, though it needs a custom Docker image.
3.9.1 - NitroKey HSM support (OpenSC)
Nitrokey HSM is a USB HSM device based on the OpenSC project. We are using NitroKey to develop real hardware-based HSM support for Bank-Vaults. This device is not a cryptographic accelerator, only key generation and the private key operations (sign and decrypt) are supported. Public key operations should be done by extracting the public key and working on the computer, and this is how it is implemented in Bank-Vaults. It is not possible to extract private keys from NitroKey HSM, the device is tamper-resistant.
This device supports only RSA based encryption/decryption, and thus this is implemented in Bank-Vaults currently. It supports ECC keys as well, but only for sign/verification operations.
To start using a NitroKey HSM, complete the following steps.
-
Install OpenSC and initialize the NitroKey HSM stick:
brew install opensc
sc-hsm-tool --initialize --label bank-vaults --pin banzai --so-pin banzaicloud
pkcs11-tool --module /usr/local/lib/opensc-pkcs11.so --keypairgen --key-type rsa:2048 --pin banzai --token-label bank-vaults --label bank-vaults
-
Check that you got a keypair object in slot 0:
pkcs11-tool --list-objects


Using slot 0 with a present token (0x0)
Public Key Object; RSA 2048 bits
  label:      bank-vaults
  ID:         a9548075b20243627e971873826ead172e932359
  Usage:      encrypt, verify, wrap
  Access:     none
pkcs15-tool --list-keys

Using reader with a card: Nitrokey Nitrokey HSM
Private RSA Key [bank-vaults]
  Object Flags   : [0x03], private, modifiable
  Usage          : [0x0E], decrypt, sign, signRecover
  Access Flags   : [0x1D], sensitive, alwaysSensitive, neverExtract, local
  ModLength      : 2048
  Key ref        : 1 (0x01)
  Native         : yes
  Auth ID        : 01
  ID             : a9548075b20243627e971873826ead172e932359
  MD:guid        : a6b2832c-1dc5-f4ef-bb0f-7b3504f67015
-
If you are testing the HSM on macOS, setup minikube. Otherwise, continue with the next step.
-
Configure the operator to use NitroKey HSM for unsealing.
You must adjust the unsealConfig section in the vault-operator configuration, so the operator can communicate with OpenSC HSM devices correctly. Adjust your configuration based on the following snippet:
  # This example relies on an OpenSC HSM (NitroKey HSM) device initialized and plugged in to the Kubernetes Node.
  unsealConfig:
    hsm:
      # OpenSC daemon is needed in this case to communicate with the device
      daemon: true
      # The HSM SO module path (opensc is built into the bank-vaults image)
      modulePath: /usr/lib/opensc-pkcs11.so
      # For OpenSC slotId is the preferred way instead of tokenLabel
      # (OpenSC appends/prepends some extra stuff to labels)
      slotId: 0
      pin: banzai # This can be specified in the BANK_VAULTS_HSM_PIN environment variable as well, from a Secret
      keyLabel: bank-vaults
-
Configure your Kubernetes node that has the HSM attached so Bank-Vaults can access it.
Setup on Minikube for testing (optional)
On macOS where you run Docker in VMs you need to do some extra steps before mounting your HSM device to Kubernetes.
Complete the following steps to mount NitroKey into the minikube Kubernetes cluster:
-
Make sure that the Oracle VM VirtualBox Extension Pack for USB 2.0 support is installed.
-
Remove the HSM device from your computer if it is already plugged in.
-
Specify VirtualBox as the VM backend for Minikube.
minikube config set vm-driver virtualbox
-
Create a minikube cluster with the virtualbox driver and stop it, so you can modify the VM.
minikube start
minikube stop
-
Enable USB 2.0 support for the minikube VM.
VBoxManage modifyvm minikube --usbehci on
-
Find the vendorid and productid for your Nitrokey HSM device.
VBoxManage list usbhost

VENDORID=0x20a0
PRODUCTID=0x4230
-
Create a filter for it.
VBoxManage usbfilter add 1 --target minikube --name "Nitrokey HSM" --vendorid ${VENDORID} --productid ${PRODUCTID}
-
Restart the minikube VM.
-
Plug in the USB device.
-
Check that minikube captured your NitorKey HSM.
minikube ssh lsusb | grep ${VENDORID:2}:${PRODUCTID:2}
Now your minikube Kubernetes cluster has access to the HSM device through USB.
Kubernetes node setup
Some HSM vendors offer network daemons to enhance the reach of their HSM equipment to different servers. Unfortunately, there is no networking standard defined for PKCS11 access and thus currently Bank-Vaults has to be scheduled to the same node where the HSM device is attached directly (if not using a Cloud HSM).
Since the HSM is a hardware device connected to a physical node, Bank-Vaults has to find its way to that node. To make this work, create an HSM extended resource on the Kubernetes nodes for which the HSM device is plugged in. Extended resources must be advertised in integer amounts, for example, a Node can advertise four HSM devices, but not 4.5.
-
You need to patch the node to specify that it has an HSM device as a resource.
Because of the integer constraint and because all Bank-Vaults related Pods has to land on a Node where an HSM resource is available we need to advertise two units for 1 device, one will be allocated by each Vault Pod and one by the Configurer. If you would like to run Vault in HA mode - multiple Vault instances in different nodes - you will need multiple HSM devices plugged into those nodes, having the same key and slot setup.
kubectl proxy &

NODE=minikube

curl --header "Content-Type: application/json-patch+json" \
    --request PATCH \
    --data '[{"op": "add", "path": "/status/capacity/nitrokey.com~1hsm", "value": "2"}]' \
    http://localhost:8001/api/v1/nodes/${NODE}/status
From now on, you can request the nitrokey.com/hsm resource in the PodSpec
-
Include the nitrokey.com/hsm resource in your PodSpec:
  # If using the NitroKey HSM example, that resource has to be part of the resource scheduling request.
  resources:
    hsmDaemon:
      requests:
        cpu: 100m
        memory: 64Mi
        nitrokey.com/hsm: 1
      limits:
        cpu: 200m
        memory: 128Mi
        nitrokey.com/hsm: 1
-
Apply the modified setup from scratch:
kubectl delete vault vault
kubectl delete pvc vault-file-vault-0
kubectl delete secret vault-unseal-keys
kubectl apply -f https://raw.githubusercontent.com/bank-vaults/vault-operator/v1.24.0/deploy/examples/cr-hsm-nitrokey.yaml
-
Check the logs that unsealing uses the NitroKey HSM device. Run the following command:
kubectl logs -f vault-0 bank-vaults
The output should be something like:
time="2020-03-04T13:32:29Z" level=info msg="HSM Information {CryptokiVersion:{Major:2 Minor:20} ManufacturerID:OpenSC Project Flags:0 LibraryDescription:OpenSC smartcard framework LibraryVersion:{Major:0 Minor:20}}"
time="2020-03-04T13:32:29Z" level=info msg="HSM Searching for slot in HSM slots [{ctx:0xc0000c0318 id:0}]"
time="2020-03-04T13:32:29Z" level=info msg="found HSM slot 0 in HSM by slot ID"
time="2020-03-04T13:32:29Z" level=info msg="HSM TokenInfo {Label:bank-vaults (UserPIN)\x00\x00\x00\x00\x00\x00\x00\x00\x00\x00\x00 ManufacturerID:www.CardContact.de Model:PKCS#15 emulated SerialNumber:DENK0200074 Flags:1037 MaxSessionCount:0 SessionCount:0 MaxRwSessionCount:0 RwSessionCount:0 MaxPinLen:15 MinPinLen:6 TotalPublicMemory:18446744073709551615 FreePublicMemory:18446744073709551615 TotalPrivateMemory:18446744073709551615 FreePrivateMemory:18446744073709551615 HardwareVersion:{Major:24 Minor:13} FirmwareVersion:{Major:3 Minor:3} UTCTime:\x00\x00\x00\x00\x00\x00\x00\x00\x00\x00\x00\x00\x00\x00\x00\x00}"
time="2020-03-04T13:32:29Z" level=info msg="HSM SlotInfo for slot 0: {SlotDescription:Nitrokey Nitrokey HSM (DENK02000740000         ) 00 00 ManufacturerID:Nitrokey Flags:7 HardwareVersion:{Major:0 Minor:0} FirmwareVersion:{Major:0 Minor:0}}"
time="2020-03-04T13:32:29Z" level=info msg="found objects with label \"bank-vaults\" in HSM"
time="2020-03-04T13:32:29Z" level=info msg="this HSM device doesn't support encryption, extracting public key and doing encrytion on the computer"
time="2020-03-04T13:32:29Z" level=info msg="no storage backend specified for HSM, using on device storage"
time="2020-03-04T13:32:29Z" level=info msg="joining leader vault..."
time="2020-03-04T13:32:29Z" level=info msg="vault metrics exporter enabled: :9091/metrics"
[GIN-debug] [WARNING] Running in "debug" mode. Switch to "release" mode in production.
- using env:  export GIN_MODE=release
- using code: gin.SetMode(gin.ReleaseMode)

[GIN-debug] GET    /metrics                  --> github.com/gin-gonic/gin.WrapH.func1 (3 handlers)
[GIN-debug] Listening and serving HTTP on :9091
time="2020-03-04T13:32:30Z" level=info msg="initializing vault..."
time="2020-03-04T13:32:30Z" level=info msg="initializing vault"
time="2020-03-04T13:32:31Z" level=info msg="unseal key stored in key store" key=vault-unseal-0
time="2020-03-04T13:32:31Z" level=info msg="unseal key stored in key store" key=vault-unseal-1
time="2020-03-04T13:32:32Z" level=info msg="unseal key stored in key store" key=vault-unseal-2
time="2020-03-04T13:32:32Z" level=info msg="unseal key stored in key store" key=vault-unseal-3
time="2020-03-04T13:32:33Z" level=info msg="unseal key stored in key store" key=vault-unseal-4
time="2020-03-04T13:32:33Z" level=info msg="root token stored in key store" key=vault-root
time="2020-03-04T13:32:33Z" level=info msg="vault is sealed, unsealing"
time="2020-03-04T13:32:39Z" level=info msg="successfully unsealed vault"
-
Find the unseal keys and the root token on the HSM:
pkcs11-tool --list-objects
Expected output:
Using slot 0 with a present token (0x0)
Public Key Object; RSA 2048 bits
  label:      bank-vaults
  ID:         a9548075b20243627e971873826ead172e932359
  Usage:      encrypt, verify, wrap
  Access:     none
Data object 2168561792
  label:          'vault-test'
  application:    'vault-test'
  app_id:         <empty>
  flags:           modifiable
Data object 2168561168
  label:          'vault-unseal-0'
  application:    'vault-unseal-0'
  app_id:         <empty>
  flags:           modifiable
Data object 2168561264
  label:          'vault-unseal-1'
  application:    'vault-unseal-1'
  app_id:         <empty>
  flags:           modifiable
Data object 2168561360
  label:          'vault-unseal-2'
  application:    'vault-unseal-2'
  app_id:         <empty>
  flags:           modifiable
Data object 2168562304
  label:          'vault-unseal-3'
  application:    'vault-unseal-3'
  app_id:         <empty>
  flags:           modifiable
Data object 2168562400
  label:          'vault-unseal-4'
  application:    'vault-unseal-4'
  app_id:         <empty>
  flags:           modifiable
Data object 2168562496
  label:          'vault-root'
  application:    'vault-root'
  app_id:         <empty>
  flags:           modifiable
-
If you don’t need the encryption keys or the unseal keys on the HSM anymore, you can delete them with the following commands:
PIN=banzai

# Delete the unseal keys and the root token
for label in "vault-test" "vault-root" "vault-unseal-0" "vault-unseal-1" "vault-unseal-2" "vault-unseal-3" "vault-unseal-4"
do
  pkcs11-tool --delete-object --type data --label ${label} --pin ${PIN}
done

# Delete the encryption key
pkcs11-tool --delete-object --type privkey --label bank-vaults --pin ${PIN}
3.9.2 - SoftHSM support for testing
You can use SoftHSMv2 to implement and test software interacting with PKCS11 implementations. You can install it on macOS by running the following commands:
# Initializing SoftHSM to be able to create a working example (only for dev),
# sharing the HSM device is emulated with a pre-created keypair in the image.
brew install softhsm
softhsm2-util --init-token --free --label bank-vaults --so-pin banzai --pin banzai
pkcs11-tool --module /usr/local/lib/softhsm/libsofthsm2.so --keypairgen --key-type rsa:2048 --pin banzai --token-label bank-vaults --label bank-vaults
To interact with SoftHSM when using the vault-operator, include the following unsealConfig snippet in the Vault CR:
  # This example relies on the SoftHSM device initialized in the Docker image.
  unsealConfig:
    hsm:
      # The HSM SO module path (softhsm is built into the bank-vaults image)
      modulePath: /usr/lib/softhsm/libsofthsm2.so
      tokenLabel: bank-vaults
      pin: banzai
      keyLabel: bank-vaults
To run the whole SoftHSM based example in Kubernetes, run the following commands:
kubectl create namespace vault-infra
helm upgrade --install vault-operator oci://ghcr.io/bank-vaults/helm-charts/vault-operator --namespace vault-infra
kubectl apply -f https://raw.githubusercontent.com/bank-vaults/vault-operator/v1.24.0/deploy/examples/cr-hsm-softhsm.yaml
3.10 - Monitoring
You can use Prometheus to monitor Vault. You can configure Vault to expose metrics through statsd. Both the Helm chart and the Vault Operator installs the Prometheus StatsD exporter and annotates the pods correctly with Prometheus annotations so Prometheus can discover and scrape them. All you have to do is to put the telemetry stanza into your Vault configuration:
    telemetry:
      statsd_address: localhost:9125
You may find the generic Prometheus kubernetes client Go Process runtime monitoring dashboard useful for monitoring the webhook or any other Go process.
To monitor the mutating webhook, see Monitoring the Webhook with Grafana and Prometheus.
3.11 - Annotations and labels
Annotations
The Vault Operator supports annotating most of the resources it creates using a set of fields in the Vault Specs:
Common Vault Resources annotations
apiVersion: "vault.banzaicloud.com/v1alpha1"
kind: "Vault"
metadata:
  name: "vault"
    spec:
      annotations:
          example.com/test: "something"
These annotations are common to all Vault created resources
- Vault StatefulSet
- Vault Pods
- Vault Configurer Deployment
- Vault Configurer Pod
- Vault Services
- Vault Configurer Service
- Vault TLS Secret
Vault StatefulSet Resources annotations
apiVersion: "vault.banzaicloud.com/v1alpha1"
kind: "Vault"
metadata:
  name: "vault"
    spec:
      vaultAnnotations:
          example.com/vault: "true"
These annotations are common to all Vault StatefulSet created resources
- Vault StatefulSet
- Vault Pods
- Vault Services
- Vault TLS Secret
These annotations will override any annotation defined in the common set
apiVersion: "vault.banzaicloud.com/v1alpha1"
kind: "Vault"
metadata:
  name: "vault"
    spec:
      vaultConfigurerAnnotations:
          example.com/vaultConfigurer: "true"
These annotations are common to all Vault Configurer Deployment created resources
- Vault Configurer Deployment
- Vault Configurer Pod
- Vault Configurer Service
These annotations will override any annotation defined in the common set
ETCD CRD Annotations
apiVersion: "vault.banzaicloud.com/v1alpha1"
kind: "Vault"
metadata:
  name: "vault"
    spec:
      etcdAnnotations:
          etcd.database.coreos.com/scope: clusterwide
These annotations are set only on the etcdcluster resource
ETCD PODs Annotations
apiVersion: "vault.banzaicloud.com/v1alpha1"
kind: "Vault"
metadata:
  name: "vault"
    spec:
      etcdPodAnnotations:
          backup.velero.io/backup-volumes: "YOUR_VOLUME_NAME"
These annotations are set only on the etcd pods created by the etcd-operator
Labels
The Vault Operator support labelling most of the resources it creates using a set of fields in the Vault Specs:
Vault StatefulSet Resources labels
apiVersion: "vault.banzaicloud.com/v1alpha1"
kind: "Vault"
metadata:
  name: "vault"
    spec:
      vaultLabels:
          example.com/log-format: "json"
These labels are common to all Vault StatefulSet created resources
- Vault StatefulSet
- Vault Pods
- Vault Services
- Vault TLS Secret
apiVersion: "vault.banzaicloud.com/v1alpha1"
kind: "Vault"
metadata:
  name: "vault"
    spec:
      vaultConfigurerLabels:
          example.com/log-format: "string"
These labels are common to all Vault Configurer Deployment created resources
- Vault Configurer Deployment
- Vault Configurer Pod
- Vault Configurer Service
3.12 - Watching External Secrets
In some cases, you might have to restart the Vault StatefulSet when secrets that are not managed by the operator control are changed. For example:
- Cert-Manager managing a public Certificate for vault using Let’s Encrypt.
- Cloud IAM Credentials created with an external tool (like terraform) to allow vault to interact with the cloud services.
The operator can watch a set of secrets in the namespace of the Vault resource using either a list of label selectors or an annotations selector. When the content of any of those secrets changes, the operator updates the StatefulSet and triggers a rolling restart.
Set the secrets to watch using the watchedSecretsAnnotations and watchedSecretsLabels fields in your Vault custom resource.
Note: For cert-manager 0.11 or newer, use the watchedSecretsAnnotations field.
In the following example, the Vault StatefulSet is restarted when:
- A secret with label certmanager.k8s.io/certificate-name: vault-letsencrypt-cert changes its contents (cert-manager 0.10 and earlier).
- A secret with label test.com/scope: gcp AND test.com/credentials: vault changes its contents.
- A secret with annotation cert-manager.io/certificate-name: vault-letsencrypt-cert changes its contents (cert-manager 0.11 and newer).
watchedSecretsLabels:
  - certmanager.k8s.io/certificate-name: vault-letsencrypt-cert
  - test.com/scope: gcp
    test.com/credentials: vault

watchedSecretsAnnotations:
  - cert-manager.io/certificate-name: vault-letsencrypt-cert
The operator controls the restart of the StatefulSet by adding an annotation to the spec.template of the vault resource
kubectl get -n vault statefulset vault -o json | jq .spec.template.metadata.annotations
{
  "prometheus.io/path": "/metrics",
  "prometheus.io/port": "9102",
  "prometheus.io/scrape": "true",
  "vault.banzaicloud.io/watched-secrets-sum": "ff1f1c79a31f76c68097975977746be9b85878f4737b8ee5a9d6ee3c5169b0ba"
}
3.13 - API Reference
Packages
vault.banzaicloud.com/v1alpha1
Package v1alpha1 contains API Schema definitions for the vault.banzaicloud.com v1alpha1 API group
AWSUnsealConfig
AWSUnsealConfig holds the parameters for AWS KMS based unsealing
Appears in:
kmsKeyId (string)
kmsRegion (string)
kmsEncryptionContext (string)
s3Bucket (string)
s3Prefix (string)
s3Region (string)
s3SSE (string)
AlibabaUnsealConfig
AlibabaUnsealConfig holds the parameters for Alibaba Cloud KMS based unsealing
–alibaba-kms-region eu-central-1 –alibaba-kms-key-id 9d8063eb-f9dc-421b-be80-15d195c9f148 –alibaba-oss-endpoint oss-eu-central-1.aliyuncs.com –alibaba-oss-bucket bank-vaults
Appears in:
kmsRegion (string)
kmsKeyId (string)
ossEndpoint (string)
ossBucket (string)
ossPrefix (string)
AzureUnsealConfig
AzureUnsealConfig holds the parameters for Azure Key Vault based unsealing
Appears in:
keyVaultName (string)
CredentialsConfig
CredentialsConfig configuration for a credentials file provided as a secret
Appears in:
env (string)
path (string)
secretName (string)
EmbeddedObjectMetadata contains a subset of the fields included in k8s.io/apimachinery/pkg/apis/meta/v1.ObjectMeta Only fields which are relevant to embedded resources are included. controller-gen discards embedded ObjectMetadata type fields, so we have to overcome this.
Appears in:
name (string)
Name must be unique within a namespace. Is required when creating resources, although some resources may allow a client to request the generation of an appropriate name automatically. Name is primarily intended for creation idempotence and configuration definition. Cannot be updated. More info: https://kubernetes.io/docs/concepts/overview/working-with-objects/names/#names
labels (object (keys:string, values:string))
Map of string keys and values that can be used to organize and categorize (scope and select) objects. May match selectors of replication controllers and services. More info: https://kubernetes.io/docs/concepts/overview/working-with-objects/labels/
annotations (object (keys:string, values:string))
Annotations is an unstructured key value map stored with a resource that may be set by external tools to store and retrieve arbitrary metadata. They are not queryable and should be preserved when modifying objects. More info: https://kubernetes.io/docs/concepts/overview/working-with-objects/annotations/
EmbeddedPersistentVolumeClaim
EmbeddedPersistentVolumeClaim is an embeddable and controller-gen friendly version of k8s.io/api/core/v1.PersistentVolumeClaim. It contains TypeMeta and a reduced ObjectMeta.
Appears in:
Refer to Kubernetes API documentation for fields of metadata.
Spec defines the desired characteristics of a volume requested by a pod author. More info: https://kubernetes.io/docs/concepts/storage/persistent-volumes#persistentvolumeclaims
EmbeddedPodSpec
EmbeddedPodSpec is a description of a pod, which allows containers to be missing, almost as k8s.io/api/core/v1.PodSpec.
Appears in:
volumes (Volume array)
List of volumes that can be mounted by containers belonging to the pod. More info: https://kubernetes.io/docs/concepts/storage/volumes
initContainers (Container array)
List of initialization containers belonging to the pod. Init containers are executed in order prior to containers being started. If any init container fails, the pod is considered to have failed and is handled according to its restartPolicy. The name for an init container or normal container must be unique among all containers. Init containers may not have Lifecycle actions, Readiness probes, Liveness probes, or Startup probes. The resourceRequirements of an init container are taken into account during scheduling by finding the highest request/limit for each resource type, and then using the max of of that value or the sum of the normal containers. Limits are applied to init containers in a similar fashion. Init containers cannot currently be added or removed. Cannot be updated. More info: https://kubernetes.io/docs/concepts/workloads/pods/init-containers/
containers (Container array)
List of containers belonging to the pod. Containers cannot currently be added or removed. There must be at least one container in a Pod. Cannot be updated.
List of ephemeral containers run in this pod. Ephemeral containers may be run in an existing pod to perform user-initiated actions such as debugging. This list cannot be specified when creating a pod, and it cannot be modified by updating the pod spec. In order to add an ephemeral container to an existing pod, use the pod’s ephemeralcontainers subresource.
Restart policy for all containers within the pod. One of Always, OnFailure, Never. Default to Always. More info: https://kubernetes.io/docs/concepts/workloads/pods/pod-lifecycle/#restart-policy
terminationGracePeriodSeconds (integer)
Optional duration in seconds the pod needs to terminate gracefully. May be decreased in delete request. Value must be non-negative integer. The value zero indicates stop immediately via the kill signal (no opportunity to shut down). If this value is nil, the default grace period will be used instead. The grace period is the duration in seconds after the processes running in the pod are sent a termination signal and the time when the processes are forcibly halted with a kill signal. Set this value longer than the expected cleanup time for your process. Defaults to 30 seconds.
activeDeadlineSeconds (integer)
Optional duration in seconds the pod may be active on the node relative to StartTime before the system will actively try to mark it failed and kill associated containers. Value must be a positive integer.
Set DNS policy for the pod. Defaults to “ClusterFirst”. Valid values are ‘ClusterFirstWithHostNet’, ‘ClusterFirst’, ‘Default’ or ‘None’. DNS parameters given in DNSConfig will be merged with the policy selected with DNSPolicy. To have DNS options set along with hostNetwork, you have to specify DNS policy explicitly to ‘ClusterFirstWithHostNet’.
nodeSelector (object (keys:string, values:string))
NodeSelector is a selector which must be true for the pod to fit on a node. Selector which must match a node’s labels for the pod to be scheduled on that node. More info: https://kubernetes.io/docs/concepts/configuration/assign-pod-node/
serviceAccountName (string)
ServiceAccountName is the name of the ServiceAccount to use to run this pod. More info: https://kubernetes.io/docs/tasks/configure-pod-container/configure-service-account/
serviceAccount (string)
DeprecatedServiceAccount is a depreciated alias for ServiceAccountName. Deprecated: Use serviceAccountName instead.
automountServiceAccountToken (boolean)
AutomountServiceAccountToken indicates whether a service account token should be automatically mounted.
nodeName (string)
NodeName is a request to schedule this pod onto a specific node. If it is non-empty, the scheduler simply schedules this pod onto that node, assuming that it fits resource requirements.
hostNetwork (boolean)
Host networking requested for this pod. Use the host’s network namespace. If this option is set, the ports that will be used must be specified. Default to false.
hostPID (boolean)
Use the host’s pid namespace. Optional: Default to false.
hostIPC (boolean)
Use the host’s ipc namespace. Optional: Default to false.
shareProcessNamespace (boolean)
Share a single process namespace between all of the containers in a pod. When this is set containers will be able to view and signal processes from other containers in the same pod, and the first process in each container will not be assigned PID 1. HostPID and ShareProcessNamespace cannot both be set. Optional: Default to false.
SecurityContext holds pod-level security attributes and common container settings. Optional: Defaults to empty. See type description for default values of each field.
ImagePullSecrets is an optional list of references to secrets in the same namespace to use for pulling any of the images used by this PodSpec. If specified, these secrets will be passed to individual puller implementations for them to use. More info: https://kubernetes.io/docs/concepts/containers/images#specifying-imagepullsecrets-on-a-pod
hostname (string)
Specifies the hostname of the Pod If not specified, the pod’s hostname will be set to a system-defined value.
subdomain (string)
If specified, the fully qualified Pod hostname will be “...svc.”. If not specified, the pod will not have a domainname at all.
If specified, the pod’s scheduling constraints
schedulerName (string)
If specified, the pod will be dispatched by specified scheduler. If not specified, the pod will be dispatched by default scheduler.
If specified, the pod’s tolerations.
hostAliases (HostAlias array)
HostAliases is an optional list of hosts and IPs that will be injected into the pod’s hosts file if specified. This is only valid for non-hostNetwork pods.
priorityClassName (string)
If specified, indicates the pod’s priority. “system-node-critical” and “system-cluster-critical” are two special keywords which indicate the highest priorities with the former being the highest priority. Any other name must be defined by creating a PriorityClass object with that name. If not specified, the pod priority will be default or zero if there is no default.
priority (integer)
The priority value. Various system components use this field to find the priority of the pod. When Priority Admission Controller is enabled, it prevents users from setting this field. The admission controller populates this field from PriorityClassName. The higher the value, the higher the priority.
Specifies the DNS parameters of a pod. Parameters specified here will be merged to the generated DNS configuration based on DNSPolicy.
If specified, all readiness gates will be evaluated for pod readiness. A pod is ready when all its containers are ready AND all conditions specified in the readiness gates have status equal to “True” More info: https://git.k8s.io/enhancements/keps/sig-network/580-pod-readiness-gates
runtimeClassName (string)
RuntimeClassName refers to a RuntimeClass object in the node.k8s.io group, which should be used to run this pod. If no RuntimeClass resource matches the named class, the pod will not be run. If unset or empty, the “legacy” RuntimeClass will be used, which is an implicit class with an empty definition that uses the default runtime handler. More info: https://git.k8s.io/enhancements/keps/sig-node/585-runtime-class
enableServiceLinks (boolean)
EnableServiceLinks indicates whether information about services should be injected into pod’s environment variables, matching the syntax of Docker links. Optional: Defaults to true.
PreemptionPolicy is the Policy for preempting pods with lower priority. One of Never, PreemptLowerPriority. Defaults to PreemptLowerPriority if unset.
Overhead represents the resource overhead associated with running a pod for a given RuntimeClass. This field will be autopopulated at admission time by the RuntimeClass admission controller. If the RuntimeClass admission controller is enabled, overhead must not be set in Pod create requests. The RuntimeClass admission controller will reject Pod create requests which have the overhead already set. If RuntimeClass is configured and selected in the PodSpec, Overhead will be set to the value defined in the corresponding RuntimeClass, otherwise it will remain unset and treated as zero. More info: https://git.k8s.io/enhancements/keps/sig-node/688-pod-overhead/README.md
TopologySpreadConstraints describes how a group of pods ought to spread across topology domains. Scheduler will schedule pods in a way which abides by the constraints. All topologySpreadConstraints are ANDed.
setHostnameAsFQDN (boolean)
If true the pod’s hostname will be configured as the pod’s FQDN, rather than the leaf name (the default). In Linux containers, this means setting the FQDN in the hostname field of the kernel (the nodename field of struct utsname). In Windows containers, this means setting the registry value of hostname for the registry key HKEY_LOCAL_MACHINE\SYSTEM\CurrentControlSet\Services\Tcpip\Parameters to FQDN. If a pod does not have FQDN, this has no effect. Default to false.
Specifies the OS of the containers in the pod. Some pod and container fields are restricted if this is set.
If the OS field is set to linux, the following fields must be unset: -securityContext.windowsOptions
If the OS field is set to windows, following fields must be unset: - spec.hostPID - spec.hostIPC - spec.hostUsers - spec.securityContext.seLinuxOptions - spec.securityContext.seccompProfile - spec.securityContext.fsGroup - spec.securityContext.fsGroupChangePolicy - spec.securityContext.sysctls - spec.shareProcessNamespace - spec.securityContext.runAsUser - spec.securityContext.runAsGroup - spec.securityContext.supplementalGroups - spec.containers[].securityContext.seLinuxOptions - spec.containers[].securityContext.seccompProfile - spec.containers[].securityContext.capabilities - spec.containers[].securityContext.readOnlyRootFilesystem - spec.containers[].securityContext.privileged - spec.containers[].securityContext.allowPrivilegeEscalation - spec.containers[].securityContext.procMount - spec.containers[].securityContext.runAsUser - spec.containers[*].securityContext.runAsGroup
hostUsers (boolean)
Use the host’s user namespace. Optional: Default to true. If set to true or not present, the pod will be run in the host user namespace, useful for when the pod needs a feature only available to the host user namespace, such as loading a kernel module with CAP_SYS_MODULE. When set to false, a new userns is created for the pod. Setting false is useful for mitigating container breakout vulnerabilities even allowing users to run their containers as root without actually having root privileges on the host. This field is alpha-level and is only honored by servers that enable the UserNamespacesSupport feature.
SchedulingGates is an opaque list of values that if specified will block scheduling the pod. More info: https://git.k8s.io/enhancements/keps/sig-scheduling/3521-pod-scheduling-readiness.
This is an alpha-level feature enabled by PodSchedulingReadiness feature gate.
ResourceClaims defines which ResourceClaims must be allocated and reserved before the Pod is allowed to start. The resources will be made available to those containers which consume them by name.
This is an alpha field and requires enabling the DynamicResourceAllocation feature gate.
This field is immutable.
GoogleUnsealConfig
GoogleUnsealConfig holds the parameters for Google KMS based unsealing
Appears in:
kmsKeyRing (string)
kmsCryptoKey (string)
kmsLocation (string)
kmsProject (string)
storageBucket (string)
HSMUnsealConfig
HSMUnsealConfig holds the parameters for remote HSM based unsealing
Appears in:
daemon (boolean)
modulePath (string)
slotId (integer)
tokenLabel (string)
pin (string)
keyLabel (string)
Ingress
Ingress specification for the Vault cluster
Appears in:
annotations (object (keys:string, values:string))
KubernetesUnsealConfig
KubernetesUnsealConfig holds the parameters for Kubernetes based unsealing
Appears in:
secretNamespace (string)
secretName (string)
Resources
Resources holds different container’s ResourceRequirements
Appears in:
UnsealConfig
UnsealConfig represents the UnsealConfig field of a VaultSpec Kubernetes object
Appears in:
UnsealOptions
UnsealOptions represents the common options to all unsealing backends
Appears in:
preFlightChecks (boolean)
storeRootToken (boolean)
secretThreshold (integer)
secretShares (integer)
Vault
Vault is the Schema for the vaults API
Appears in:
apiVersion string vault.banzaicloud.com/v1alpha1
kind string Vault
Refer to Kubernetes API documentation for fields of metadata.
VaultList
VaultList contains a list of Vault
apiVersion string vault.banzaicloud.com/v1alpha1
kind string VaultList
Refer to Kubernetes API documentation for fields of metadata.
items (Vault array)
VaultSpec
VaultSpec defines the desired state of Vault
Appears in:
size (integer)
Size defines the number of Vault instances in the cluster (>= 1 means HA) default: 1
image (string)
Image specifies the Vault image to use for the Vault instances default: hashicorp/vault:latest
bankVaultsImage (string)
BankVaultsImage specifies the Bank Vaults image to use for Vault unsealing and configuration default: ghcr.io/bank-vaults/bank-vaults:latest
bankVaultsVolumeMounts (VolumeMount array)
BankVaultsVolumeMounts define some extra Kubernetes Volume mounts for the Bank Vaults Sidecar container. default:
statsdDisabled (boolean)
StatsDDisabled specifies if StatsD based metrics should be disabled default: false
statsdImage (string)
StatsDImage specifices the StatsD image to use for Vault metrics exportation default: prom/statsd-exporter:latest
statsdConfig (string)
StatsdConfig specifices the StatsD mapping configuration default:
fluentdEnabled (boolean)
FluentDEnabled specifies if FluentD based log exportation should be enabled default: false
fluentdImage (string)
FluentDImage specifices the FluentD image to use for Vault log exportation default: fluent/fluentd:edge
fluentdConfLocation (string)
FluentDConfLocation is the location of the fluent.conf file default: “/fluentd/etc”
fluentdConfFile (string)
FluentDConfFile specifices the FluentD configuration file name to use for Vault log exportation default:
fluentdConfig (string)
FluentDConfig specifices the FluentD configuration to use for Vault log exportation default:
watchedSecretsLabels (object array)
WatchedSecretsLabels specifices a set of Kubernetes label selectors which select Secrets to watch. If these Secrets change the Vault cluster gets restarted. For example a Secret that Cert-Manager is managing a public Certificate for Vault using let’s Encrypt. default:
watchedSecretsAnnotations (object array)
WatchedSecretsAnnotations specifices a set of Kubernetes annotations selectors which select Secrets to watch. If these Secrets change the Vault cluster gets restarted. For example a Secret that Cert-Manager is managing a public Certificate for Vault using let’s Encrypt. default:
annotations (object (keys:string, values:string))
Annotations define a set of common Kubernetes annotations that will be added to all operator managed resources. default:
vaultAnnotations (object (keys:string, values:string))
VaultAnnotations define a set of Kubernetes annotations that will be added to all Vault Pods. default:
vaultLabels (object (keys:string, values:string))
VaultLabels define a set of Kubernetes labels that will be added to all Vault Pods. default:
VaultPodSpec is a Kubernetes Pod specification snippet (spec: block) that will be merged into the operator generated Vault Pod specification. default:
vaultContainerSpec (Container)
VaultContainerSpec is a Kubernetes Container specification snippet that will be merged into the operator generated Vault Container specification. default:
VaultConfigurerAnnotations define a set of Kubernetes annotations that will be added to the Vault Configurer Pod. default:
VaultConfigurerLabels define a set of Kubernetes labels that will be added to all Vault Configurer Pod. default:
VaultConfigurerPodSpec is a Kubernetes Pod specification snippet (spec: block) that will be merged into the operator generated Vault Configurer Pod specification. default:
config (JSON)
Config is the Vault Server configuration. See https://www.vaultproject.io/docs/configuration/ for more details. default:
externalConfig (JSON)
ExternalConfig is higher level configuration block which instructs the Bank Vaults Configurer to configure Vault through its API, thus allows setting up: - Secret Engines - Auth Methods - Audit Devices - Plugin Backends - Policies - Startup Secrets (Bank Vaults feature)
UnsealConfig defines where the Vault cluster’s unseal keys and root token should be stored after initialization. See the type’s documentation for more details. Only one method may be specified. default: Kubernetes Secret based unsealing
CredentialsConfig defines a external Secret for Vault and how it should be mounted to the Vault Pod for example accessing Cloud resources. default:
envsConfig (EnvVar array)
EnvsConfig is a list of Kubernetes environment variable definitions that will be passed to all Bank-Vaults pods. default:
SecurityContext is a Kubernetes PodSecurityContext that will be applied to all Pods created by the operator. default:
serviceType (string)
ServiceType is a Kubernetes Service type of the Vault Service. default: ClusterIP
loadBalancerIP (string)
LoadBalancerIP is an optional setting for allocating a specific address for the entry service object of type LoadBalancer default: ""
serviceRegistrationEnabled (boolean)
serviceRegistrationEnabled enables the injection of the service_registration Vault stanza. This requires elaborated RBAC privileges for updating Pod labels for the Vault Pod. default: false
raftLeaderAddress (string)
RaftLeaderAddress defines the leader address of the raft cluster in multi-cluster deployments. (In single cluster (namespace) deployments it is automatically detected). “self” is a special value which means that this instance should be the bootstrap leader instance. default: ""
servicePorts (object (keys:string, values:integer))
ServicePorts is an extra map of ports that should be exposed by the Vault Service. default:
Affinity is a group of affinity scheduling rules applied to all Vault Pods. default:
podAntiAffinity (string)
PodAntiAffinity is the TopologyKey in the Vault Pod’s PodAntiAffinity. No PodAntiAffinity is used if empty. Deprecated. Use Affinity. default:
NodeAffinity is Kubernetees NodeAffinity definition that should be applied to all Vault Pods. Deprecated. Use Affinity. default:
nodeSelector (object (keys:string, values:string))
NodeSelector is Kubernetees NodeSelector definition that should be applied to all Vault Pods. default:
Tolerations is Kubernetes Tolerations definition that should be applied to all Vault Pods. default:
serviceAccount (string)
ServiceAccount is Kubernetes ServiceAccount in which the Vault Pods should be running in. default: default
volumes (Volume array)
Volumes define some extra Kubernetes Volumes for the Vault Pods. default:
VolumeMounts define some extra Kubernetes Volume mounts for the Vault Pods. default:
VolumeClaimTemplates define some extra Kubernetes PersistentVolumeClaim templates for the Vault Statefulset. default:
vaultEnvsConfig (EnvVar array)
VaultEnvsConfig is a list of Kubernetes environment variable definitions that will be passed to the Vault container. default:
sidecarEnvsConfig (EnvVar array)
SidecarEnvsConfig is a list of Kubernetes environment variable definitions that will be passed to Vault sidecar containers. default:
Resources defines the resource limits for all the resources created by the operator. See the type for more details. default:
Ingress, if it is specified the operator will create an Ingress resource for the Vault Service and will annotate it with the correct Ingress annotations specific to the TLS settings in the configuration. See the type for more details. default:
serviceMonitorEnabled (boolean)
ServiceMonitorEnabled enables the creation of Prometheus Operator specific ServiceMonitor for Vault. default: false
existingTlsSecretName (string)
ExistingTLSSecretName is name of the secret that contains a TLS server certificate and key and the corresponding CA certificate. Required secret format kubernetes.io/tls type secret keys + ca.crt key If it is set, generating certificate will be disabled default: ""
tlsExpiryThreshold (string)
TLSExpiryThreshold is the Vault TLS certificate expiration threshold in Go’s Duration format. default: 168h
tlsAdditionalHosts (string array)
TLSAdditionalHosts is a list of additional hostnames or IP addresses to add to the SAN on the automatically generated TLS certificate. default:
caNamespaces (string array)
CANamespaces define a list of namespaces where the generated CA certificate for Vault should be distributed, use ["*"] for all namespaces. default:
istioEnabled (boolean)
IstioEnabled describes if the cluster has a Istio running and enabled. default: false
veleroEnabled (boolean)
VeleroEnabled describes if the cluster has a Velero running and enabled. default: false
veleroFsfreezeImage (string)
VeleroFsfreezeImage specifices the Velero Fsrfeeze image to use in Velero backup hooks default: velero/fsfreeze-pause:latest
vaultContainers (Container array)
VaultContainers add extra containers
vaultInitContainers (Container array)
VaultInitContainers add extra initContainers
VaultUnsealConfig
VaultUnsealConfig holds the parameters for remote Vault based unsealing
Appears in:
address (string)
unsealKeysPath (string)
role (string)
authPath (string)
tokenPath (string)
token (string)
4 - Secret injection webhook
How the webhook works - overview
Kubernetes secrets are the standard way in which applications consume secrets and credentials on Kubernetes. Any secret that is securely stored in Vault and then unsealed for consumption eventually ends up as a Kubernetes secret. However, despite their name, Kubernetes secrets are not secure, since they are only base64 encoded.
The secret injection webhook of Bank-Vaults is a mutating webhook that bypasses the Kubernetes secrets mechanism and injects the secrets retrieved from Vault directly into the Pods. Specifically, the mutating admission webhook injects (in a very non-intrusive way) an executable into containers of Deployments and StatefulSets. This executable can request secrets from Vault through special environment variable definitions.
An important and unique aspect of the webhook is that it is a daemonless solution (although if you need it, you can deploy the webhook in daemon mode as well).
Why is this more secure than using Kubernetes secrets or any other custom sidecar container?
Our solution is particularly lightweight and uses only existing Kubernetes constructs like annotations and environment variables. No confidential data ever persists on the disk or in etcd - not even temporarily. All secrets are stored in memory, and are only visible to the process that requested them. Additionally, there is no persistent connection with Vault, and any Vault token used to read environment variables is flushed from memory before the application starts, in order to minimize attack surface.
If you want to make this solution even more robust, you can disable kubectl exec-ing in running containers. If you do so, no one will be able to hijack injected environment variables from a process.
The webhook checks if a container has environment variables defined in the following formats, and reads the values for those variables directly from Vault during startup time.
        env:
        - name: AWS_SECRET_ACCESS_KEY
          value: vault:secret/data/accounts/aws#AWS_SECRET_ACCESS_KEY
# or
        - name: AWS_SECRET_ACCESS_KEY
          valueFrom:
            secretKeyRef:
              name: aws-key-secret
              key: AWS_SECRET_ACCESS_KEY
# or
        - name: AWS_SECRET_ACCESS_KEY
            valueFrom:
              configMapKeyRef:
                name: aws-key-configmap
                key: AWS_SECRET_ACCESS_KEY
The webhook checks if a container has envFrom and parses the defined ConfigMaps and Secrets:
        envFrom:
          - secretRef:
              name: aws-key-secret
# or
          - configMapRef:
              name: aws-key-configmap
Secret and ConfigMap examples
Secrets require their payload to be base64 encoded, the API rejects manifests with plaintext in them.
The secret value should contain a base64 encoded template string referencing the vault path you want to insert.
Run echo -n "vault:secret/data/accounts/aws#AWS_SECRET_ACCESS_KEY" | base64 to get the correct string.
apiVersion: v1
kind: Secret
metadata:
  name: aws-key-secret
data:
  AWS_SECRET_ACCESS_KEY: dmF1bHQ6c2VjcmV0L2RhdGEvYWNjb3VudHMvYXdzI0FXU19TRUNSRVRfQUNDRVNTX0tFWQ==
type: Opaque
apiVersion: v1
kind: ConfigMap
metadata:
  name: aws-key-configmap
data:
  AWS_SECRET_ACCESSKEY: vault:secret/data/accounts/aws#AWS_SECRET_ACCESS_KEY
For further examples and use cases, see Configuration examples and scenarios.
4.1 - Deploy the webhook
Deploy the mutating webhook
You can deploy the Vault Secrets Webhook using Helm. Note that:
- The Helm chart of the vault-secrets-webhook contains the templates of the required permissions as well.
- The deployed RBAC objects contain the necessary permissions fo running the webhook.
Prerequisites
- The user you use for deploying the chart to the Kubernetes cluster must have cluster-admin privileges.
- The chart requires Helm 3.
- To interact with Vault (for example, for testing), the Vault command line client must be installed on your computer.
- You have deployed Vault with the operator and configured your Vault client to access it, as described in Deploy a local Vault operator.
Deploy the webhook
-
Create a namespace for the webhook and add a label to the namespace, for example, vault-infra:
kubectl create namespace vault-infra
kubectl label namespace vault-infra name=vault-infra
-
Deploy the vault-secrets-webhook chart. If you want to customize the Helm chart, see the list of vault-secrets-webhook Helm chart values.
helm upgrade --install --wait vault-secrets-webhook oci://ghcr.io/bank-vaults/helm-charts/vault-secrets-webhook --namespace vault-infra
Expected output:
Release "vault-secrets-webhook" does not exist. Installing it now.
NAME: vault-secrets-webhook
LAST DEPLOYED: Fri Jul 14 15:42:36 2023
NAMESPACE: vault-infra
STATUS: deployed
REVISION: 1
TEST SUITE: None
For further details, see the webhook’s Helm chart repository.
-
Check that the pods are running:
kubectl get pods --namespace vault-infra
Expected output:
NAME                                     READY   STATUS    RESTARTS   AGE
vault-secrets-webhook-58b97c8d6d-qfx8c   1/1     Running   0          22s
vault-secrets-webhook-58b97c8d6d-rthgd   1/1     Running   0          22s
-
If you already have the Vault CLI installed, write a secret into Vault:
vault kv put secret/demosecret/aws AWS_SECRET_ACCESS_KEY=s3cr3t
Expected output:
Key              Value
---              -----
created_time     2020-11-04T11:39:01.863988395Z
deletion_time    n/a
destroyed        false
version          1
-
Apply the following deployment to your cluster. The webhook will mutate this deployment because it has an environment variable having a value which is a reference to a path in Vault:
kubectl apply -f - <<"EOF"
apiVersion: apps/v1
kind: Deployment
metadata:
  name: vault-test
spec:
  replicas: 1
  selector:
    matchLabels:
      app.kubernetes.io/name: vault
  template:
    metadata:
      labels:
        app.kubernetes.io/name: vault
      annotations:
        vault.security.banzaicloud.io/vault-addr: "https://vault:8200" # optional, the address of the Vault service, default values is https://vault:8200
        vault.security.banzaicloud.io/vault-role: "default" # optional, the default value is the name of the ServiceAccount the Pod runs in, in case of Secrets and ConfigMaps it is "default"
        vault.security.banzaicloud.io/vault-skip-verify: "false" # optional, skip TLS verification of the Vault server certificate
        vault.security.banzaicloud.io/vault-tls-secret: "vault-tls" # optional, the name of the Secret where the Vault CA cert is, if not defined it is not mounted
        vault.security.banzaicloud.io/vault-agent: "false" # optional, if true, a Vault Agent will be started to do Vault authentication, by default not needed and vault-env will do Kubernetes Service Account based Vault authentication
        vault.security.banzaicloud.io/vault-path: "kubernetes" # optional, the Kubernetes Auth mount path in Vault the default value is "kubernetes"
    spec:
      serviceAccountName: default
      containers:
      - name: alpine
        image: alpine
        command: ["sh", "-c", "echo $AWS_SECRET_ACCESS_KEY && echo going to sleep... && sleep 10000"]
        env:
        - name: AWS_SECRET_ACCESS_KEY
          value: vault:secret/data/demosecret/aws#AWS_SECRET_ACCESS_KEY
EOF
Expected output:
deployment.apps/vault-test created
-
Check the mutated deployment.
kubectl describe deployment vault-test
The output should look similar to the following:
Name:                   vault-test
Namespace:              default
CreationTimestamp:      Wed, 04 Nov 2020 12:44:18 +0100
Labels:                 <none>
Annotations:            deployment.kubernetes.io/revision: 1
Selector:               app.kubernetes.io/name=vault
Replicas:               1 desired | 1 updated | 1 total | 1 available | 0 unavailable
StrategyType:           RollingUpdate
MinReadySeconds:        0
RollingUpdateStrategy:  25% max unavailable, 25% max surge
Pod Template:
  Labels:           app.kubernetes.io/name=vault
  Annotations:      vault.security.banzaicloud.io/vault-addr: https://vault:8200
                    vault.security.banzaicloud.io/vault-agent: false
                    vault.security.banzaicloud.io/vault-path: kubernetes
                    vault.security.banzaicloud.io/vault-role: default
                    vault.security.banzaicloud.io/vault-skip-verify: false
                    vault.security.banzaicloud.io/vault-tls-secret: vault-tls
  Service Account:  default
  Containers:
   alpine:
    Image:      alpine
    Port:       <none>
    Host Port:  <none>
    Command:
      sh
      -c
      echo $AWS_SECRET_ACCESS_KEY && echo going to sleep... && sleep 10000
    Environment:
      AWS_SECRET_ACCESS_KEY:  vault:secret/data/demosecret/aws#AWS_SECRET_ACCESS_KEY
    Mounts:                   <none>
  Volumes:                    <none>
Conditions:
  Type           Status  Reason
  ----           ------  ------
  Available      True    MinimumReplicasAvailable
  Progressing    True    NewReplicaSetAvailable
OldReplicaSets:  <none>
NewReplicaSet:   vault-test-55c569f9 (1/1 replicas created)
Events:
  Type    Reason             Age   From                   Message
  ----    ------             ----  ----                   -------
  Normal  ScalingReplicaSet  29s   deployment-controller  Scaled up replica set vault-test-55c569f9 to 1
As you can see, the original environment variables in the definition are unchanged, and the sensitive value of the AWS_SECRET_ACCESS_KEY variable is only visible within the alpine container.
Deploy the webhook from a private registry
If you are getting the x509: certificate signed by unknown authority app=vault-secrets-webhook error when the webhook is trying to download the manifest from a private image registry, you can:
- Build a docker image where the CA store of the OS layer of the image contains the CA certificate of the registry.
- Alternatively, you can disable certificate verification for the registry by using the REGISTRY_SKIP_VERIFY=“true” environment variable in the deployment of the webhook.
Deploy in daemon mode
vault-env by default replaces itself with the original process of the Pod after reading the secrets from Vault, but with the vault.security.banzaicloud.io/vault-env-daemon: "true" annotation this behavior can be changed. So vault-env can change to daemon mode, so vault-env starts the original process as a child process and remains in memory, and renews the lease of the requested Vault token and of the dynamic secrets (if requested any) until their final expiration time.
You can find a full example using MySQL dynamic secrets in the Bank-Vaults project’s Vault Operator repository:
# Deploy MySQL first as the Vault storage backend and our application will request dynamic secrets for this database as well:
helm upgrade --install mysql stable/mysql --set mysqlRootPassword=your-root-password --set mysqlDatabase=vault --set mysqlUser=vault --set mysqlPassword=secret --set 'initializationFiles.app-db\.sql=CREATE DATABASE IF NOT EXISTS app;'

# Deploy the vault-operator and the vault-secrets-webhook
kubectl create namespace vault-infra
kubectl label namespace vault-infra name=vault-infra
helm upgrade --namespace vault-infra --install vault-operator oci://ghcr.io/bank-vaults/helm-charts/vault-operator
helm upgrade --namespace vault-infra --install vault-secrets-webhook oci://ghcr.io/bank-vaults/helm-charts/vault-secrets-webhook

# Create a Vault instance with MySQL storage and a configured dynamic database secrets backend
kubectl apply -f operator/deploy/rbac.yaml
kubectl apply -f operator/deploy/cr-mysql-ha.yaml

# Deploy the example application requesting dynamic database credentials from the above Vault instance
kubectl apply -f deploy/test-dynamic-env-vars.yaml
kubectl logs -f deployment/hello-secrets
4.2 - Configuration examples and scenarios
The following examples show you how to configure the mutating webhook to best suit your environment.
The webhook checks if a container has environment variables defined in the following formats, and reads the values for those variables directly from Vault during startup time.
        env:
        - name: AWS_SECRET_ACCESS_KEY
          value: vault:secret/data/accounts/aws#AWS_SECRET_ACCESS_KEY
# or
        - name: AWS_SECRET_ACCESS_KEY
          valueFrom:
            secretKeyRef:
              name: aws-key-secret
              key: AWS_SECRET_ACCESS_KEY
# or
        - name: AWS_SECRET_ACCESS_KEY
            valueFrom:
              configMapKeyRef:
                name: aws-key-configmap
                key: AWS_SECRET_ACCESS_KEY
The webhook checks if a container has envFrom and parses the defined ConfigMaps and Secrets:
        envFrom:
          - secretRef:
              name: aws-key-secret
# or
          - configMapRef:
              name: aws-key-configmap
Secret and ConfigMap examples
Secrets require their payload to be base64 encoded, the API rejects manifests with plaintext in them.
The secret value should contain a base64 encoded template string referencing the vault path you want to insert.
Run echo -n "vault:secret/data/accounts/aws#AWS_SECRET_ACCESS_KEY" | base64 to get the correct string.
apiVersion: v1
kind: Secret
metadata:
  name: aws-key-secret
data:
  AWS_SECRET_ACCESS_KEY: dmF1bHQ6c2VjcmV0L2RhdGEvYWNjb3VudHMvYXdzI0FXU19TRUNSRVRfQUNDRVNTX0tFWQ==
type: Opaque
apiVersion: v1
kind: ConfigMap
metadata:
  name: aws-key-configmap
data:
  AWS_SECRET_ACCESSKEY: vault:secret/data/accounts/aws#AWS_SECRET_ACCESS_KEY
Prerequisites for inline injection to work
Vault needs to be properly configured for mutation to function; namely
externalConfig.auth and externConfig.roles (from the perspective of the
vault operator CR) need to be properly configured. If you’re not using the vault
operator then you must make sure that your Vault configuration for Kubernetes
auth methods are properly configured. This configuration is outside the scope
of this document. If you use the operator for managing Vault in your cluster, see the Vault operator documentation.
Inject secret into resources
The webhook can inject into any kind of resources, even into CRDs, for example:
apiVersion: mysql.example.github.com/v1
kind: MySQLCluster
metadata:
  name: "my-cluster"
spec:
  caBundle: "vault:pki/cert/43138323834372136778363829719919055910246657114#ca"
Inline mutation
The webhook also supports inline mutation when your secret needs to be replaced somewhere inside a string.
apiVersion: v1
kind: Secret
type: Opaque
metadata:
  name: aws-key-secret
  annotations:
    vault.security.banzaicloud.io/vault-addr: "https://vault.default:8200"
data:
  config.yaml: >
    foo: bar
    secret: ${vault:secret/data/mysecret#supersecret}
This works also for ConfigMap resources when configMapMutation: true is set in the webhook’s Helm chart.
You can specify the version of the injected Vault secret as well in the special reference, the format is: vault:PATH#KEY_OR_TEMPLATE#VERSION
Example:
        env:
        - name: AWS_SECRET_ACCESS_KEY
          value: vault:secret/data/accounts/aws#AWS_SECRET_ACCESS_KEY#2
Define multiple inline-secrets in resources
You can also inject multiple secrets under the same key in a Secret/ConfigMap/Object. This means that you can use multiple Vault paths in a value, for example:
apiVersion: v1
kind: ConfigMap
metadata:
  name: sample-configmap
  annotations:
    vault.security.banzaicloud.io/vault-addr: "https://vault.default:8200"
    vault.security.banzaicloud.io/vault-role: "default"
    vault.security.banzaicloud.io/vault-tls-secret: vault-tls
    vault.security.banzaicloud.io/vault-path: "kubernetes"
data:
  aws-access-key-id: "vault:secret/data/accounts/aws#AWS_ACCESS_KEY_ID"
  aws-access-template: "vault:secret/data/accounts/aws#AWS key in base64: ${.AWS_ACCESS_KEY_ID | b64enc}"
  aws-access-inline: "AWS_ACCESS_KEY_ID: ${vault:secret/data/accounts/aws#AWS_ACCESS_KEY_ID} AWS_SECRET_ACCESS_KEY: ${vault:secret/data/accounts/aws#AWS_SECRET_ACCESS_KEY}"
This example also shows how a CA certificate (created by the operator) can be used with the vault.security.banzaicloud.io/vault-tls-secret: vault-tls annotation to validate the TLS connection in case of a non-Pod resource.
Request a Vault token
There is a special vault:login reference format to request a working Vault token into an environment variable to be later consumed by your application:
        env:
        - name: VAULT_TOKEN
          value: vault:login
Read a value from Vault
Values starting with "vault:" issue a read (HTTP GET) request towards the Vault API, this can be also used to request a dynamic database username/password pair for MySQL:
NOTE: This feature takes advantage of secret caching since we need to access the my-role endpoint twice, but in the background, it is written only once in Vault:
    env:
    - name: MYSQL_USERNAME
      value: "vault:database/creds/my-role#username"
    - name: MYSQL_PASSWORD
      value: "vault:database/creds/my-role#password"
    - name: REDIS_URI
      value: "redis://${vault:database/creds/my-role#username}:${vault:database/creds/my-role#password}@127.0.0.1:6739"
Write a value into Vault
Values starting with ">>vault:" issue a write (HTTP POST/PUT) request towards the Vault API, some secret engine APIs should be written instead of reading from like the Password Generator for HashiCorp Vault:
    env:
    - name: MY_SECRET_PASSWORD
      value: ">>vault:gen/password#value"
Or with Transit Secret Engine which is a fairly complex example since we are using templates when rendering the response and send data in the write request as well, the format is: vault:PATH#KEY_OR_TEMPLATE#DATA
Example:
    env:
    - name: MY_SECRET_PASSWORD
      value: ">>vault:transit/decrypt/mykey#${.plaintext | b64dec}#{"ciphertext":"vault:v1:/DupSiSbX/ATkGmKAmhqD0tvukByrx6gmps7dVI="}"
Templating in values
Templating is also supported on the secret sourced from Vault (in the key part, after the first #), in the very same fashion as in the Vault configuration and external configuration with all the Sprig functions (this is supported only for Pods right now):
    env:
    - name: DOCKER_USERNAME
      value: "vault:secret/data/accounts/dockerhub#My username on DockerHub is: ${title .DOCKER_USERNAME}"
In this case, an init-container will be injected into the given Pod. This container copies the vault-env binary into an in-memory volume and mounts that Volume to every container which has an environment variable definition like that. It also changes the command of the container to run vault-env instead of your application directly. When vault-env starts up, it connects to Vault to checks the environment variables. (By default, vault-env uses the Kubernetes Auth method, but you can also configure other authentication methods for the webhook.) The variables that have a reference to a value stored in Vault (vault:secret/....) are replaced with that value read from the Secret backend. After this, vault-env immediately executes (with syscall.Exec()) your process with the given arguments, replacing itself with that process (in non-daemon mode).
With this solution none of your Secrets stored in Vault will ever land in Kubernetes Secrets, thus in etcd.
vault-env was designed to work in Kubernetes in the first place, but nothing stops you to use it outside Kubernetes as well. It can be configured with the standard Vault client’s environment variables (because there is a standard Go Vault client underneath).
Currently, the Kubernetes Service Account-based Vault authentication mechanism is used by vault-env, so it requests a Vault token based on the Service Account of the container it is injected into.
Kubernetes 1.12 introduced a feature called APIServer dry-run which became beta as of 1.13. This feature requires some changes in webhooks with side effects. Vault mutating admission webhook is dry-run aware.
Mutate data from Vault and replace it in Kubernetes Secret
You can mutate Secrets (and ConfigMaps) as well if you set annotations and define proper Vault path in the data section:
apiVersion: v1
kind: Secret
metadata:
  name: sample-secret
  annotations:
    vault.security.banzaicloud.io/vault-addr: "https://vault.default.svc.cluster.local:8200"
    vault.security.banzaicloud.io/vault-role: "default"
    vault.security.banzaicloud.io/vault-skip-verify: "true"
    vault.security.banzaicloud.io/vault-path: "kubernetes"
type: kubernetes.io/dockerconfigjson
data:
  .dockerconfigjson: eyJhdXRocyI6eyJodHRwczovL2RvY2tlci5pbyI6eyJ1c2VybmFtZSI6InZhdWx0OnNlY3JldC9kYXRhL2RvY2tlcnJlcG8vI0RPQ0tFUl9SRVBPX1VTRVIiLCJwYXNzd29yZCI6InZhdWx0OnNlY3JldC9kYXRhL2RvY2tlcnJlcG8vI0RPQ0tFUl9SRVBPX1BBU1NXT1JEIiwiYXV0aCI6ImRtRjFiSFE2YzJWamNtVjBMMlJoZEdFdlpHOWphMlZ5Y21Wd2J5OGpSRTlEUzBWU1gxSkZVRTlmVlZORlVqcDJZWFZzZERwelpXTnlaWFF2WkdGMFlTOWtiMk5yWlhKeVpYQnZMeU5FVDBOTFJWSmZVa1ZRVDE5UVFWTlRWMDlTUkE9PSJ9fX0=
In the example above the secret type is kubernetes.io/dockerconfigjson and the webhook can get credentials from Vault.
The base64 encoded data contain vault path in case of username and password for docker repository and you can create it with commands:
kubectl create secret docker-registry dockerhub --docker-username="vault:secret/data/dockerrepo#DOCKER_REPO_USER" --docker-password="vault:secret/data/dockerrepo#DOCKER_REPO_PASSWORD"
kubectl annotate secret dockerhub vault.security.banzaicloud.io/vault-addr="https://vault.default.svc.cluster.local:8200"
kubectl annotate secret dockerhub vault.security.banzaicloud.io/vault-role="default"
kubectl annotate secret dockerhub vault.security.banzaicloud.io/vault-skip-verify="true"
kubectl annotate secret dockerhub vault.security.banzaicloud.io/vault-path="kubernetes"
Use charts without explicit container.command and container.args
The Webhook can determine the container’s ENTRYPOINT and CMD with the help of image metadata queried from the image registry. This data is cached until the webhook Pod is restarted. If the registry is publicly accessible (without authentication) you don’t need to do anything, but if the registry requires authentication the credentials have to be available in the Pod’s imagePullSecrets section.
Some examples (apply cr.yaml from the operator samples first):
helm upgrade --install mysql stable/mysql \
  --set mysqlRootPassword=vault:secret/data/mysql#MYSQL_ROOT_PASSWORD \
  --set mysqlPassword=vault:secret/data/mysql#MYSQL_PASSWORD \
  --set "podAnnotations.vault\.security\.banzaicloud\.io/vault-addr"=https://vault:8200 \
  --set "podAnnotations.vault\.security\.banzaicloud\.io/vault-tls-secret"=vault-tls
Registry access
You can also specify a default secret being used by the webhook for cases where a pod has no imagePullSecrets specified. To make this work you have to set the following environment variables when deploying the vault-secrets-webhook: DEFAULT_IMAGE_PULL_SECRET, DEFAULT_IMAGE_PULL_SECRET_NAMESPACE and DEFAULT_IMAGE_PULL_SECRET_SERVICE_ACCOUNT.
Have a look at the values.yaml of the vault-secrets-webhook helm chart to see how this is done.
Note:
- If your EC2 nodes have the ECR instance role, the webhook can request an ECR access token through that role automatically, instead of an explicit
imagePullSecret - If your workload is running on GCP nodes, the webhook automatically authenticates to GCR.
Using a private image repository
# Docker Hub

kubectl create secret docker-registry dockerhub --docker-username=${DOCKER_USERNAME} --docker-password=$DOCKER_PASSWORD

helm upgrade --install mysql stable/mysql --set mysqlRootPassword=vault:secret/data/mysql#MYSQL_ROOT_PASSWORD --set "imagePullSecrets[0].name=dockerhub" --set-string "podAnnotations.vault\.security\.banzaicloud\.io/vault-skip-verify=true" --set image="private-repo/mysql"

# GCR

kubectl create secret docker-registry gcr \
--docker-server=gcr.io \
--docker-username=_json_key \
--docker-password="$(cat ~/json-key-file.json)"

helm upgrade --install mysql stable/mysql --set mysqlRootPassword=vault:secret/data/mysql#MYSQL_ROOT_PASSWORD --set "imagePullSecrets[0].name=gcr" --set-string "podAnnotations.vault\.security\.banzaicloud\.io/vault-skip-verify=true" --set image="gcr.io/your-repo/mysql"

# ECR

TOKEN=`aws ecr --region=eu-west-1 get-authorization-token --output text --query authorizationData[].authorizationToken | base64 --decode | cut -d: -f2`

kubectl create secret docker-registry ecr \
 --docker-server=https://171832738826.dkr.ecr.eu-west-1.amazonaws.com \
 --docker-username=AWS \
 --docker-password="${TOKEN}"

 helm upgrade --install mysql stable/mysql --set mysqlRootPassword=vault:secret/data/mysql#MYSQL_ROOT_PASSWORD --set "imagePullSecrets[0].name=ecr" --set-string "podAnnotations.vault\.security\.banzaicloud\.io/vault-skip-verify=true" --set image="171832738826.dkr.ecr.eu-west-1.amazonaws.com/mysql" --set-string imageTag=5.7
Mount all keys from Vault secret to env
This feature is very similar to Kubernetes’ standard envFrom: construct, but instead of a Kubernetes Secret/ConfigMap, all its keys are mounted from a Vault secret using the webhook and vault-env.
You can set the Vault secret to mount using the vault.security.banzaicloud.io/vault-env-from-path annotation.
Compared to the original environment variable definition in the Pod env construct, the only difference is that you won’t see the actual environment variables in the definition, because they are dynamic, and are based on the contents of the Vault secret’s, just like envFrom:.
apiVersion: apps/v1
kind: Deployment
metadata:
  name: hello-secrets
spec:
  selector:
    matchLabels:
      app.kubernetes.io/name: hello-secrets
  template:
    metadata:
      labels:
        app.kubernetes.io/name: hello-secrets
      annotations:
        vault.security.banzaicloud.io/vault-addr: "https://vault:8200"
        vault.security.banzaicloud.io/vault-tls-secret: vault-tls
        vault.security.banzaicloud.io/vault-env-from-path: "secret/data/accounts/aws"
    spec:
      initContainers:
      - name: init-ubuntu
        image: ubuntu
        command: ["sh", "-c", "echo AWS_ACCESS_KEY_ID: $AWS_ACCESS_KEY_ID && echo initContainers ready"]
      containers:
      - name: alpine
        image: alpine
        command: ["sh", "-c", "echo AWS_SECRET_ACCESS_KEY: $AWS_SECRET_ACCESS_KEY && echo going to sleep... && sleep 10000"]
Since vault-env v1.21.1 (which is the default since vault-secrets-webhook v1.21.0) you can specify the version of
the injected Vault secret as well, the format is: PATH#VERSION
Example:
      annotations:
        vault.security.banzaicloud.io/vault-env-from-path: "secret/data/accounts/aws#1"
Authenticate the webhook to Vault
By default, the webhook uses Kubernetes ServiceAccount-based authentication in Vault. Use the vault.security.banzaicloud.io/vault-auth-method annotation to request different authentication types from the following supported types: “kubernetes”, “aws-ec2”, “gcp-gce”, “gcp-iam”, “jwt”, “azure”.
Note: GCP IAM authentication (gcp-iam) only allows for authentication with the ‘default’ service account of the caller, and a new token is generated at every request.
Note: Azure MSI authentication (azure) a new token is generated at every request.
The following deployment - if running on a GCP instance - will automatically receive a signed JWT token from the metadata server of the cloud provider, and use it to authenticate against Vault. The same goes for vault-auth-method: "aws-ec2", when running on an EC2 node with the right instance-role.
apiVersion: apps/v1
kind: Deployment
metadata:
  name: vault-env-gcp-auth
spec:
  selector:
    matchLabels:
      app.kubernetes.io/name: vault-env-gcp-auth
  template:
    metadata:
      labels:
        app.kubernetes.io/name: vault-env-gcp-auth
      annotations:
        # These annotations enable Vault GCP GCE auth, see:
        # https://developer.hashicorp.com/vault/docs/auth/gcp#gce-login
        vault.security.banzaicloud.io/vault-addr: "https://vault:8200"
        vault.security.banzaicloud.io/vault-tls-secret: vault-tls
        vault.security.banzaicloud.io/vault-role: "my-role"
        vault.security.banzaicloud.io/vault-path: "gcp"
        vault.security.banzaicloud.io/vault-auth-method: "gcp-gce"
    spec:
      containers:
        - name: alpine
          image: alpine
          command:
            - "sh"
            - "-c"
            - "echo $MYSQL_PASSWORD && echo going to sleep... && sleep 10000"
          env:
            - name: MYSQL_PASSWORD
              value: vault:secret/data/mysql#MYSQL_PASSWORD
4.3 - Annotations
The mutating webhook adds the following PodSpec, Secret, ConfigMap, and CRD annotations.
| Annotation | default | Explanation |
vault.security.banzaicloud.io/vault-addr | "https://vault:8200" | Same as VAULT_ADDR |
vault.security.banzaicloud.io/vault-image | "hashicorp/vault:latest" | Vault agent image |
vault.security.banzaicloud.io/vault-image-pull-policy | IfNotPresent | the Pull policy for the vault agent container |
vault.security.banzaicloud.io/vault-role | "" | The Vault role for Vault agent to use, for Pods it is the name of the ServiceAccount if not specified |
vault.security.banzaicloud.io/vault-path | "kubernetes" | The mount path of the auth method |
vault.security.banzaicloud.io/vault-skip-verify | "false" | Same as VAULT_SKIP_VERIFY |
vault.security.banzaicloud.io/vault-tls-secret | "" | Name of the Kubernetes Secret holding the CA certificate for Vault |
vault.security.banzaicloud.io/vault-ignore-missing-secrets | "false" | When enabled will only log warnings when Vault secrets are missing |
vault.security.banzaicloud.io/vault-env-passthrough | "" | Comma separated list of VAULT_* related environment variables to pass through to vault-env to the main process. E.g. VAULT_ADDR,VAULT_ROLE. |
vault.security.banzaicloud.io/vault-env-daemon | "false" | Run vault-env as a daemon instead of replacing itself with the main process. For details, see Deploy in daemon mode. |
vault.security.banzaicloud.io/vault-env-image | "banzaicloud/vault-env:latest" | vault-env image |
vault.security.banzaicloud.io/vault-env-image-pull-policy | IfNotPresent | the Pull policy for the vault-env container |
vault.security.banzaicloud.io/enable-json-log | "false" | Log in JSON format in vault-env |
vault.security.banzaicloud.io/mutate | "" | Defines the mutation of the given resource, possible values: "skip" which prevents it. |
vault.security.banzaicloud.io/mutate-probes | "false" | Mutate the ENV passed to a liveness or readiness probe. |
vault.security.banzaicloud.io/vault-env-from-path | "" | Comma-delimited list of vault paths to pull in all secrets as environment variables, which also supports versioning (since vault-env v1.21.1). For more details, see Mount all keys from Vault secret to env. |
vault.security.banzaicloud.io/token-auth-mount | "" | {volume:file} to be injected as .vault-token. |
vault.security.banzaicloud.io/vault-auth-method | "jwt" | The Vault authentication method to be used, one of ["kubernetes", "aws-ec2", "aws-iam", "gcp-gce", "gcp-iam", "jwt", "azure", "namespaced"] |
vault.security.banzaicloud.io/vault-serviceaccount | "" | The ServiceAccount in the objects namespace to use, useful for non-pod resources |
vault.security.banzaicloud.io/vault-namespace | "" | The Vault Namespace secrets will be pulled from. This annotation sets the VAULT_NAMESPACE environment variable. |
vault.security.banzaicloud.io/run-as-non-root | "false" | When enabled will add runAsNonRoot: true to the securityContext of all injected containers |
vault.security.banzaicloud.io/run-as-user | "0" | Set the UID (runAsUser) for all injected containers. The default value of "0" means that no modifications will be made to the securityContext of injected containers. |
vault.security.banzaicloud.io/run-as-group | "0" | Set the GID (runAsGroup) for all injected containers. The default value of "0" means that no modifications will be made to the securityContext of injected containers. |
vault.security.banzaicloud.io/readonly-root-fs | "false" | When enabled will add readOnlyRootFilesystem: true to the securityContext of all injected containers |
4.4 - Using Vault Agent Templating in the mutating webhook
With Bank-Vaults you can use Vault Agent to handle secrets that expire, and supply them to applications that read their configurations from a file.
When to use vault-agent
- You have an application or tool that requires to read its configuration from a file.
- You wish to have secrets that have a TTL and expire.
- You have no issues with running your application with a sidecar.
Note: If you need to revoke tokens, or use additional secret backends, see Using consul-template in the mutating webhook.
Workflow
- Your pod starts up, the webhook will inject one container into the pods lifecycle.
- The sidecar container is running Vault, using the vault agent that accesses Vault using the configuration specified inside a configmap and writes a configuration file based on a pre configured template (written inside the same configmap) onto a temporary file system which your application can use.
Prerequisites
This document assumes the following.
-
You have a working Kubernetes cluster which has:
-
You have a working knowledge of Kubernetes.
-
You can apply Deployments or PodSpec’s to the cluster.
-
You can change the configuration of the mutating webhook.
Use Vault TTLs
If you wish to use Vault TTLs, you need a way to HUP your application on configuration file change. You can configure the Vault Agent to execute a command when it writes a new configuration file using the command attribute. The following is a basic example which uses the Kubernetes authentication method.
Configuration
To configure the webhook, you can either:
Enable vault agent in the webhook
For the webhook to detect that it will need to mutate or change a PodSpec, add the vault.security.banzaicloud.io/vault-agent-configmap annotation to the Deployment or PodSpec you want to mutate, otherwise it will be ignored for configuration with Vault Agent.
Defaults via environment variables
| Variable | Default | Explanation |
| VAULT_IMAGE | hashicorp/vault:latest | The vault image to use for the sidecar container |
| VAULT_IMAGE_PULL_POLICY | IfNotPresent | The pull policy for the vault agent container |
| VAULT_ADDR | https://127.0.0.1:8200 | Kubernetes service Vault endpoint URL |
| VAULT_TLS_SECRET | "" | Supply a secret with the vault TLS CA so TLS can be verified |
| VAULT_AGENT_SHARE_PROCESS_NAMESPACE | Kubernetes version <1.12 default off, 1.12 or higher default on | ShareProcessNamespace override |
PodSpec annotations
| Annotation | Default | Explanation |
| vault.security.banzaicloud.io/vault-addr | Same as VAULT_ADDR above | "" |
| vault.security.banzaicloud.io/vault-tls-secret | Same as VAULT_TLS_SECRET above | "" |
| vault.security.banzaicloud.io/vault-agent-configmap | "" | A configmap name which holds the vault agent configuration |
| vault.security.banzaicloud.io/vault-agent-once | False | Do not run vault-agent in daemon mode, useful for kubernetes jobs |
| vault.security.banzaicloud.io/vault-agent-share-process-namespace | Same as VAULT_AGENT_SHARE_PROCESS_NAMESPACE above | "" |
| vault.security.banzaicloud.io/vault-agent-cpu | 100m | Specify the vault-agent container CPU resource limit |
| vault.security.banzaicloud.io/vault-agent-memory | 128Mi | Specify the vault-agent container memory resource limit |
| vault.security.banzaicloud.io/vault-agent-cpu-request | 100m | Specify the vault-agent container CPU resource request |
| vault.security.banzaicloud.io/vault-agent-cpu-limit | 100m | Specify the vault-agent container CPU resource limit (Overridden by vault-agent-cpu) |
| vault.security.banzaicloud.io/vault-agent-memory-request | 128Mi | Specify the vault-agent container memory resource request |
| vault.security.banzaicloud.io/vault-agent-memory-limit | 128Mi | Specify the vault-agent container memory resource limit (Overridden by vault-agent-cpu) |
| vault.security.banzaicloud.io/vault-configfile-path | /vault/secrets | Mount path of Vault Agent rendered files |
4.5 - Using consul-template in the mutating webhook
With Bank-Vaults you can use Consul Template as an addition to vault-env to handle secrets that expire, and supply them to applications that read their configurations from a file.
When to use consul-template
- You have an application or tool that must read its configuration from a file.
- You wish to have secrets that have a TTL and expire.
- You do not wish to be limited on which vault secrets backend you use.
- You can also expire tokens/revoke tokens (to do this you need to have a ready/live probe that can send a HUP to consul-template when the current details fail).
Workflow
The following shows the general workflow for using Consul Template:
- Your pod starts up. The webhook injects an init container (running vault agent) and a sidecar container (running consul-template) into the pods lifecycle.
- The vault agent in the init container logs in to Vault and retrieves a Vault token based on the configured VAULT_ROLE and Kubernetes Service Account.
- The consul-template running in the sidecar container logs in to Vault using the Vault token and writes a configuration file based on a pre-configured template in a configmap onto a temporary file system which your application can use.
Prerequisites
This document assumes the following.
-
You have a working Kubernetes cluster which has:
-
You have a working knowledge of Kubernetes.
-
You can apply Deployments or PodSpec’s to the cluster.
-
You can change the configuration of the mutating webhook.
Use Vault TTLs
If you wish to use Vault TTLs, you need a way to HUP your application on configuration file change. You can configure the Consul Template to execute a command when it writes a new configuration file using the command attribute. The following is a basic example (adapted from here).
Configuration
To configure the webhook, you can either:
Enable Consul Template in the webhook
For the webhook to detect that it will need to mutate or change a PodSpec, add the vault.security.banzaicloud.io/vault-ct-configmap annotation to the Deployment or PodSpec you want to mutate, otherwise it will be ignored for configuration with Consul Template.
Defaults via environment variables
| Variable | default | Explanation |
| VAULT_IMAGE | hashicorp/vault:latest | the vault image to use for the init container |
| VAULT_ENV_IMAGE | ghcr.io/bank-vaults/vault-env:latest | the vault-env image to use |
| VAULT_CT_IMAGE | hashicorp/consul-template:0.32.0 | the consul template image to use |
| VAULT_ADDR | https://127.0.0.1:8200 | Kubernetes service Vault endpoint URL |
| VAULT_SKIP_VERIFY | “false” | should vault agent and consul template skip verifying TLS |
| VAULT_TLS_SECRET | "" | supply a secret with the vault TLS CA so TLS can be verified |
| VAULT_AGENT | “true” | enable the vault agent |
| VAULT_CT_SHARE_PROCESS_NAMESPACE | Kubernetes version <1.12 default off, 1.12 or higher default on | ShareProcessNamespace override |
PodSpec annotations
| Annotation | default | Explanation |
| vault.security.banzaicloud.io/vault-addr | Same as VAULT_ADDR above | |
| vault.security.banzaicloud.io/vault-role | default | The Vault role for Vault agent to use |
| vault.security.banzaicloud.io/vault-path | auth/<method type> | The mount path of the method |
| vault.security.banzaicloud.io/vault-skip-verify | Same as VAULT_SKIP_VERIFY above | |
| vault.security.banzaicloud.io/vault-tls-secret | Same as VAULT_TLS_SECRET above | |
| vault.security.banzaicloud.io/vault-agent | Same as VAULT_AGENT above | |
| vault.security.banzaicloud.io/vault-ct-configmap | "" | A configmap name which holds the consul template configuration |
| vault.security.banzaicloud.io/vault-ct-image | "" | Specify a custom image for consul template |
| vault.security.banzaicloud.io/vault-ct-once | false | do not run consul-template in daemon mode, useful for kubernetes jobs |
| vault.security.banzaicloud.io/vault-ct-pull-policy | IfNotPresent | the Pull policy for the consul template container |
| vault.security.banzaicloud.io/vault-ct-share-process-namespace | Same as VAULT_CT_SHARE_PROCESS_NAMESPACE above | |
| vault.security.banzaicloud.io/vault-ct-cpu | “100m” | Specify the consul-template container CPU resource limit |
| vault.security.banzaicloud.io/vault-ct-memory | “128Mi” | Specify the consul-template container memory resource limit |
| vault.security.banzaicloud.io/vault-ignore-missing-secrets | “false” | When enabled will only log warnings when Vault secrets are missing |
| vault.security.banzaicloud.io/vault-env-passthrough | "" | Comma seprated list of VAULT_* related environment variables to pass through to main process. E.g.VAULT_ADDR,VAULT_ROLE. |
| vault.security.banzaicloud.io/vault-ct-secrets-mount-path | “/vault/secret” | Mount path of Consul template rendered files |
4.6 - Transit Encryption
The transit secrets engine handles cryptographic functions on data in-transit, mainly to encrypt data from applications while still storing that encrypted data in some primary data store. Vault doesn’t store the data sent to the secrets engine, it can also be viewed as “cryptography as a service” or “encryption as a service”. For details about transit encryption, see the official documentation.
Note:
Enable Transit secrets engine
To enable and test the Transit secrets engine, complete the following steps.
-
Enable the Transit secrets engine:
vault secrets enable transit
-
Create a named encryption key:
vault write -f transit/keys/my-key
-
Encrypt data with encryption key:
vault write transit/encrypt/my-key plaintext=$(base64 <<< "my secret data")
-
After completing the previous steps, the webhook will mutate pods that have at least one environment variable with a value which is encrypted by Vault. For example (in the last line of the example):
apiVersion: apps/v1
kind: Deployment
metadata:
  name: vault-test
spec:
  replicas: 1
  selector:
    matchLabels:
      app.kubernetes.io/name: vault
  template:
    metadata:
      labels:
        app.kubernetes.io/name: vault
      annotations:
        vault.security.banzaicloud.io/vault-addr: "https://vault:8200" # optional, the address of the Vault service, default values is https://vault:8200
        vault.security.banzaicloud.io/vault-role: "default" # optional, the default value is the name of the ServiceAccount the Pod runs in, in case of Secrets and ConfigMaps it is "default"
        vault.security.banzaicloud.io/vault-skip-verify: "false" # optional, skip TLS verification of the Vault server certificate
        vault.security.banzaicloud.io/vault-tls-secret: "vault-tls" # optinal, the name of the Secret where the Vault CA cert is, if not defined it is not mounted
        vault.security.banzaicloud.io/vault-agent: "false" # optional, if true, a Vault Agent will be started to do Vault authentication, by default not needed and vault-env will do Kubernetes Service Account based Vault authentication
        vault.security.banzaicloud.io/vault-path: "kubernetes" # optional, the Kubernetes Auth mount path in Vault the default value is "kubernetes"
        vault.security.banzaicloud.io/transit-key-id: "my-key" # required if encrypted data was found; transit key id that created before
    spec:
      serviceAccountName: default
      containers:
      - name: alpine
        image: alpine
        command: ["sh", "-c", "echo $AWS_SECRET_ACCESS_KEY && echo going to sleep... && sleep 10000"]
        env:
        - name: AWS_SECRET_ACCESS_KEY
          # Value based on encrypted key that stored in Vault, so value from this example
          # not the same as you can get after `encrypt`
          value: vault:v1:8SDd3WHDOjf7mq69CyCqYjBXAiQQAVZRkFM13ok481zoCmHnSeDX9vyf7w==
4.7 - Monitoring the Webhook with Grafana and Prometheus
To monitor the webhook with Prometheus and Grafana, complete the following steps.
Prerequisites
Steps
-
Install the Prometheus Operator Bundle:
kubectl apply -f https://raw.githubusercontent.com/prometheus-operator/prometheus-operator/master/bundle.yaml
-
Install the webhook with monitoring and Prometheus Operator ServiceMonitor enabled:
helm upgrade --wait --install vault-secrets-webhook \
    oci://ghcr.io/bank-vaults/helm-charts/vault-secrets-webhook \
    --namespace vault-infra \
    --set metrics.enabled=true \
    --set metrics.serviceMonitor.enabled={}
-
Create a Prometheus instance which monitors the components of Bank-Vaults:
kubectl apply -f https://raw.githubusercontent.com/bank-vaults/vault-operator/main/test/prometheus.yaml
-
Create a Grafana instance and expose it:
kubectl create deployment grafana --image grafana/grafana
kubectl expose deployment grafana --port 3000 --type LoadBalancer
-
Fetch the external IP address of the Grafana instance, and open it in your browser on port 3000.
kubectl get service grafana
-
Create a Prometheus Data Source in this Grafana instance which grabs data from http://prometheus-operated:9090/.
-
Import the Kubewebhook admission webhook dashboard to Grafana (created by Xabier Larrakoetxea).
-
Select the previously created Data Source to feed this dashboard.
4.8 - Injecting consul-template into the Prometheus operator for Vault metrics
To get vault metrics into Prometheus you need to log in to Vault to get access to a native Vault endpoint that provides the metrics.
Workflow
- The webhook injects
vault-agent as an init container, based on the Kubernetes Auth role configuration prometheus-operator-prometheus. - The vault-agent grabs a token with the policy of
prometheus-operator-prometheus. consul-template runs as a sidecar, and uses the token from the previous step to retrieve a new token using the Token Auth role prometheus-metrics which has the policy prometheus-metrics applied to it.- Prometheus can now use this second token to read the Vault Prometheus endpoint.
The trick here is that Prometheus runs with the SecurityContext UID of 1000 but the default consul-template image is running under the UID of 100. This is because of a Dockerfile Volume that is configured which dockerd mounts as 100 (/consul-template/data).
Subsequently using this consul-template means it will never start, so we need to ensure we do not use this declared volume and change the UID using a custom Dockerfile and entrypoint.
Prerequisites
This document assumes you have a working Kubernetes cluster which has a:
-
You have a working Kubernetes cluster which has:
-
You have the CoreOS Prometheus Operator installed and working.
-
You have a working knowledge of Kubernetes.
-
You can apply Deployments or PodSpec’s to the cluster.
-
You can change the configuration of the mutating webhook.
Configuration
Custom consul-template image; docker-entrypoint.sh
#!/bin/dumb-init /bin/sh
set -ex

# Note above that we run dumb-init as PID 1 in order to reap zombie processes
# as well as forward signals to all processes in its session. Normally, sh
# wouldn't do either of these functions so we'd leak zombies as well as do
# unclean termination of all our sub-processes.

# CONSUL_DATA_DIR is exposed as a volume for possible persistent storage.
# CT_CONFIG_DIR isn't exposed as a volume but you can compose additional config
# files in there if you use this image as a base, or use CT_LOCAL_CONFIG below.
CT_DATA_DIR=/consul-template/config
CT_CONFIG_DIR=/consul-template/config

# You can also set the CT_LOCAL_CONFIG environment variable to pass some
# Consul Template configuration JSON without having to bind any volumes.
if [ -n "$CT_LOCAL_CONFIG" ]; then
  echo "$CT_LOCAL_CONFIG" > "$CT_CONFIG_DIR/local-config.hcl"
fi

# If the user is trying to run consul-template directly with some arguments, then
# pass them to consul-template.
if [ "${1:0:1}" = '-' ]; then
  set -- /bin/consul-template "$@"
fi

# If we are running Consul, make sure it executes as the proper user.
if [ "$1" = '/bin/consul-template' ]; then

  # Set the configuration directory
  shift
  set -- /bin/consul-template \
    -config="$CT_CONFIG_DIR" \
    "$@"

  # Check the user we are running as
  current_user="$(id -un)"
  if [ "${current_user}" == "root" ]; then
    # Run under the right user
    set -- gosu consul-template "$@"
  fi
fi

exec "$@"
Dockerfile
FROM hashicorp/consul-template:0.32.0

ADD build/docker-entrypoint.sh /usr/local/bin/docker-entrypoint.sh

RUN apk --no-cache add shadow && \
    usermod -u 1000 consul-template && \
    chown -Rc consul-template:consul-template /consul-template/

USER consul-template:consul-template
ConfigMap
---
apiVersion: v1
kind: ConfigMap
metadata:
  labels:
    app.kubernetes.io/name: prometheus
    prometheus: consul-template
  name: prometheus-consul-template
data:
  config.hcl: |
    vault {
      ssl {
        ca_cert = "/vault/tls/ca.crt"
      }
      grace = "5m"
      retry {
        backoff = "1s"
      }
    }
    template {
      destination = "/vault/secrets/vault-token"
      command     = "/bin/sh -c '/usr/bin/curl -s http://127.0.0.1:9090/-/reload'"
      contents = <<-EOH
      {{with secret "/auth/token/create/prometheus-metrics" "policy=prometheus-metrics" }}{{.Auth.ClientToken}}{{ end }}
      EOH
      wait {
        min = "2s"
        max = "60s"
      }
    }
Vault CR snippets
Set the vault image to use:
---
apiVersion: "vault.banzaicloud.com/v1alpha1"
kind: "Vault"
metadata:
  name: "vault"
spec:
  size: 2
  image: hashicorp/vault:2.0.1
Our Vault config for telemetry:
  # A YAML representation of a final vault config file.
  # See https://developer.hashicorp.com/vault/docs/configuration for more information.
  config:
    telemetry:
      prometheus_retention_time: 30s
      disable_hostname: true
Disable statsd:
  # since we are running Vault 1.1.0 with the native Prometheus support, we do not need the statsD exporter
  statsdDisabled: true
Vault externalConfig policies:
  externalConfig:
    policies:
      - name: prometheus-operator-prometheus
        rules: |
          path "auth/token/create/prometheus-metrics" {
            capabilities = ["read", "update"]
          }
      - name: prometheus-metrics
        rules: path "sys/metrics" {
          capabilities = ["list", "read"]
          }
auth:
    auth:
      - type: token
        roles:
          - name: prometheus-metrics
            allowed_policies:
              - prometheus-metrics
            orphan: true
      - type: kubernetes
        roles:
          - name: prometheus-operator-prometheus
            bound_service_account_names: prometheus-operator-prometheus
            bound_service_account_namespaces: mynamespace
            policies: prometheus-operator-prometheus
            ttl: 4h
Prometheus Operator Snippets
prometheusSpec
  prometheusSpec:
    # https://github.com/coreos/prometheus-operator/blob/master/Documentation/api.md#prometheusspec
    podMetadata:
      annotations:
        vault.security.banzaicloud.io/vault-ct-configmap: "prometheus-consul-template"
        vault.security.banzaicloud.io/vault-role: prometheus-operator-prometheus
        vault.security.banzaicloud.io/vault-ct-image: "mycustomimage:latest"

    secrets:
      - etcd-client-tls
      - vault-tls
Prometheus CRD ServiceMonitor
---
apiVersion: monitoring.coreos.com/v1
kind: ServiceMonitor
metadata:
  labels:
    app.kubernetes.io/name: vault
    app.kubernetes.io/instance: prometheus-operator
  name: prometheus-operator-vault
spec:
  endpoints:
    - bearerTokenFile: /vault/secrets/vault-token
      interval: 30s
      params:
        format: ['prometheus']
      path: /v1/sys/metrics
      port: api-port
      scheme: https
      tlsConfig:
        caFile: /etc/prometheus/secrets/vault-tls/ca.crt
        certFile: /etc/prometheus/secrets/vault-tls/server.crt
        keyFile: /etc/prometheus/secrets/vault-tls/server.key
        insecureSkipVerify: true
  selector:
    matchLabels:
      app.kubernetes.io/name: vault
      vault_cr: vault
4.9 - Comparison of Banzai Cloud and HashiCorp mutating webhook for Vault
Legend
- ✅: Implemented
- o: Planned/In-progress
| Feature | Banzai Cloud Webhook | HashiCorp Webhook |
| Automated Vault and K8S setup | ✅ (operator) | |
| vault-agent/consul-template sidecar injection | ✅ | ✅ |
| Direct env var injection | ✅ | |
| Injecting into K8S Secrets | ✅ | |
| Injecting into K8S ConfigMaps | ✅ | |
| Injecting into K8S CRDs | ✅ | |
| Sidecar-less dynamic secrets | ✅ | |
| CSI Driver | o | |
| Native Kubernetes sidecar | o | |
4.10 - Running the webhook and Vault on different clusters
This section describes how to configure the webhook and Vault when the webhook runs on a different cluster from Vault, or if Vault runs outside Kubernetes.
Let’s suppose you have two different K8S clusters:
cluster1 contains vault-operatorcluster2 contains vault-secrets-webhook
Basically, you have to grant cluster2 access to the Vault running on cluster1. To achieve this, complete the following steps.
-
Extract the cluster.certificate-authority-data and the cluster.server fields from your cluster2 kubeconfig file. You will need them in the externalConfig section of the cluster1 configuration. For example:
kubectl config view -o yaml --minify=true --raw=true
-
Decode the certificate from the cluster.certificate-authority-data field, for example::
grep 'certificate-authority-data' $HOME/.kube/config | awk '{print $2}' | base64 --decode
-
On cluster2, create a vault ServiceAccount and the vault-auth-delegator ClusterRoleBinding:
kubectl kustomize https://github.com/bank-vaults/vault-operator/deploy/rbac | kubectl apply -f -
Expected output:
serviceaccount/vault created
    role.rbac.authorization.k8s.io/vault created
    role.rbac.authorization.k8s.io/leader-election-role created
    rolebinding.rbac.authorization.k8s.io/leader-election-rolebinding created
    rolebinding.rbac.authorization.k8s.io/vault created
    clusterrolebinding.rbac.authorization.k8s.io/vault-auth-delegator created
You can use the vault ServiceAccount token as a token_reviewer_jwt in the auth configuration. To retrieve the token, run the following command:
kubectl get secret $(kubectl get sa vault -o jsonpath='{.secrets[0].name}') -o jsonpath='{.data.token}' | base64 --decode
-
In the vault.banzaicloud.com custom resource (for example, in this sample CR) of cluster1, define an externalConfig section. Fill the values of the kubernetes_ca_cert, kubernetes_host, and token_reviewer_jwt using the data collected in the previous steps.
  externalConfig:
    policies:
      - name: allow_secrets
        rules: path "secret/*" {
          capabilities = ["create", "read", "update", "delete", "list"]
          }
    auth:
      - type: kubernetes
        config:
          token_reviewer_jwt: <token-for-cluster2-service-account>
          kubernetes_ca_cert: |
            -----BEGIN CERTIFICATE-----
            <certificate-from-certificate-authority-data-on-cluster2>
            -----END CERTIFICATE-----
          kubernetes_host: <cluster.server-field-on-cluster2>
        roles:
          # Allow every pod in the default namespace to use the secret kv store
          - name: default
            bound_service_account_names: ["default", "vault-secrets-webhook"]
            bound_service_account_namespaces: ["default", "vswh"]
            policies: allow_secrets
            ttl: 1h
-
In a production environment, it is highly recommended to specify TLS config for your Vault ingress.
  # Request an Ingress controller with the default configuration
  ingress:
    # Specify Ingress object annotations here, if TLS is enabled (which is by default)
    # the operator will add NGINX, Traefik and HAProxy Ingress compatible annotations
    # to support TLS backends
    annotations:
    # Override the default Ingress specification here
    # This follows the same format as the standard Kubernetes Ingress
    # See: https://kubernetes.io/docs/reference/generated/kubernetes-api/v1.13/#ingressspec-v1beta1-extensions
    spec:
      tls:
      - hosts:
        - vault-dns-name
        secretName: vault-ingress-tls-secret
-
Deploy the Vault custom resource containing the externalConfig section to cluster1:
kubectl apply -f your-proper-vault-cr.yaml
-
After Vault started in cluster1, you can use the vault-secrets-webhook in cluster2 with the proper annotations. For example:
spec:
  replicas: 1
  selector:
    matchLabels:
      app.kubernetes.io/name: hello-secrets
  template:
    metadata:
      labels:
        app.kubernetes.io/name: hello-secrets
      annotations:
        vault.security.banzaicloud.io/vault-addr: "https://vault-dns-name:443"
        vault.security.banzaicloud.io/vault-role: "default"
        vault.security.banzaicloud.io/vault-skip-verify: "true"
        vault.security.banzaicloud.io/vault-path: "kubernetes"
Authenticate the mutating-webhook with a cloud identity
You can use a cloud identity to authenticate the mutating-webhook against the external vault.
-
Add your cloud authentication method in your external vault, for example, the Azure Auth Method.
-
Configure your vault-secrets-webhook to use the this method. For example:
env:
  VAULT_ADDR: https://external-vault.example.com
  VAULT_AUTH_METHOD: azure
  VAULT_PATH: azure
  VAULT_ROLE: default
For the VAULT_AUTH_METHOD env var, the following types are supported: “kubernetes”, “aws-ec2”, “gcp-gce”, “gcp-iam”, “jwt”, “azure”
5 - bank-vaults CLI
The bank-vaults CLI tool is to help automate the setup and management of HashiCorp Vault.
Features:
-
Initializes Vault and stores the root token and unseal keys in one of the followings:
- AWS KMS keyring (backed by S3)
- Azure Key Vault
- Google Cloud KMS keyring (backed by GCS)
- Alibaba Cloud KMS (backed by OSS)
- Kubernetes Secrets (should be used only for development purposes)
- Dev Mode (useful for
vault server -dev dev mode Vault servers) - Files (backed by files, should be used only for development purposes)
-
Automatically unseals Vault with these keys
-
In addition to the standard Vault configuration, the operator and CLI can continuously configure Vault using an external YAML/JSON configuration. That way you can configure Vault declaratively using your usual automation tools and workflow.
- If the configuration is updated, Vault will be reconfigured.
- The external configuration supports configuring Vault secret engines, plugins, auth methods, policies, and more.
For details, see External configuration for Vault.
The bank-vaults CLI command needs certain cloud permissions to function properly (init, unseal, configuration).
6 - The Go library
The vault-sdk repository contains several Go packages for interacting with Vault, these packages are organized into the sdk Go module, which can be pulled in with go get github.com/bank-vaults/vault-sdk/ and is versioned by the vX.Y.Z Git tags:
-
auth: Stores JWT bearer tokens in Vault.
Note: The Gin handler is available at gin-utilz

-
vault: A wrapper for the official Vault client with automatic token renewal, and Kubernetes support.

-
db: A helper for creating database source strings (MySQL/PostgreSQL) with database credentials dynamically based on configured Vault roles (instead of username:password).

-
tls: A simple package to generate self-signed TLS certificates. Useful for bootstrapping situations, when you can’t use Vault’s PKI secret engine.
Examples for using the library part
Some examples are in cmd/examples/main.go of the vault-operator repository.
7 - Tips and tricks
The following section lists some questions, problems, and tips.
Login to the Vault web UI
To login to the Vault web UI, you can use the root token, or any configured authentication backend.
Can changing the vault CR delete the Vault instance and data?
Bank-Vaults never ever deletes the Vault instance from the cluster. However, if you delete the Vault CR, then the Kubernetes garbage controller deletes the vault pods. You are recommended to keep backups.
Set default for vault.security.banzaicloud.io/vault-addr
You can set the default settings for vault.security.banzaicloud.io/vault-addr so you don’t have to specify it in every PodSpec. Just set the VAULT_ADDR in the env section of your values.yaml file.
7.1 - Guide - Run Bank-Vaults stack on Azure
In this guide, you will:
Prerequisites
- Access to Azure cloud with a subscription
azure-cli installed on your machine
Step 1: Create Azure resources
Ensure that you are logged in to your Azure account with azure-cli:
az login --tenant <YourTenantName>
Expected output:
[
  {
    "cloudName": "AzureCloud",
    "homeTenantId": "<YourHomeTenantId>",
    "id": "<YourSubscriptionId>",
    "isDefault": true,
    "managedByTenants": [],
    "name": "<YourSubscriptionName>",
    "state": "Enabled",
    "tenantId": "<YourTenantId>",
    "user": {
      "name": "<YourUserName>",
      "type": "user"
    }
  }
]
Save <YourSubscriptionId> and <YourTenantId> as it will be required later.
If you don’t already have a Resource group you would like to use, create a new one using:
az group create --name "bank-vaults-test-rg" --location "EastUS"
{...}
Create an AKS cluster
# create cluster
az aks create --resource-group "bank-vaults-test-rg" --name "bank-vaults-test-cluster" --generate-ssh-keys
{...}

# write credentials to kubeconfig
az aks get-credentials --resource-group "bank-vaults-test-rg" --name "bank-vaults-test-cluster"

# if you need to look at cluster information again
az aks show --resource-group "bank-vaults-test-rg" --name "bank-vaults-test-cluster"
Create an App Registration and a Client secret
This App Registration resource will be used as the resource for generating MSI access tokens for authentication. A more detailed guide for this can be found here.
# create App Registration and only return with its Application Id
az ad app create --display-name "bank-vaults-test-ar" --query appId --output tsv
<YourAppRegistrationApplicationId>

# create Service Principal for your App Registration
az ad sp create --id "<YourAppRegistrationApplicationId>" --query id --output tsv
<YourEnterpriseApplicationObjectID>

# create secret
# The output includes credentials that you must protect. Be sure that you do not include these credentials in your code or check the credentials into your source control. For more information, see https://aka.ms/azadsp-cli
az ad app credential reset --id "<YourAppRegistrationApplicationId>" --append --display-name "bank-vaults-test-secret" --query password --output tsv
<YourAppRegistrationClientSecret>

# authorize the Service Principal to read resources in your Resource Group
az role assignment create --assignee "<YourEnterpriseApplicationObjectID>" --scope "/subscriptions/<YourSubscriptionId>/resourceGroups/MC_bank-vaults-test-rg_bank-vaults-test-cluster_eastus" --role Reader
{...}
Create an Azure Key Vault and permit access for the AKS cluster
# create Azure Key Vault
az keyvault create --resource-group "bank-vaults-test-rg" --name "bank-vaults-test-kv" --location "EastUS"
{...}

# get the AKS cluster's Object ID
az aks show --resource-group "bank-vaults-test-rg" --name "bank-vaults-test-cluster" --query "identityProfile.kubeletidentity.objectId" --output tsv
<YourAKSClusterObjectID>

# set policy
az keyvault set-policy --name "bank-vaults-test-kv" --object-id <YourAKSClusterObjectID> --secret-permissions all --key-permissions all --certificate-permissions all
{...}
Create Storage Account and a Container
# create storage account
az storage account create \
  --name "bankvaultsteststorage" \
  --resource-group "bank-vaults-test-rg" \
  --location "EastUS" \
  --sku "Standard_RAGRS" \
  --kind "StorageV2"
{...}

# get storage account key
az storage account keys list --account-name "bankvaultsteststorage" --query "[0].value" --output tsv
<YourStorageAccountKey>

# create container
az storage container create \
    --name "bank-vaults-test-container" \
    --account-name "bankvaultsteststorage"
{...}
Step 2: Install Bank-Vaults components
This step will:
- install the Vault Operator
- install the mutating Webhook on the created AKS cluster
- create a
Vault custom resource to deploy Vault that uses Azure resources for authentication, and to store generated secrets and Vault’s data
Install Vault Operator
# install Vault Operator
helm upgrade --install --wait vault-operator oci://ghcr.io/bank-vaults/helm-charts/vault-operator
Install Vault Secrets Webhook
# create a new namespace and install the Vault Secrets Webhook in it
kubectl create namespace vault-infra
kubectl label namespace vault-infra name=vault-infra

helm upgrade --install --wait vault-secrets-webhook oci://ghcr.io/bank-vaults/helm-charts/vault-secrets-webhook --namespace vault-infra
Create a cr-azure.yaml resource definition file as defined below. Replace <YourStorageAccountKey>, <YourTenantId>, <YourAppRegistrationObjectId>, <YourAppRegistrationClientSecret>, <YourSubscriptionId> and <YourAKSClusterObjectID> with the values acquired in the previous steps.
Make sure to also update the spec.unsealConfig.azure.keyVaultName, spec.config.storage.azure.accountName, spec.config.storage.azure.container fields other names were used for these Azure resources compared to this guide.
The Vault Operator can put some initial secrets into Vault when configuring it (spec.externalConfig.startupSecrets), which will be used to test the initial deployment.
apiVersion: "vault.banzaicloud.com/v1alpha1"
kind: "Vault"
metadata:
  name: "vault"
spec:
  size: 1
  image: "hashicorp/vault:2.0.1"

  # Describe where you would like to store the Vault unseal keys and root token in Azure KeyVault.
  unsealConfig:
    azure:
      keyVaultName: "bank-vaults-test-kv" # name of the Key Vault you created

  # Specify the ServiceAccount where the Vault Pod and the Bank-Vaults configurer/unsealer is running
  serviceAccount: vault

  # A YAML representation of a final vault config file. This config defines the Azure as backing store for Vault.
  # See https://www.vaultproject.io/docs/configuration/ for more information.
  config:
    storage:
      azure:
        accountName: "bankvaultsteststorage" # name of the storage you created
        accountKey: "<YourStorageAccountKey>" # storage account key you listed in a previous step
        container: "bank-vaults-test-container" # name of the container you created
        environment: "AzurePublicCloud"
    listener:
      tcp:
        address: "0.0.0.0:8200"
        tls_cert_file: /vault/tls/server.crt
        tls_key_file: /vault/tls/server.key
    api_addr: https://vault.default:8200
    telemetry:
      statsd_address: localhost:9125
    ui: true

  # See: https://banzaicloud.com/docs/bank-vaults/cli-tool/#example-external-vault-configuration
  # The repository also contains a lot examples in the deploy/ and operator/deploy directories.
  externalConfig:
    policies:
      - name: allow_secrets
        rules: path "secret/*" {
          capabilities = ["create", "read", "update", "delete", "list"]
          }
    auth:
      - type: azure
        path: azure
        config:
          tenant_id: "<YourTenantId>"
          resource: "https://management.azure.com/"
          client_id: "<YourAppRegistrationApplicationId>"  # App Registration Application (client) ID
          client_secret: "<YourAppRegistrationClientSecret>"  # App Registration generated secret value
        roles:
        # Add roles for azure identities
        # See https://www.vaultproject.io/api/auth/azure/index.html#create-role
          - name: default
            policies: allow_secrets
            bound_subscription_ids:
              - "<YourSubscriptionId>"
            bound_service_principal_ids:
              - "<YourAKSClusterObjectID>"  # AKS cluster Object ID

    secrets:
      - path: secret
        type: kv
        description: General secrets.
        options:
          version: 2

    # Allows writing some secrets to Vault (useful for development purposes).
    # See https://www.vaultproject.io/docs/secrets/kv/index.html for more information.
    startupSecrets:
      - type: kv
        path: secret/data/accounts/aws
        data:
          data:
            AWS_ACCESS_KEY_ID: secretId
            AWS_SECRET_ACCESS_KEY: s3cr3t
      - type: kv
        path: secret/data/dockerrepo
        data:
          data:
            DOCKER_REPO_USER: dockerrepouser
            DOCKER_REPO_PASSWORD: dockerrepopassword
      - type: kv
        path: secret/data/mysql
        data:
          data:
            MYSQL_ROOT_PASSWORD: s3cr3t
            MYSQL_PASSWORD: 3xtr3ms3cr3t
Once the resource definition is filled out with proper data, apply it together after adding required RBAC rules:
# apply RBAC rules
kubectl kustomize https://github.com/bank-vaults/vault-operator/deploy/rbac | kubectl apply -f -

# apply deployment manifest
kubectl apply -f cr-azure.yaml
After the Vault instance has been successfully created, proceed to access Vault with the Vault CLI from the terminal by running:
export VAULT_TOKEN=$(az keyvault secret download --file azure --name vault-root --vault-name bank-vaults-test-kv; cat azure; rm azure)

kubectl get secret vault-tls -o jsonpath="{.data.ca\.crt}" | base64 --decode > $PWD/vault-ca.crt
export VAULT_CACERT=$PWD/vault-ca.crt

export VAULT_ADDR=https://127.0.0.1:8200

kubectl port-forward service/vault 8200 &
Step 3: Create a deployment that uses Azure auth
Finally, you can create a test deployment and check if the secrets were successfully injected into its pods!
Create a resource definition file called deployment.yaml with the following content:
apiVersion: apps/v1
kind: Deployment
metadata:
  name: bank-vaults-test
spec:
  replicas: 1
  selector:
    matchLabels:
      app.kubernetes.io/name: bank-vaults-test
  template:
    metadata:
      labels:
        app.kubernetes.io/name: bank-vaults-test
      annotations:
        vault.security.banzaicloud.io/vault-addr: "https://vault:8200"
        vault.security.banzaicloud.io/vault-skip-verify: "true"
        vault.security.banzaicloud.io/vault-role: "default"
        vault.security.banzaicloud.io/vault-path: "azure"
        vault.security.banzaicloud.io/vault-auth-method: "azure"
    spec:
      containers:
        - name: alpine
          image: alpine
          command:
            - "sh"
            - "-c"
            - "echo $AWS_SECRET_ACCESS_KEY && echo $MYSQL_PASSWORD && echo going to sleep... && sleep 10000"
          env:
            - name: AWS_SECRET_ACCESS_KEY
              value: vault:secret/data/accounts/aws#AWS_SECRET_ACCESS_KEY
            - name: MYSQL_PASSWORD
              value: vault:secret/data/mysql#${.MYSQL_PASSWORD}
          resources:
            limits:
              memory: "128Mi"
              cpu: "100m"
Apply it and then watch for its logs - are the secrets injected by the Webhook present?
kubectl appply -f deployment.yaml

kubectl logs -l app.kubernetes.io/name=bank-vaults-test --follow
Expected output:
...
s3cr3t
3xtr3ms3cr3t
going to sleep...
Step 4: Clean up
To cleanup Azure resources created in the previous steps, you might want to remove them to reduce cloud costs:
# delete Resource group with the AKS Cluster, Key Vault, Storage and Container etc.
az group delete --name "bank-vaults-test-rg"


# delete App Registration
az ad app delete --id "<YourAppRegistrationApplicationId>"
7.2 - Deploy vault into a custom namespace
To deploy Vault into a custom namespace (not into default), you have to:
-
Ensure that you have required permissions:
export NAMESPACE="<your-custom-namespace>"
cat <<EOF > kustomization.yaml | kubectl kustomize | kubectl apply -f -
apiVersion: kustomize.config.k8s.io/v1beta1
kind: Kustomization
resources:
- https://github.com/bank-vaults/vault-operator/deploy/rbac
transformers:
- |-
  apiVersion: builtin
  kind: NamespaceTransformer
  metadata:
    name: vault-namespace-transform
    namespace: $NAMESPACE
  setRoleBindingSubjects: defaultOnly
EOF
-
Use the custom namespace in the following fields in the Vault CR:
If not using CRDs, you have to use the custom namespace in the following fields of the Vault Helm chart:
-
Deploy the Vault CustomResource to the custom namespace. For example:
kubectl apply --namespace <your-custom-namespace> -f <your-customized-vault-cr>
8 - Support
If you encounter problems while using Bank-Vaults that the documentation does not address, you can open an issue in the repository of the relevant component or talk to us in the #bank-vaults channel of the CNCF Slack.
Before reporting a new issue, please ensure that the issue was not already reported or fixed by searching through our issue tracker.
When creating a new issue, please be sure to include a title and clear description, as much relevant information as
possible, and, if possible, a test case.
If you discover a security bug, please do not report it through GitHub issues. Instead, please follow the steps in Security procedures.
9 - Contributing guide
Thanks for your interest in contributing to Bank-Vaults!
Here are a few general guidelines on contributing and reporting bugs that we ask you to review and follow.
Please note that all of your interactions in the project are subject to our Code of Conduct. This
includes creation of issues or pull requests, commenting on issues or pull requests, and extends to all interactions in
any real-time space e.g., Slack, Discord, etc.
Submitting pull requests and code changes is not the only way to contribute:
Reporting issues
Before reporting a new issue, please ensure that the issue was not already reported or fixed by searching through our issue tracker.
When creating a new issue, please be sure to include a title and clear description, as much relevant information as
possible, and, if possible, a test case.
If you discover a security bug, please do not report it through GitHub issues. Instead, please follow the steps in Security procedures.
Sending pull requests
Before sending a new pull request, take a look at existing pull requests and issues to see if the proposed change or fix
has been discussed in the past, or if the change was already implemented but not yet released.
Make sure to sign-off your commits: Signed-off-by: your name <youremail@address.com>
We expect new pull requests to include tests for any affected behavior, and, as we follow semantic versioning, we may
reserve breaking changes until the next major version release.
Development environment
In your development environment you can use file mode for testing bank-vaults cli-tool:
vault server -config vault.hcl
example vault.hcl:
api_addr = "http://localhost:8200"

storage "file" {
  path = "/tmp/vault"
}

listener "tcp" {
  address = "0.0.0.0:8200"
  tls_disable = true
}
Now you have a running vault server which is uninitialized and unsealed you can init and unseal it with bank-vaults cli-tool and unseal keys will be stored to a local file:
VAULT_ADDR=http://127.0.0.1:8200 bank-vaults unseal --init --mode file
The unseal keys and root token are stored your working directory:
vault-root
vault-unseal-0
vault-unseal-1
vault-unseal-2
vault-unseal-3
vault-unseal-4
Operator
Developing the operator requires a working Kubernetes cluster, minikube and Docker for Mac Kubernetes will suffice.
The operator consists of two parts, the bank-vaults sidecar running inside a container and the operator itself.
You can fire up the operator on your machine, so you can debug it locally (yes you don’t have to build a container from it), if your kube context points to the development cluster:
This installs all the necessary RBAC rules and other CRDs that you need to create a Vault instance. If you change the code of the operator you have to CTRL + C this make command and rerun it again.
Now it is time create a Vault instance for yourself, which you can work on:
kubectl apply -f operator/deploy/cr.yaml
If you change the bank-vaults sidecar code you have to build a new Docker image from it:
DOCKER_LATEST=1 make docker
There are at least four ways to distribute this image in your Kubernetes cluster, by default IfNotPresent image pull policy is used:
- If you are using Docker for Mac, you don’t have to anything, the Kubernetes cluster and your host shares the same Docker daemon.
- If you are using Minikube with
--vm-driver=none (you are probably using Linux) the same applies as for Docker for Mac - If you are using Minikube with some real
vm-driver you have to run eval $(minikube docker-env) before building the Docker image with the make command so you build it with the minikube Docker daemon and the image will be stored there - Build and re-tag the image and push it to the Docker registry of your choice, don’t forget to change the
bankVaultsImage attribute in the the Vault Custom Resource YAML file (cr.yaml in this case).
Restart the containers using the bank-vaults image: Vault instances and the configurer.
Webhook
This will deploy the webhook via the Helm chart, scale it to 0, start it locally and proxy it into the cluster (somehow similar to operator-up but a bit more complex).
You will need Helm and kurun installed to run this:
Now you can try out with mutating a Deployment:
kubectl apply -f deploy/test-deployment.yaml
10 - Maintainer guide
This guide explains the tasks and responsibilities of maintainers.
Useful links
Development
Please read the Development guide.
Keeping dependencies up-to-date
Bank-Vaults uses Dependabot to automate dependency upgrades.
Dependabot opens pull requests in each repository for every dependency upgrade.
Maintainers should regularly review and merge these pull requests as a measurement to secure the software supply chain.
Dependency upgrades are automatically added to this project board.
In addition to keeping project dependencies up-to-date, the development environment needs to be updated from time to time.
This is currently a manual process:
- Run
nix flake update in the project repo - Run
versions to see current versions of relevant dependencies - Update versions in the
Makefile to reflect the output of the previous command - Commit and push changes
As an Open Source project, Bank-Vaults often gets contributions from the community.
Community contributions do not have to go through our normal development process since we basically only need to review and accept/reject the changes.
Therefore, community contributions are added to a separate project board.
Whenever someone outside of the maintainers submits a pull request, add that PR to the project board and adjust its status as appropriate.
11 - Licensing guide
This guide explains the licensing of the Bank-Vaults components and how they interact with the upstream Vault implementation they manage.
Bank-Vaults components
All Bank-Vaults components are licensed under the Apache 2.0 License. Each repository contains its own LICENSE file. This applies to:
Bank-Vaults does not embed or redistribute Vault, it manages an upstream Vault container image you choose. Whatever license applies to that image applies to the Vault deployment you run.
Upstream Vault licensing
Vault’s license has changed over time:
- MPL-2.0 for Vault
< 1.14.x. - BSL 1.1 for Vault
>= 1.14.x and the Vault 2.0 line. The HashiCorp BSL restricts commercial offerings that compete with HashiCorp’s managed Vault product; production use of Vault itself is permitted. - HashiCorp was acquired by IBM in 2025; the BSL-1.1 terms carried over.
If your use case is restricted by Vault’s BSL, you have two options:
- Stay on an MPL-licensed Vault release (
< 1.14.x). Bank-Vaults still supports these — see the version compatibility matrix. - Use OpenBao — the Linux Foundation MPL-2.0 community fork. Bank-Vaults image references can be pointed at an OpenBao image; the operator’s API is unchanged. This path is community-supported and not yet in our CI matrix.
If you need a commercial Vault license to bypass the BSL non-compete, obtaining it from HashiCorp/IBM is your responsibility. Bank-Vaults does not include or imply any Vault license.
12 - Development
This guide explains the requirements for developing Bank-Vaults projects.
Requirements
Each Bank-Vaults project is a Go module with its own Makefile. The Makefile is the entry point for all common development tasks (building, testing, linting, generating code, etc.).
Common prerequisites across the projects:
- A recent Go toolchain (see each project’s
.go-version file for the exact version). - Docker for building container images and running integration tests.
kind for running Kubernetes-based acceptance tests locally.
Additional tools (kubectl, helm, kustomize, controller-gen, golangci-lint, etc.) are installed automatically into the project’s bin/ directory the first time you run make deps.
Getting started
-
Clone the project you want to work on, for example:
git clone https://github.com/bank-vaults/vault-operator.git
cd vault-operator
-
Install local dependencies:
-
Run the test suite:
-
See make help for the full list of available targets, and refer to the project’s README.md and CONTRIBUTING.md for project-specific guidance.
13 - Security procedures
This document outlines security procedures and general policies for the Bank-Vaults organization.
Reporting a bug
The Bank-Vaults team and community take all security issues seriously.
Thank you for improving the security of our projects.
We appreciate your efforts and responsible disclosure and
will make every effort to acknowledge your contributions.
Report security issues using GitHub’s vulnerability reporting feature.
Alternatively, you can send an email to team@bank-vaults.dev.
Somebody from the core maintainer team will acknowledge your report within 48 hours,
and will follow up with a more detailed response after that indicating the next steps in handling
your report. After the initial reply to your report, the team will
endeavor to keep you informed of the progress towards a fix and full
announcement, and may ask for additional information or guidance.
Disclosure policy
When the team receives a vulnerability report, they will assign it to a
primary handler. This person will coordinate the fix and release process,
involving the following steps:
- Confirm the problem and determine the affected versions.
- Audit code to find any potential similar problems.
- Prepare fixes for all releases still under maintenance. These fixes will be
released as quickly as possible.
14 - Code of Conduct
Contributor Covenant Code of Conduct
Our Pledge
In the interest of fostering an open and welcoming environment, we as
contributors and maintainers pledge to make participation in our project and
our community a harassment-free experience for everyone, regardless of age, body
size, disability, ethnicity, sex characteristics, gender identity and expression,
level of experience, education, socio-economic status, nationality, personal
appearance, race, religion, or sexual identity and orientation.
Our Standards
Examples of behavior that contributes to creating a positive environment
include:
- Using welcoming and inclusive language
- Being respectful of differing viewpoints and experiences
- Gracefully accepting constructive criticism
- Focusing on what is best for the community
- Showing empathy towards other community members
Examples of unacceptable behavior by participants include:
- The use of sexualized language or imagery and unwelcome sexual attention or
advances
- Trolling, insulting/derogatory comments, and personal or political attacks
- Public or private harassment
- Publishing others’ private information, such as a physical or electronic
address, without explicit permission
- Other conduct which could reasonably be considered inappropriate in a
professional setting
Our Responsibilities
Project maintainers are responsible for clarifying the standards of acceptable
behavior and are expected to take appropriate and fair corrective action in
response to any instances of unacceptable behavior.
Project maintainers have the right and responsibility to remove, edit, or
reject comments, commits, code, wiki edits, issues, and other contributions
that are not aligned to this Code of Conduct, or to ban temporarily or
permanently any contributor for other behaviors that they deem inappropriate,
threatening, offensive, or harmful.
Scope
This Code of Conduct applies within all project spaces, and it also applies when
an individual is representing the project or its community in public spaces.
Examples of representing a project or community include using an official
project e-mail address, posting via an official social media account, or acting
as an appointed representative at an online or offline event. Representation of
a project may be further defined and clarified by project maintainers.
Enforcement
Instances of abusive, harassing, or otherwise unacceptable behavior may be
reported by contacting the project team at team@bank-vaults.dev. All
complaints will be reviewed and investigated and will result in a response that
is deemed necessary and appropriate to the circumstances. The project team is
obligated to maintain confidentiality with regard to the reporter of an incident.
Further details of specific enforcement policies may be posted separately.
Project maintainers who do not follow or enforce the Code of Conduct in good
faith may face temporary or permanent repercussions as determined by other
members of the project’s leadership.
Attribution
This Code of Conduct is adapted from the Contributor Covenant, version 1.4,
available at https://www.contributor-covenant.org/version/1/4/code-of-conduct.html
For answers to common questions about this code of conduct, see
https://www.contributor-covenant.org/faq
15 - Community
If you have questions about Bank-Vaults or its components, get in touch with us on Slack!
First, register on the CNCF Slack, then visit the #bank-vaults Slack channel.
You can also ask questions on GitHub Discussions. We also share important updates here.
If you’d like to contribute, see our contribution guidelines for details.
16 - Bank-Vaults blogs
Currently we don’t publish blog posts on this site, just provide links to Bank-Vaults related posts published on other sites. If you’d like to add your blog post to this list, open a PR, or an issue with the link!
Inject secrets into your pods in a continuous way
By Andras Jaky
Vault Secrets Reloader provides an easily configurable Kubernetes Controller that can trigger a new rollout for watched workloads if a secret they use has an updated version in Vault, leaving the rest of the work to the Webhook. Read more
Better secret management with Bank-Vaults Secret Sync
By Ramiz Polic
This post shows you how to use different secret service providers using the new Secret Sync tool while also addressing common pitfalls when dealing with secrets. Read more
Banzai Cloud blog posts
The developers of Banzai Cloud wrote a lot about Bank-Vaults. Their posts are now available on the Outshift by Cisco Blog.